
Every young child dreams that his child would be like an illustration for a Disney cartoon.
But for some reason adults often forget about it when they undertake to equip the interior of a children's room. Boring colors, right shapes and overly practical furniture - These are the most common mistakes that parents make when trying on designer responsibilities.
Furniture for the nursery should delight, cause general fun, be colorful and unusual. In short, to remain the exact opposite of adult furniture.
The author of this master class set out to teach his child how to keep his things in order. But how to achieve this, if not by the means of a peculiar game, where a boring duty turns into a pleasant ritual?
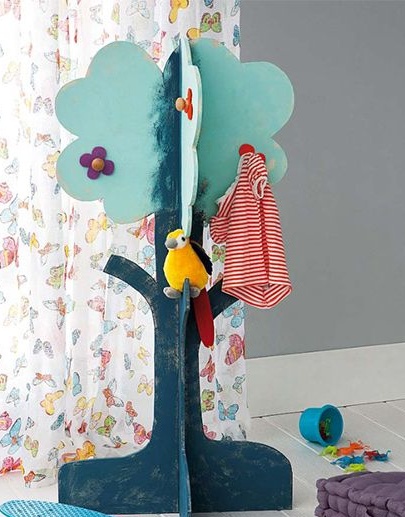
This bright and non-trivial hanger, which looks like a tree, perfectly stuck in the children's room and turned out to be so practical during operation that it surprised even its creator.
In order to make a children's hanger for clothes in the shape of a tree you will need:
Materials:
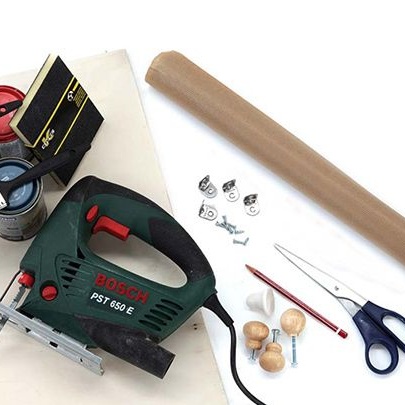
1. natural pine plywood 12-16 mm thick;
2. wooden handles or original hooks for storing clothes;
3. water-based paint;
4. varnish for woodwork;
5. pieces of multi-colored felt;
6. PVA glue;
7. metal corner joints;
8. furniture screws or wood screws;
9. cardboard or cut paper wallpaper.
Instruments:
1. jigsaw;
2. electric drill;
3. scissors;
4. paint brushes;
5. a screwdriver or Phillips screwdriver;
6. building tape;
7. pencil;
8. grinder;
9. sewing pattern if necessary.
Step 1: material selection
When choosing materials, be guided, first of all, by their safety and environmental friendliness. First of all, this applies to plywood and paints and varnishes.
Choose sturdy sturdy plywood with a smooth, smooth surface. It’s not worth saving on plywood. It should not contain harmful impurities, which can be easily recognized by an odor. If, in addition to the smell of fresh wood, you hear something else, you should look for something better for the manufacture of children's furniture.
The same applies to paints and varnishes used in the manufacture of children's products. The paint should have the most neutral smell, but at the same time give a durable coating that does not peel off during operation.
It's no secret that children constantly pull everything in their mouths and particles of paintwork can easily enter the body. In most cases, neither you nor the child will pay the slightest attention to this.
However, it happens that such foreign materials can cause a severe attack of allergies. That is why it is so important to accustom yourself to take a responsible approach to the choice of materials when you do any things for the child.
Choose water-based paints from reputable manufacturers. The varnish should be resistant and at the same time compatible with the chosen type of paint, so it is possible that you need a little consultation at the construction supermarket.
Natural paints exist, of course, but they rarely give a stable coating, and most of them can be prepared independently.
Step Two: Parts Manufacturing
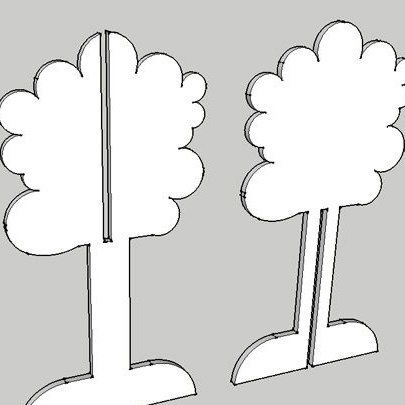
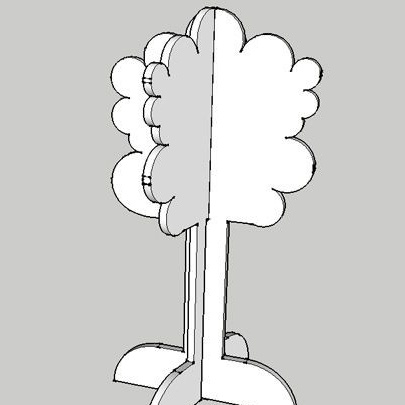
The author has provided you with a mockup according to which you can make a working piece. The hanger is two sections that go into the groove in the groove and are securely fixed to each other by metal connectors.
To the standard scheme, the author added several branches to the tree trunk, as can be seen in the first photo. You can experiment as much as you like with the layout before you start marking.
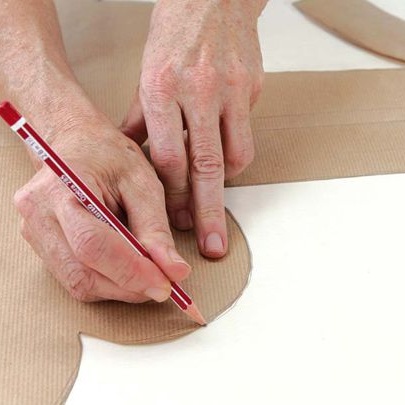
Transfer your layout to a roll of paper wallpaper or plain wrapping paper. If you don’t manage to draw by hand, you can use the help of a sewing pattern. It is small and inexpensive fixtures for outlining smooth lines you can find in any sewing store.
If you want the pattern to be symmetrical, fold the paper in half and draw half the crown of the tree with the trunk. When deployed, you get a symmetrical shape.
Cut your paper pattern and lay it on a sheet of plywood. Circle the shape. Saw the two parts out of plywood using an electric jigsaw. Both of them have the same shape, and differ only in the location of the groove. Therefore, one piece for your work will be enough. And calculate the dimensions of the groove in place.
Step Three: Parts Processing and Painting
The places for sawing plywood must be carefully treated with a grinder. Spend until the edges are perfectly smooth. So, your child does not risk getting hurt while using the hanger.
On the surface of the plywood, you can also walk lightly with a sander, preparing it for further painting.
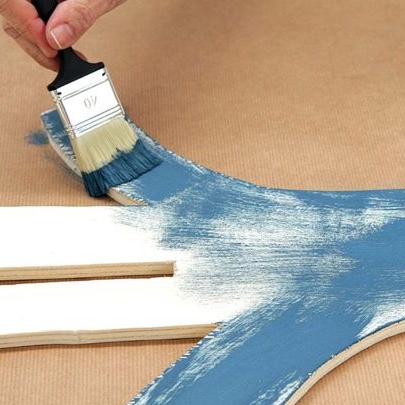
It is painting, and not painting, that is the purely creative stage of this master class. The author did not try to create a dense, perfectly even coating and clear boundaries for the transition of colors.
He chose a thick-coated acrylic paint and applied only one coat of paint to the workpieces. Just like a child would do it - not really caring about the uniformity of coverage.
He used two shades of blue: light sky and dark blue and, combining them, he achieved a wonderful artistic effect.
Apply paint, wait until it is completely dry, and varnish the surface of the hanger parts. To do this, apply the first coat of varnish and, when it dries, repeat the procedure.
Step Four: Fixation
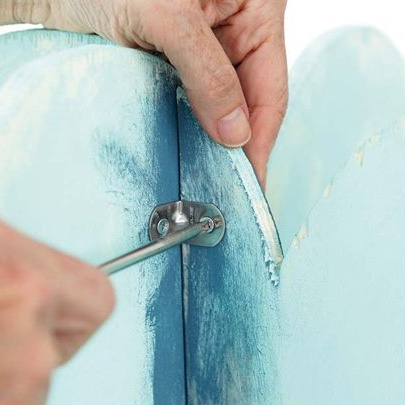
Place the details of the hanger groove in the groove. In principle, given the expansion of the base down, the design turned out to be quite stable. However, it is better to strengthen it.
The metal connecting corners will help you with this. Mark the attachment points, drill holes for the screws and fix the angle using a screwdriver or an ordinary Phillips screwdriver.
The author did not use glue, since the hanger should not be durable, and gluing would not allow the hanger to be dismantled at the right time and transported, or, for example, sent for temporary storage.
Step Five: Final Touch
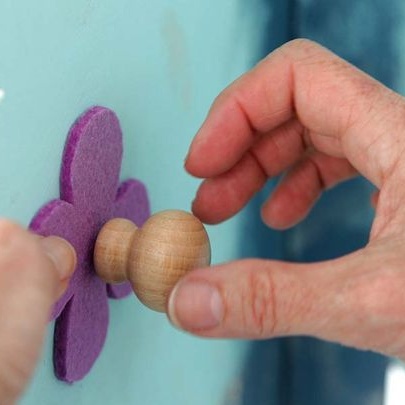
It remains to add the design of several convenient hangers and hooks for storing things. You can use different hangers, but the author chose the same. They turned out to be round wooden furniture handles. Such accessories are attached to the base with a steel threaded pin and a nut on its back. They usually come with a pen.
To embellish the tree a little, the author used multi-colored felt in the form of flowers as the basis for hangers.
Make one or two patterns for felt, circle the figure and cut out the details with scissors.
Drill holes on the diameter of the pin at the places where the hangers are attached. Make the same hole in the figures of felt. Fasten the handles with a nut on the surface of the hanger, placing felt flowers underneath.
The hanger is ready, and you can please the baby with an original and fun little thing!