
If you are fond of casting non-ferrous metals or want to try yourself in this unique type of activity, then this instruction is for you. It will describe how you can assemble a simple electric furnace from improvised metals in which aluminum can be melted. To date, this metal is readily available and quite popular. From it you can make various parts for homemade, and indeed anything. You can get aluminum even for free, because current banks are made from it, from which we drink beer and other drinks.
For this homemade work, the author used an old gas cylinder, a body is made of it. Ceramic wool was needed as an insulating material, and a spiral from an electric stove served as a heating element.
In the author’s place of residence, the voltage in the network is 120V, so for a voltage of 220V another spiral will be needed.
The advantages of such a furnace include the fact that it is completely silent, easy to build, has no consumables, and also does not need ventilation, which allows it to be used indoors. The only drawback is the low temperature, but this is not an indicator if aluminum needs to be melted in small volumes. Well, the stove warms up for a rather long time, if you compare it with a gas-fired oven and so on.
According to the author, the assembly of the furnace takes 90 minutes if all the materials have already been prepared. When assembling it, you don’t need to work with clay or refractory bricks, here they were replaced by ceramic wool, which significantly reduces the weight of the furnace. Outside, such a furnace heats up to no more than 75oC.
Safety regulations
When working with such a furnace, you must not forget about safety. There are three dangerous factors here: high voltage, high temperature and, as a result, liquid, hot metal. You need to work in protective gloves that will not melt or catch fire when in contact with a hot object. The stove must be installed where there is nothing to catch fire around. Well, just in case, you will need to arm yourself with at least a fire extinguisher.
Materials and tools for creating a furnace:
- an empty gas cylinder (the author used it from propane);
- ceramic insulation;
- A good cable that can withstand at least 10A;
- crocodiles for connecting the furnace (well, or another way to fix the wire);
- grinder;
- protective glasses;
- gloves for welding;
- drill and drill;
- a thermometer and more.
Furnace manufacturing process:
Step one. We cut a gas cylinder
Dangerously!
It all starts with the most dangerous event, this is cutting a gas cylinder. Without preliminary cleaning it from gas, it can explode during cutting. There are lots of techniques for how to clean a balloon. First you need to completely unscrew the tap from the cylinder and remove it, then pour it into the water. To permanently remove any residual gas, a fire can be made under the can and move away just in case. As a result, everything that can burn will burn out.
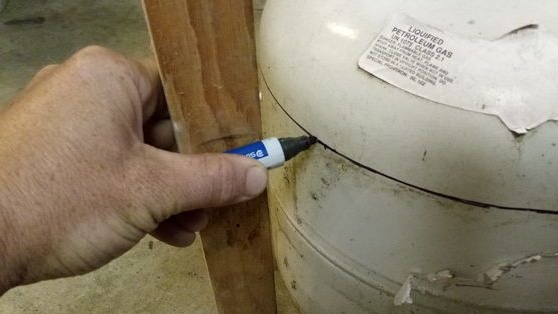
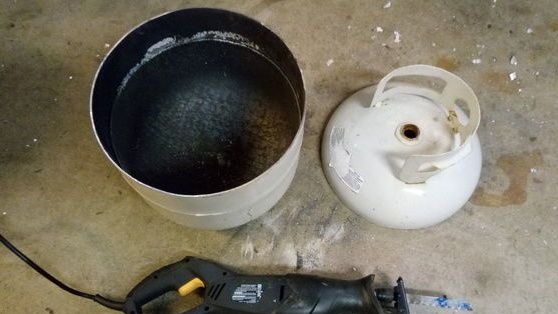
When the cylinder is ready for cutting, you will need a felt-tip pen, you need to determine the cut points in advance and draw it, drawing a line. Then a grinder with a cutting disc comes to the rescue. You can also cut it off with a saw like that of the author, it is safer, and faster.
Step Two Prepare the heating element
The author used a heating element from a hotplate. The main emphasis here must be done on quality, since the spiral in the furnace is heated to much higher temperatures than on the stove. It is important that the outer tube is thick and does not melt.
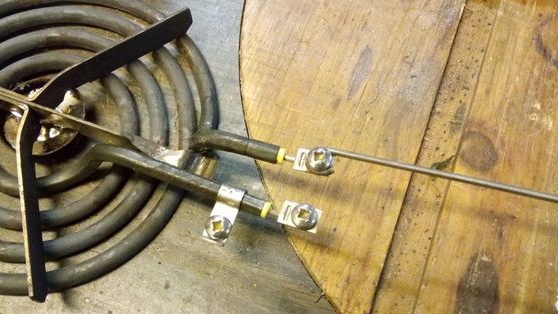
To connect a spiral, you may need to extend the contacts longer. Here a welding electrode will come to the rescue, well, or any other suitable steel wire. The contact can be fixed with a bolt and nut.
Step Three We drill holes for the output of contacts
In the lower part of the furnace body, it will be necessary to drill two holes for the heater contacts. The width is selected depending on the width of the contacts. Well, as for the height, then you need to take into account the height of the insulating material, which is laid on the bottom of the furnace.

Step Four Assembling a stove
The assembly of the furnace begins with the gradual finishing of the container inside with insulating material. You need to start from the bottom. The thicker the insulating material, the higher the temperature inside the oven will be, and the weaker it will heat outside. It is necessary to lay the material carefully so that there are no closed places and crevices anywhere else, otherwise there will be large heat leaks.
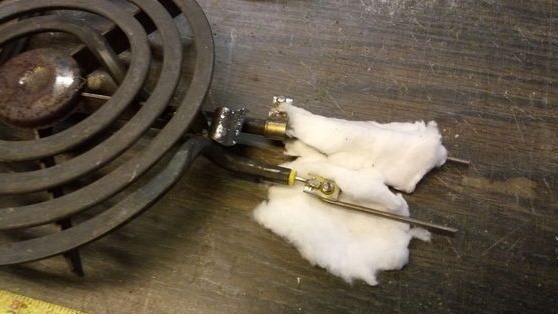

Particular attention should be paid to the heater contacts; they must be wrapped with insulating material. This is done not only for thermal insulation, but also so that the contacts do not come into contact with the metal body of the container.
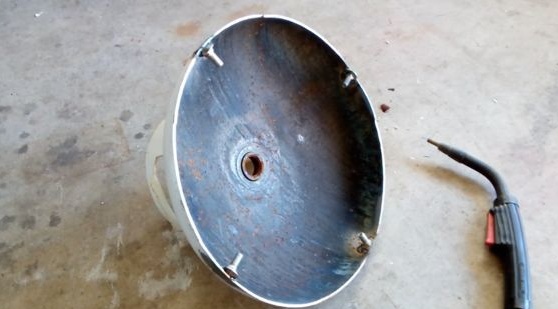
Step Five Making a cover for an oven
The author made a lid for the stove from the top of the gas cylinder. To hold it, you need to drill four holes and screw bolts with nuts into them. These screws will not only hold the cover, but will also fix the insulation material.
Next, the lid is placed on the insulating material and circled in a circle with a felt-tip pen. The resulting circle must be cut out of insulating material, and then simply inserted into the lid.
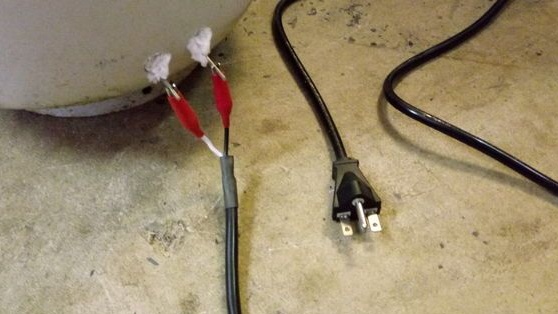
Step Six Furnace connection
The author connects the furnace using crocodiles. It is convenient, fast, but unsafe, as it turns out open contacts under high voltage. The wire can be fixed statically and insulated with heat shrink connection points.
Seventh step. Crucible
The simplest crucible for such ovens is a tin can. But if you are thinking of casting often, you will need a lot of cans, since they quickly burn out. It is better to make a crucible from a piece of steel thick-walled pipe and plate. The whole thing is cooked, and then water is poured into the crucible to determine if there are leaks.

Step Eight. Testing the oven
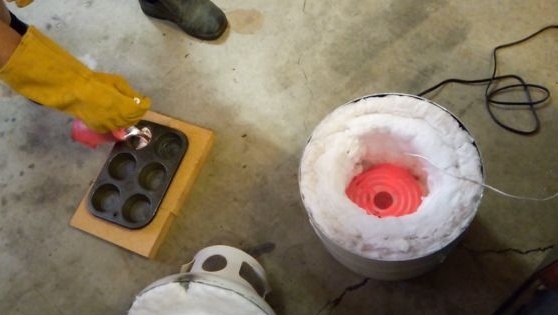
To check the oven, it must first be installed safely, that is, away from things and liquids that may catch fire. Next, a crucible with pieces of aluminum is placed in the furnace, the whole thing is covered with a lid and connected to the network. Here you will need a thermometer, since you need to track the moment when the melting temperature is reached. For high-quality melting of aluminum, a temperature of 700-750 is neededoC although it is believed that it melts at a temperature of already 660oC. When it is reached, you need to wait a little longer, well, and then the metal can be poured into molds.

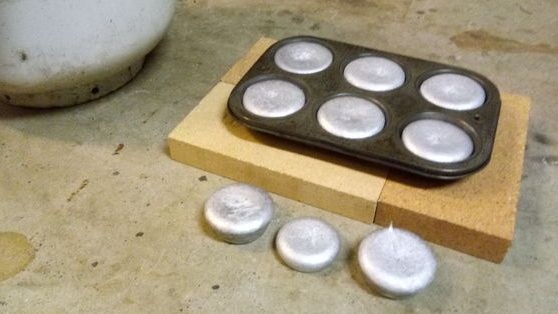
To take out the crucible, you will need good gloves and suitable mites with long handles. In the photo, the author simply poured aluminum into a mold in which ingots are made for further melting. It is important to choose the right shape, otherwise the ingot can then be too large and will not fit into the crucible.
As a result, we can say that the furnace is working, but it does not work very fast. So, for melting aluminum, it must be heated for two whole hours from a 120V source. But if you connect it to a 240V power supply, then theoretically this process takes 25 minutes. With a 240V power supply, the spiral consumes 1,400 watts, and with 120V only 350W.
It should also be noted that the heater in such a furnace will not serve for a long time, since it heats up very much, although it all depends on the quality. After several swimming trunks, the author, for example, has no signs of destruction. If you take into account the fact that the oven is going to be installed quickly, simply and at minimal cost, then homemade work is worth the time and effort.