The choice of the design of the desk anyone can bring out of balance. After all, there is no sea around - an ocean of all kinds of ideas and solutions. On the Internet you will find many free plans for the manufacture of desktops of all shapes and sizes, in any style and any color design. All master classes can be divided into projects for beginners, people with some skills, abilities and little experience in making simple of furnitureas well as complex projects for experienced craftsmen.
This master class on manufacturing a work desk with original legs is designed for a home craftsman with some experience in building furniture. However, a beginner who knows firsthand the fine woodworking will cope with the task. After all, the design of the table is not so complicated, if you look at it in more detail.
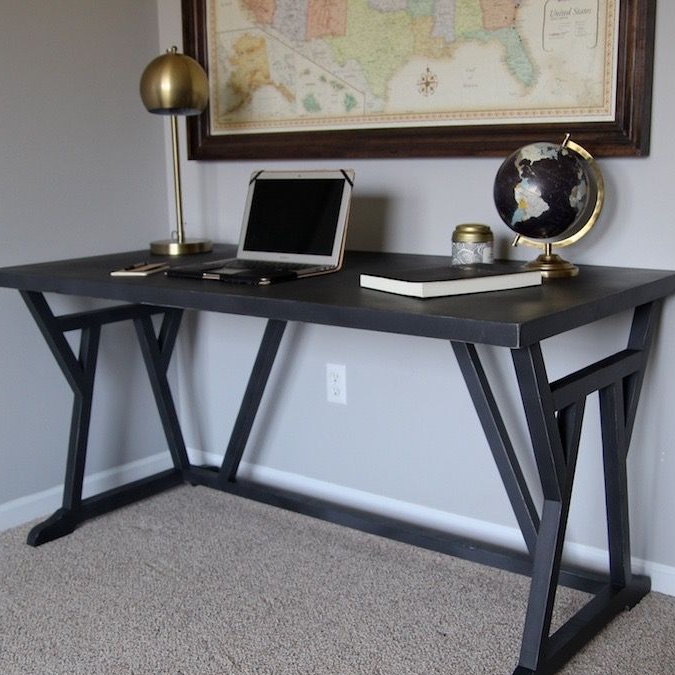
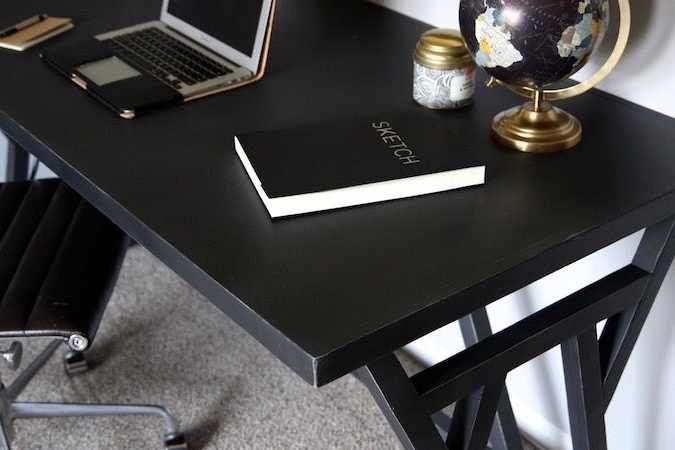
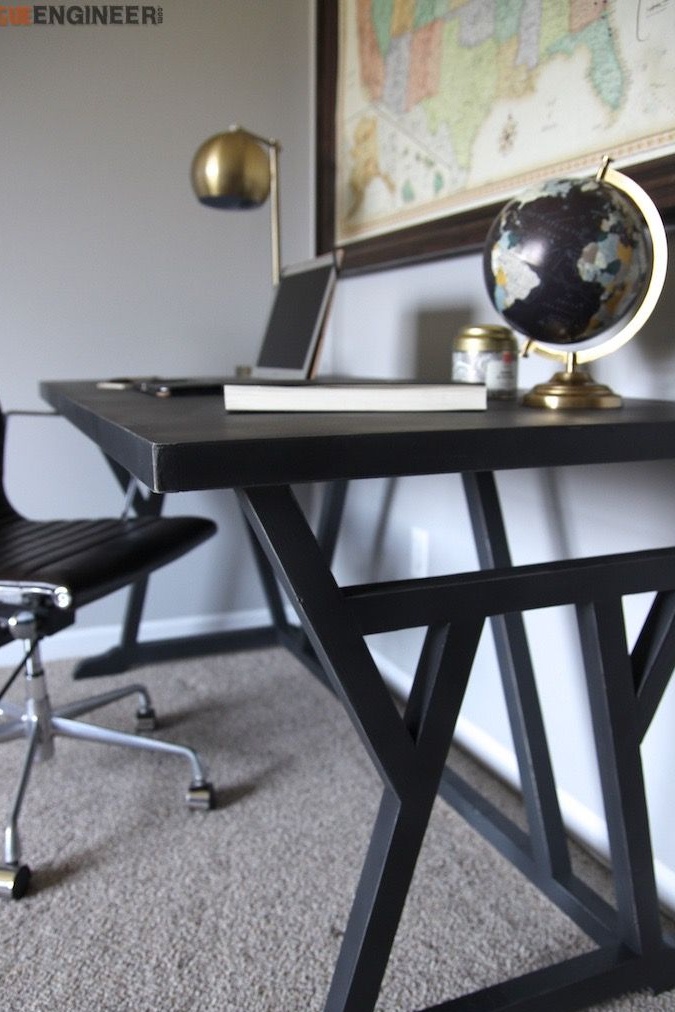
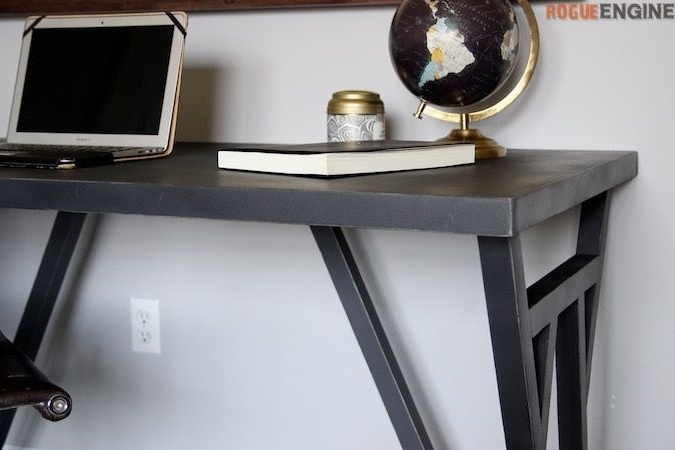
The author used natural wood and plywood for the manufacture of countertops. All details will require you to carefully polish, because for painting you will use matte paint and varnish, and they pretty much emphasize the flaws and irregularities of natural materials. By the way, as the main tone, the author did not use black paint at all, as it might seem at first glance, but dark gray.
In order to do it yourself to make such a desk with original legs, you will need:
Materials:
- square bars, for example 30 x 30 mm, for the manufacture of the skeleton of the frame;
- slats with a cross section of 20 x 30 mm or 25 x 30 mm for the manufacture of a base for plywood countertops;
- a piece of plywood according to the size of the tabletop and slats for its frame;
- a pair of boards with a thickness of at least 30 mm for the manufacture of curly parts of the legs;
- furniture screws or screws;
- primer for wood surface treatment;
- paint of a dark gray shade, preferably of the same brand as the primer;
- varnish for woodwork with a matte effect;
- metal corners to strengthen the structure, if necessary;
- small nails;
- glue for woodwork.
Instruments:
- miter saw, circular or hacksaw on wood;
- grinder;
- electric drill;
- screwdriver;
- pneumatic nail gun or joiner's hammer;
- jigsaw;
- a clamp with a device for drilling pocket holes for screws (the author dispenses with it);
- paint brushes for primers, paints and varnishes;
- sandpaper for the artificial aging of the paintwork and grinding of varnish;
- building tape measure and square;
- Ruler and pencil.
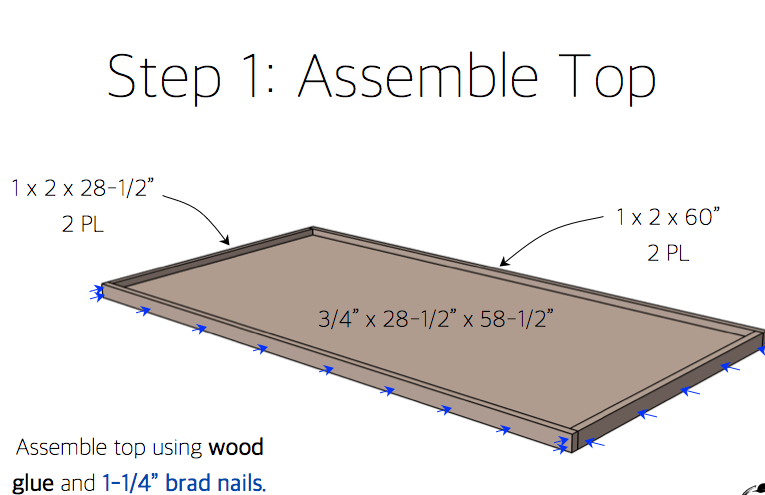
Step one: the manufacture of countertops and its individual parts
The tabletop is attached to the base of the frame, and its design is extremely simple. To make it, use plywood, as the author did or natural planed boards carefully. In addition, you will need slats of the same section that you use to build the base of the frame.
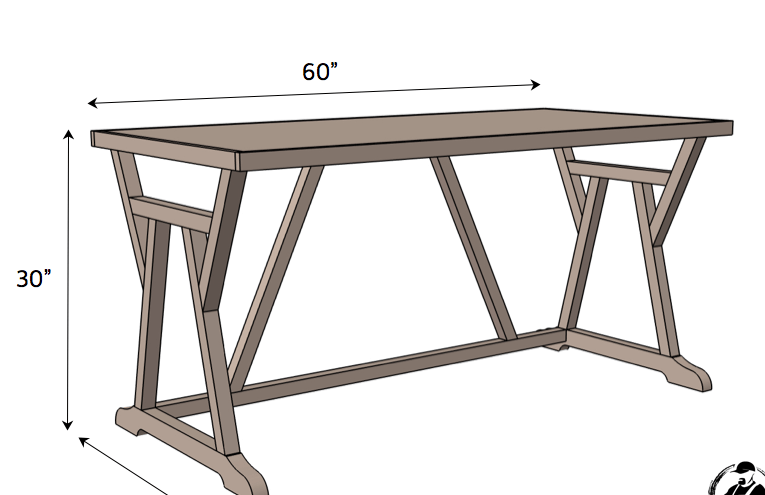
Decide on the size of the countertop. The dimensions of this countertop were 1,500 x 800 mm. But you can choose your own. Mark the rails of the frame of the countertop, as well as its plywood base. Use an ordinary pencil for this. This will make it easier for you to remove the wrong markings and lines if necessary. And in order for all the corners to be marked at a right angle, use the construction square. This is an indispensable tool for any furniture maker.
Cut the parts to size and carefully grind all surfaces with a grinder. Fine grain sandpaper grinding wheel is perfect for these purposes. Do not sand too much from the edges of the plywood blank. Please note that it must fit snugly against the rails and not create gaps.
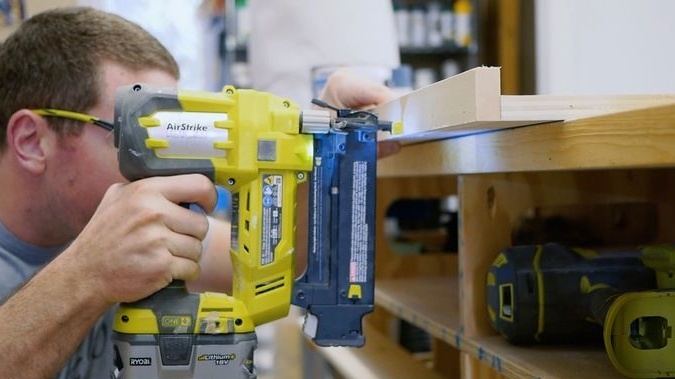
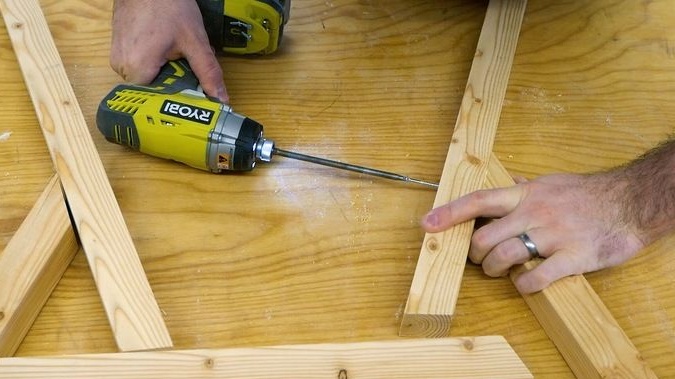
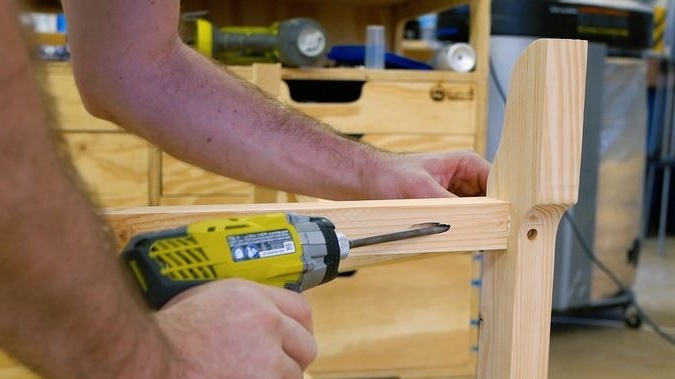
To connect the parts, the author used pocket holes and screws. Such pocket joints are usually combined by glue craftsmen. At the exit, you get a very durable, and most importantly easy-to-perform and neat connection. The author drills such holes with a drill and only without the use of any clamps and guides.
Therefore, prepare everything you need and start assembling the countertops. Drill pocket holes in the designated areas in advance. On the edges of the plywood blank, apply a little glue for woodwork, press the slats for a few seconds and screw in the screws to connect the frame of the countertop. Be sure to remove excess glue, otherwise the paint will not lie well on the surface of the wood. Wait for the glue to dry completely and harden.
You can also use small nails in this area instead of pocket joints on the screws. The frame does not bear any load, and there will be enough nails to hold the parts together. However, do not forget about the glue.
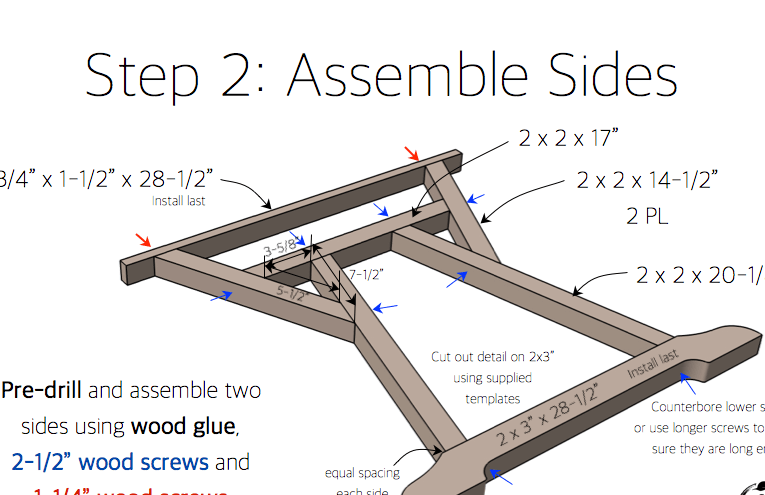
Step Two: Preparing Parts and Assembling Leg Panels
Here you will also need a square. However, the marking of the details of the legs can be carried out along the way, knowing their initial parameters. Mark the parts and saw them to size. Combine the panel by adjusting the cut angle of each of its elements. Do not forget to transfer all the parameters thus obtained to the blanks for the second panel.
The panels have a figured base in the form of elongated horizontal parts. Use a jigsaw to make them from a pair of suitable boards with a thickness of at least 30 mm or more.
All parts must also be sanded before assembly. The panel consists of several elements and in the finished form to do such a job will be much more difficult. So do not miss the moment.
To connect, use pocket holes and butt-to-butt fasteners. And again, do not forget about the glue, because without it the frame will quickly become unusable and you will have to repair it. Here, the use of nails is not advisable, since the screws will cope with their task much better.
But if you are worried about the fact that the hats of the screws will be visible, before screwing them in, drill a hole at the base along the diameter of the cap. So, a screw or a self-tapping screw will go flush into the hole, and you can subsequently hide its hat under a layer of sealant or putty on wood.
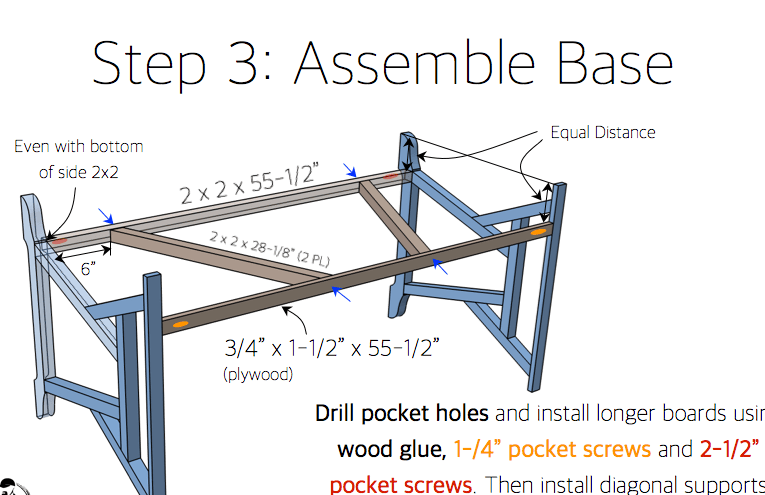
Step three: assembly of the frame and the table itself
Connect the leg panels, thus constructing the frame. To do this, mark the remaining parts, cut them to size and grind.
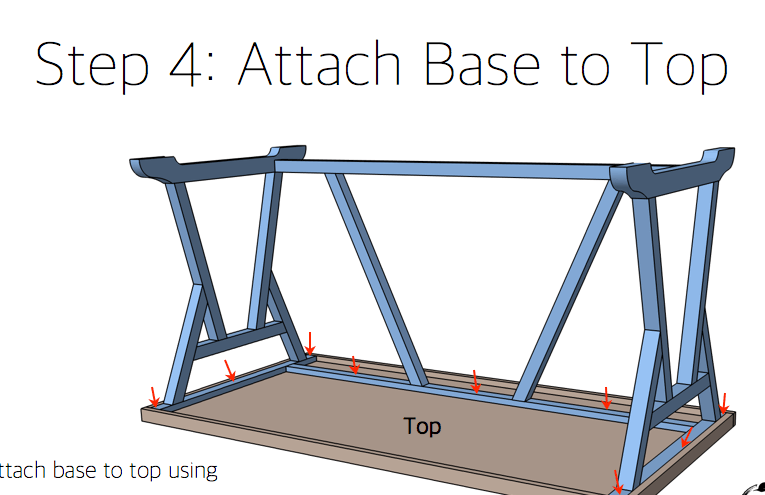
Fix the lower longitudinal crossbeam from the bar and set the legs upright. Secure the worktop base parts. They will go blanks from battens or plywood. Although the former is preferable, it is better not to use plywood in the manufacture of furniture frames.
Your frame has already gained some strength. It remains to install and fix the diagonal struts on the rear wall of the frame. They are installed at an angle, so they should be sawn at an angle.
If the strength of the frame does not inspire confidence, you can use metal corners to strengthen it. In the manufacture of tables, they are usually installed at the junction of the mounting frame and countertops, thereby giving the structure rigidity.
So, the frame is ready. All that remains for you is to fix the countertop on top. For this, the author used small self-tapping screws. The tabletop itself can be pre-planted on glue. However, this is not particularly necessary.

Step Four: Paintwork
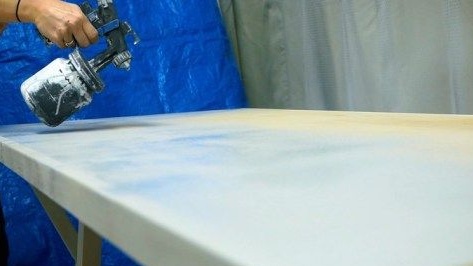
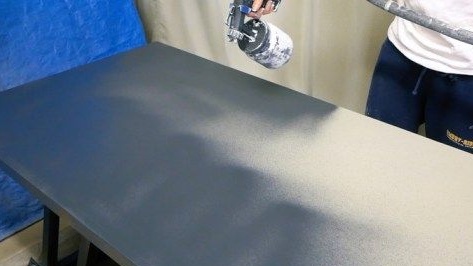
It was the turn for the most creative stage - painting the table. The author used a classic trio of primer, paint and varnish. This is a very effective method that allows you to achieve an exceptionally even, uniform and stable coating. In appearance, it most closely resembles factory painting, and does not lag behind in its properties. Of course, subject to all the rules.
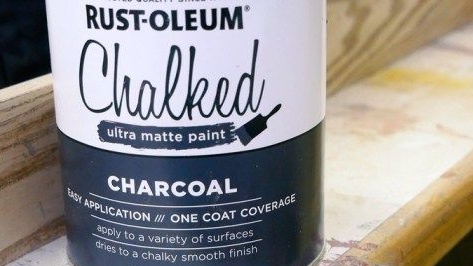
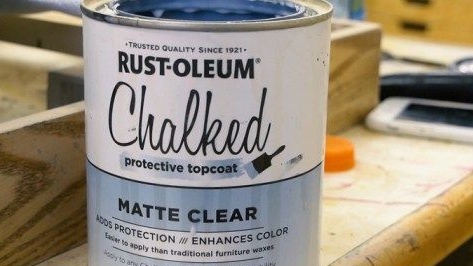
Try to choose all three products from the same manufacturer. The author used the Rust Oleum line, very popular in the USA. American bloggers who make furniture for themselves and their relatives with their own hands prefer this brand.
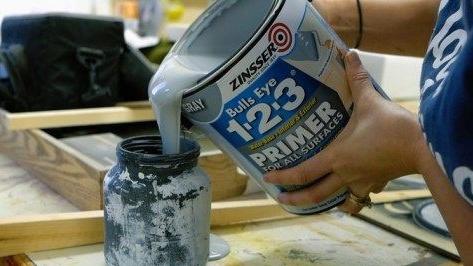
Apply primer according to instructions and let it soak. In the meantime, prepare the paint. Shake it well, open the jar and make sure that it is not too thick. Otherwise, the paint must be diluted with the solvent recommended by the manufacturer. The paint of ideal consistency should lay down in an even and uniform layer, without problems and special efforts to be distributed on the surface of the wood.
Apply several coats of paint until you get the uniform tone declared by the manufacturer. Each coat of paint should dry and harden before applying the next.
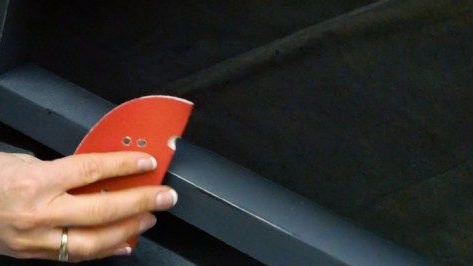
The author decided to add a little originality to the table and artificially age the coating on the edges, which are usually worn in natural conditions. The photo shows that he used sandpaper for this. The paint layer should be removed carefully, being careful not to touch the gray primer.
As a finishing touch, the author used a matte varnish of the same series. Be sure to ensure that the varnish forms a hard coating. The degree of hardness is easy to judge if you decide to scratch the coating with your fingernail. No visible marks should remain on the surface. This means that the varnish is ideal for varnishing furniture.