Making street of furniture - This is a great opportunity to improve your skills in building furniture. In other words, a suitable training apparatus. And the list of furnishings is not inferior to home: dining tables and coffee tables, benches, benches, armchairs, chairs, field kitchens and many others. Do you have something to work on?
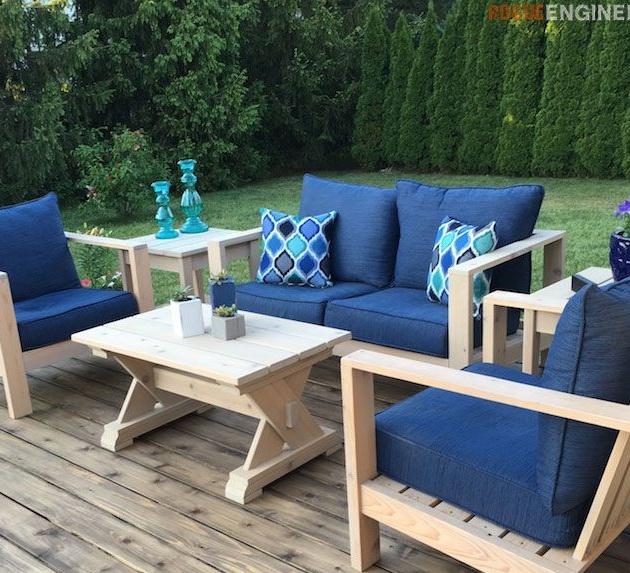
This master class was born from the idea of making a whole living room in the open air. There are tables, tables, and a coffee table, and comfortable outdoor chairs with soft textile pillows. For that period, while the track is not functioning, all textiles are sent for storage nearby. Wooden furniture can also be folded compactly into the garage for the period of rains and winter frosts. However, if she does get wet several times, this is not cause for alarm.
The whole set is made of natural wood, so it needs special treatment. Usually this operation involves priming using special antiseptic compounds. Then the furniture is painted, if necessary, and varnished. On the market are also widely represented products like "3 in 1", which are an antiseptic, and soil, and part-time toner. They create a moisture-proof transparent coating on the surface of the wood, which, if desired, can be easily and quickly updated. To do this, you do not even need grinding. But more on that later.
In the meantime, let's see what you need in order to do it yourself make this wonderful coffee table:
Materials:
- boards of pine or hard hardwood 20–25 mm thick;
- wood screws;
- small nails;
- glue for woodwork (desirable);
- antiseptic primer for wood processing or agent from the "3 in 1" series;
- paint or varnish if using a normal primer.
Instruments:
- miter saw or circular saw for sawing boards (you can use a conventional hacksaw for wood);
- grinder;
- electric drill;
- screwdriver;
- pneumatic nail gun or joiner's hammer;
- paint brushes;
- sandpaper;
- construction tape and ruler;
- construction square;
- a pencil.
Step one: determine the size of the table and drill
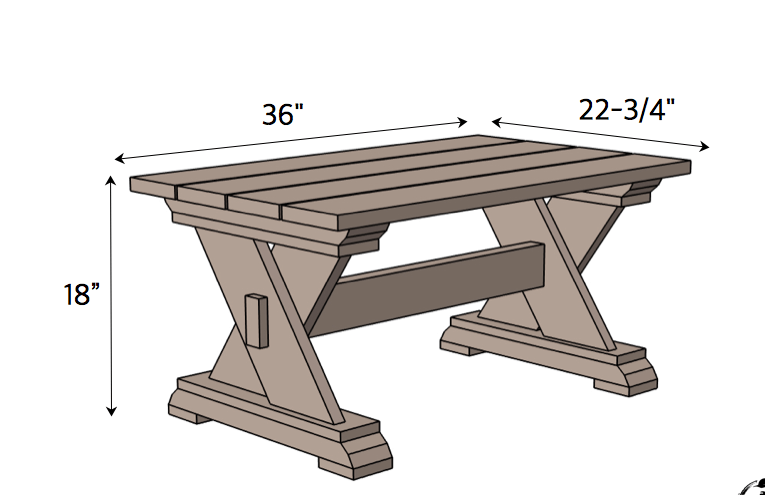
The author provided computer circuits where the individual details of the table are remarkably visible. All dimensions are in inches.When using such foreign plans, be guided only by the general dimensions, since when converting inches to centimeters and calculating the parameters of each part, you will have to deal with incomplete values, which is very inconvenient. It is much easier to calculate all the sizes yourself. Take care of this.
First, determine the overall size of the table. The table from this master class has a height of 450 mm. The width of the countertop is almost 570 mm, and its length is 900 mm. From this and build on. However, note that the table consists of a large number of details. Getting confused in size is easy. To prevent this from happening, drill down. List on paper each individual part of the table, but on the contrary indicate their sizes. Only then proceed with the markup, manufacturing of parts and assembly.
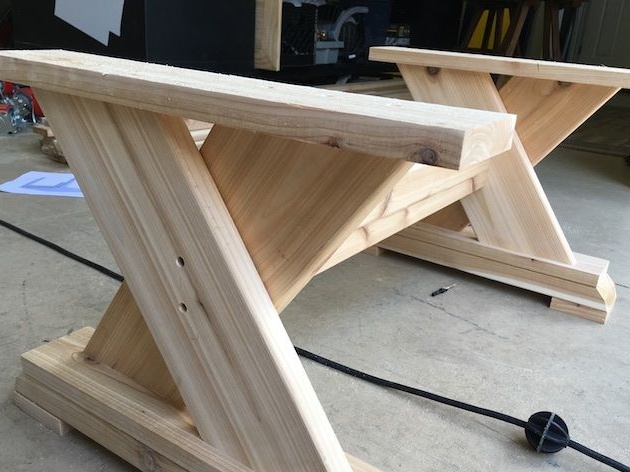
Step Two: Making X-Leg Panels
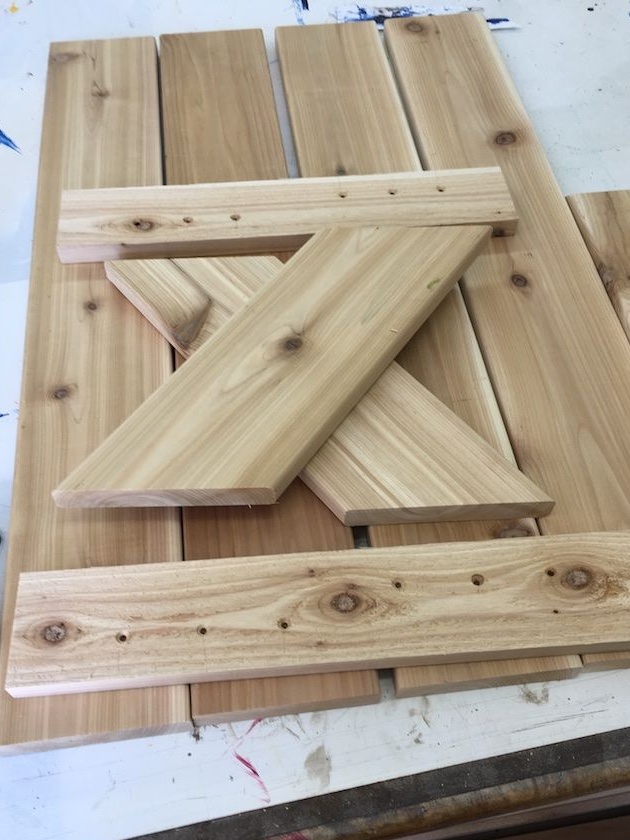
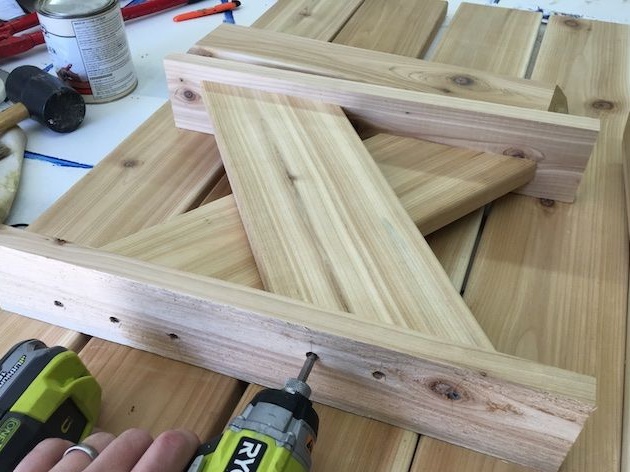
Mark out the details of the legs and saw the boards into blanks of the required size. The author uses wide boards for X-shaped elements and thick ones for making the base. Saw wide boards at the desired angle.
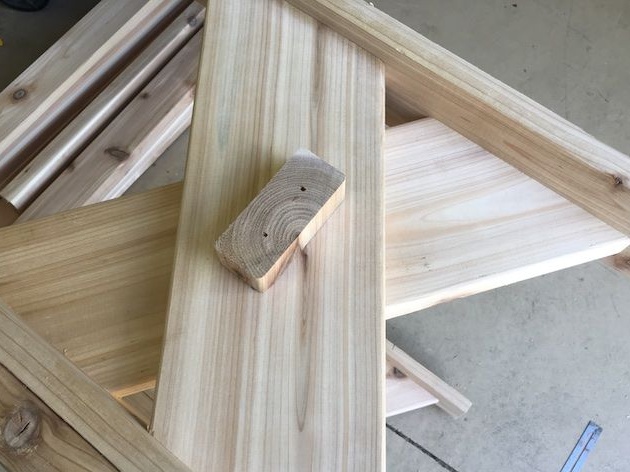
Arrange all the details on the table and mark the mounting points with screws. The holes will be in two lines above and below. Drill holes and use a larger diameter drill to expand their base under the screw head as shown in the photo below.
In order for the joints to be strong, and the design itself reliable, use glue. Of course, you can do without glue, but be prepared for the fact that over time, the fasteners will loose, and they will have to be repaired. Therefore, before joining the parts using self-tapping screws, apply a small amount of glue to the joint area and press them together for a couple of seconds. Only then screw in the screws.
By the way, the latter will save you from the prospect of using clamps for drying glued structures. They securely lock the connection, and you can continue to work immediately. Remove excess glue immediately with a damp cloth, otherwise the protective coating will not adhere well to the wood. If the adhesive nevertheless got on the painted surface and dried out, later it should be sanded with sandpaper.
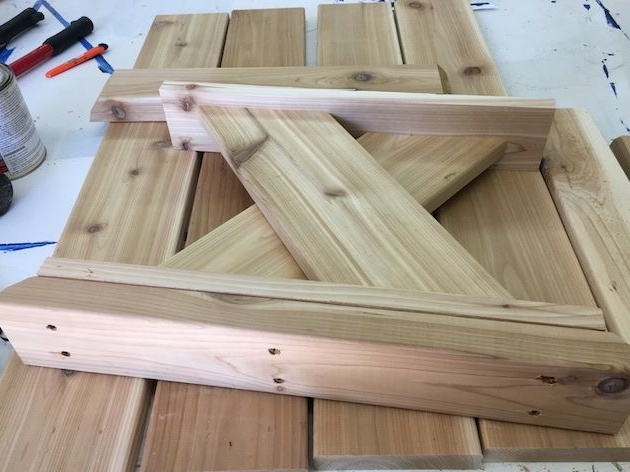
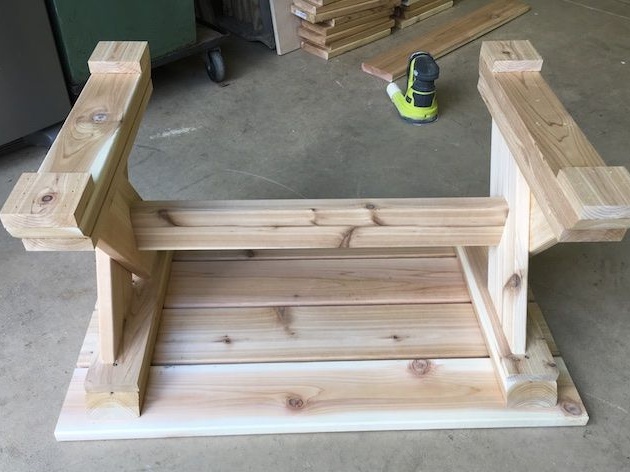
Assemble the leg panels according to the diagram shown in the picture. To do this, first assemble the central X-shaped part and fix it between the two slats. Fasten a massive base with beveled edges and small square legs at the bottom. Use glue and the simplest joints on self-tapping screws.

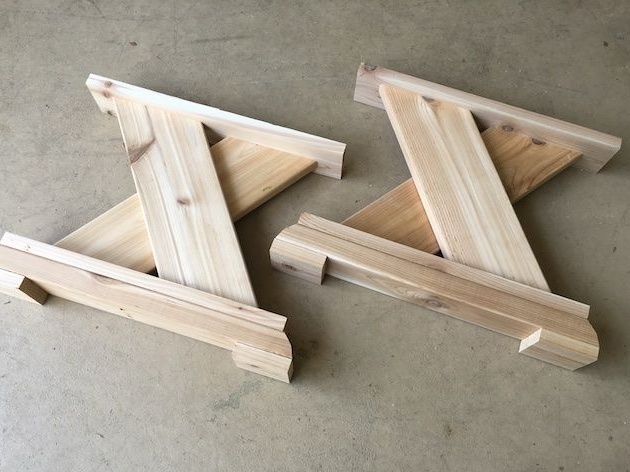
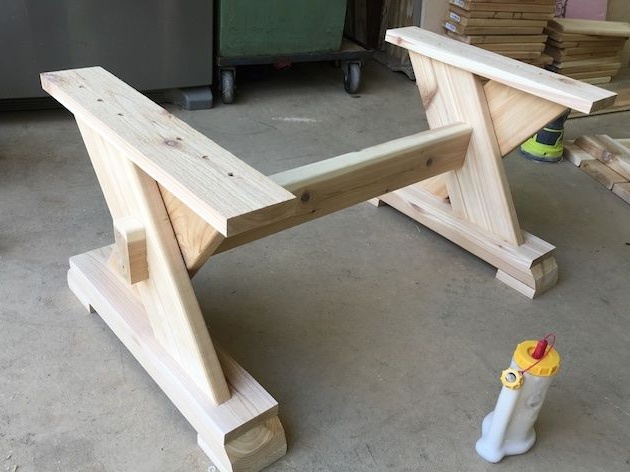
Step three: further assembly of the coffee table
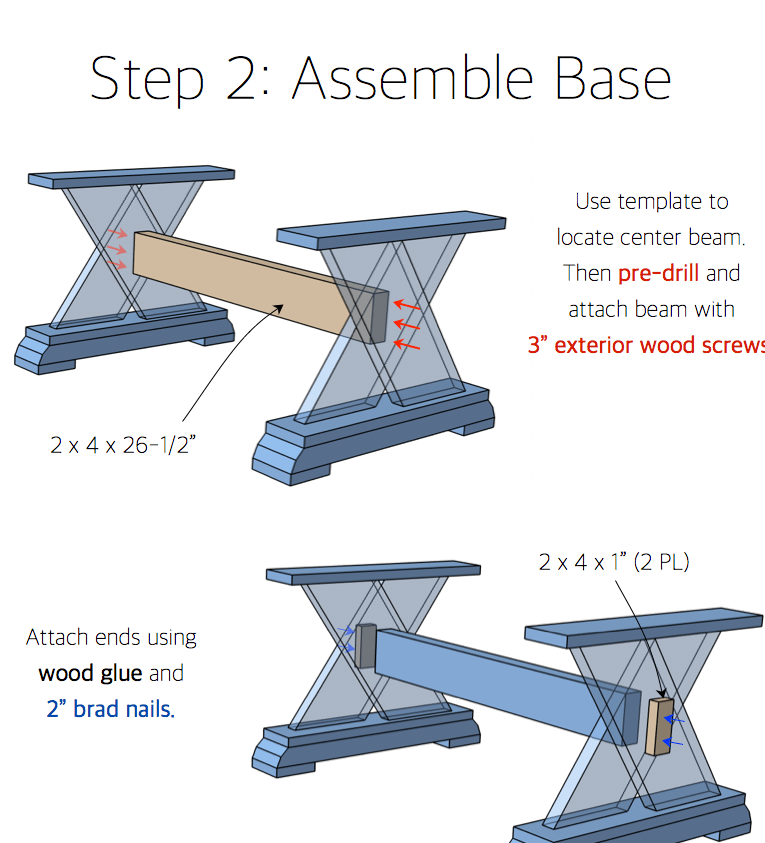
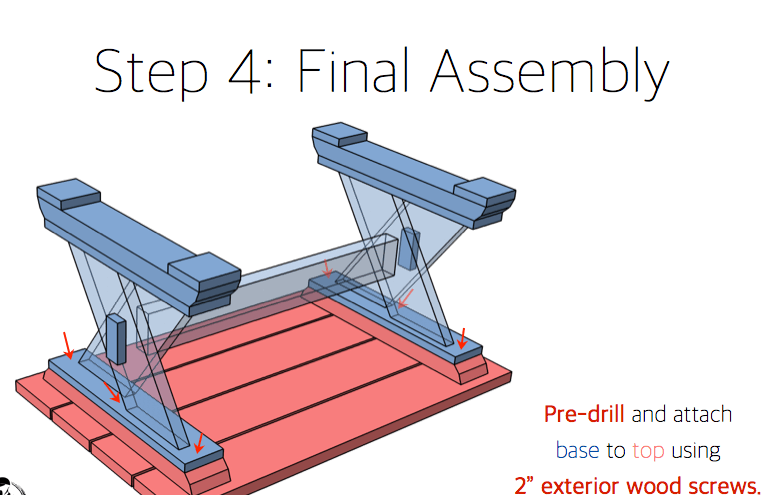
Connect the panels using the longitudinal beam and mount the frame vertically. Attach the worktop base details at the top. On the back of the panels, fix the small rectangles sawn from a thick board. This is a purely decorative design element. Do not forget to pre-drill holes for screws, otherwise the workpiece may crack at the most inopportune moment.
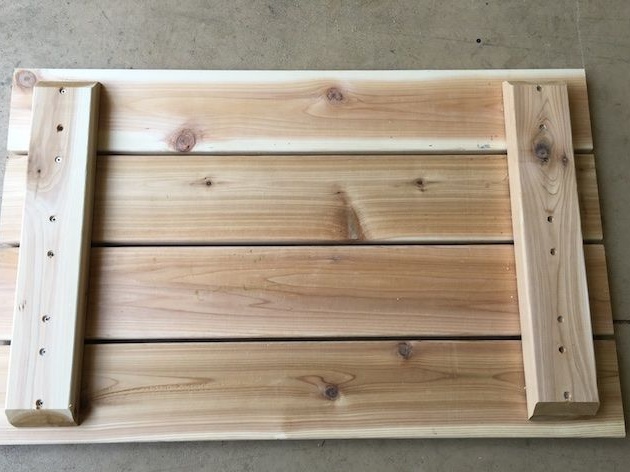
Assemble the countertop. In order to fasten the countertop boards together, use pre-prepared trims with beveled edges. Remember that blanks for countertops must be planed on the thicknesser and have the same thickness, otherwise the product will come out inaccurate. Worktop details are fixed at some distance from each other. This is necessary so that raindrops pass through the cracks and do not linger on the table.
Lay the tabletop upside down on a flat surface, and place the table frame on top. Secure it with self-tapping screws. You can also use glue here.

Step Four: Protective Wood Processing
The choice of protective composition depends on the goals you pursue. The author decided to conduct the most natural treatment in order to preserve the natural color and structure of the tree.In this case, you can use an antiseptic primer and a matte varnish for woodwork. Remember that the varnish used for varnishing furniture forms a hard, non-scratch coating after drying. All other types and types of varnish will not suit you.
Prime the wood according to the instructions and leave the product to dry completely. Apply several coats of varnish with a paint brush. Each previous layer should harden properly. And only after that a new layer should be applied. You will need two to seven layers of varnish.
If you want to change the color of the table, use paint. Choose alkyd paints that work well without varnishing. Apply the paint in three to four layers according to the same principle as the varnish.
Wood can also be tinted. For this, the notorious compositions of the type "3 in 1" are suitable for you. They reliably protect the tree from moisture, prevent the formation of mold and fungi on its surface. But that's not all. Such compositions perfectly tint wood, imitating valuable species of wood, and give it a velvet sheen. Apply the product in two layers and let the table dry under a canopy.
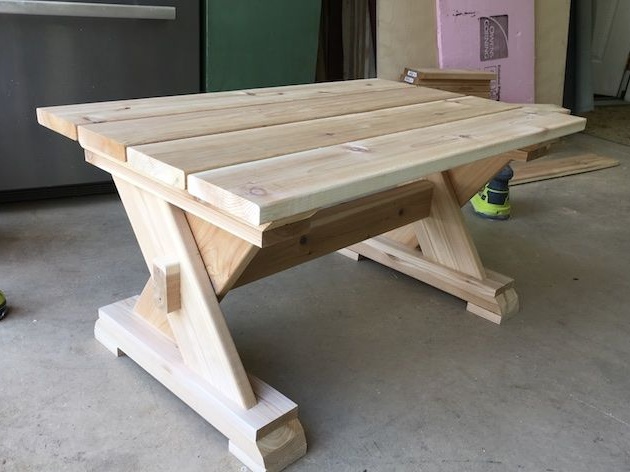
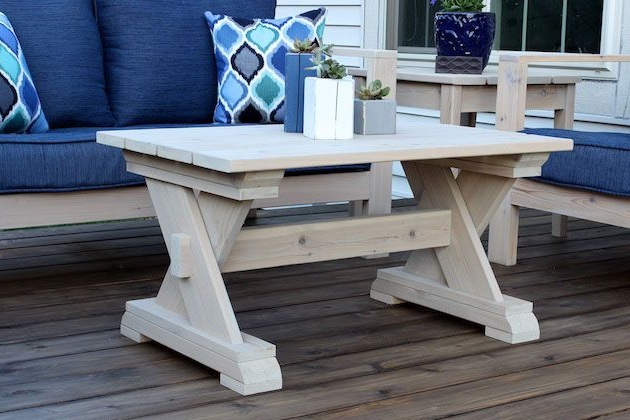
The coffee table for the terrace is ready!