
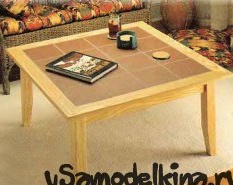
A coffee table made of wood and ceramic tiles perfectly complements your interior. Due to ceramic tiles, the surface of the tabletop will last a very long time. The underframe will be assembled on grooves and spikes formed with a circular saw. The material for the base of the countertop can serve as planed dry wood or plywood 20 millimeters thick.

The dimensions of the coffee table are selected based on the dimensions of the ceramic tiles of 200x200 mm. The base of the countertop is made of plywood, it has dimensions of 853x853x20 mm. On the base, we laid 16 tiles with three millimeter seams. 22 mm are left on each edge of the base, which will serve to fix the frame and the seam between it and the tiles. A frame made of wood with chamfers will frame the table around the perimeter.
The legs of the table are glued from boards with a thickness of 20 mm. From the inside to the bottom of the legs are narrowed. Adhesive joints should “look” in one direction on all legs. The drawbars are attached on the inside of the legs by means of two grooves (width 6 mm). The length of the legs depends on the size of the legs and the plywood base. To two outer sides of the legs are folded 10 * 12 mm. The ribs of the legs are rounded.
Underframe assembly is first done dry. It is necessary to check all the connections of the parts and adjust them if necessary. Then we glue 2 legs and the drawer, inserting a dowel between the clamp and the leg. Then, after checking the correct geometry, glue the remaining 2 czars.
The assembly of the table should begin with the fastening of the plywood base of the countertop to the base. Then glue the frame.
Finishing the wooden parts of the table should be done before laying the tiles. You can apply several layers of glossy polyurethane varnish and cover with masking tape.
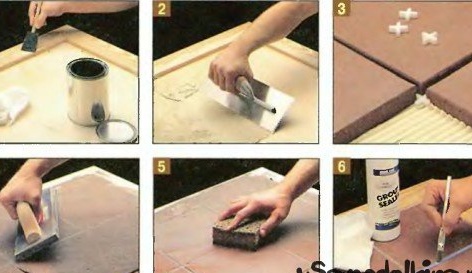
We lay the tiles on a special glue designed for this. The glue is distributed over the surface of the base of the countertop using a notched trowel. In the course of this work, plastic crosses should be used for the same distance of the seams. After drying, fill the seams with a grout to the color of the tile. The crosses can be left out and covered with grout.Excess grouting compound is removed with a sponge before it hardens. Rinse the sponge more often in running water. To cover the tile joints, you can use a special water-based sealant. And the tiles themselves do not need to be covered with anything.