

This prefix to the multimeter allows you to determine and compare the strength of magnets, the direction of the magnetic field and the shielding (anti-magnetic) effect of various materials.
Applied Tools:
Wood hacksaw
Hacksaw
Drill with a drill with a diameter of 1 mm
Flat file
The file is flat
Nippers
Pliers
Round pliers
Ruler
Marker
Soldering Iron 25 W
Scissors
Sandpaper
Brush
Materials:
Pine beam
Fiberglass
Scotch
Glue
Solder
Rosin
Solvent 646
Rags
Stranded wire
Reed switches
Plastic line
I used a magnetically controlled sealed contact (reed switch) as a magnetic field sensor, and a multimeter as an indicator.
Is that simple? Let's take a closer look at my homemade. Here is her schematic diagram.
Two parallel-connected reed switches are connected to a multimeter turned on in semiconductor continuity mode.
This mode can be found even in the most inexpensive multimeters. In this mode, the device gives a sound signal at a low resistance of the measured circuit, of course, and when it is closed.
The reed switch used in this homemade product has a normally open contact. This means that the contact is open in the absence of a magnetic field. When the field appears, the contact closes.
Why did I use two reed switches and not one? The fact is that the reed switch, due to its design features, reacts to the magnetic field differently from different directions. Good, the more reed switches connected in parallel, the better. But, guided by my experience with magnetically controlled contacts and the principle of reasonable sufficiency, I settled on two, placing them in a special way.
This photo shows the details from which I assembled this homemade product. There are very few of them.
Two identical reed switches from burglar alarm sensors, a board, a ruler, wires, a piece of fiberglass.
I placed the reed switches one above the other in the form of the letter X. With this arrangement, when one reed switch stops responding to a magnetic field of a certain direction, the other reed switch starts to respond.
To do this, I cut a small piece of fiberglass, marked out and drilled holes. I inserted the reed switch legs into the holes, bent them on the back of the fiberglass. Glued.
The photo shows that the installation of the reed switches, when bending the terminals, broke off part of the glass case of one of them. However, I checked the serviceability of the reed switch and continued to work. I soldered the reed contacts and the output wires of the console.

I made the ends of the wires in the form of tinned loops, since my multimeter can use crocodile clips on the probes.
I inserted a board with reed switches in a slot made in advance in the board - at the base, adding a little glue for reliability.
I glued the ruler.
Fastened the wires with tape.
The prefix is ready.

A small addition. Assembled this design as follows.
I took a pine beam suitable for the width for the manufacture of the base.
I tried on it a ruler, which in the design serves to determine the distance to the magnet under study.
I figured out how much space is needed to fix the board with reed switches and fasten the wires.
Summarized, gave a margin up, marked out and sawed off the desired piece of timber with a hacksaw on a tree.
He made a transverse cut in the timber with a hacksaw and a flat file to install a board with reed switches.
I used a hacksaw to cut a piece of fiberglass that was necessary in size. Marked and drilled four holes in it for the conclusions of the reed switches.
I filed the edges of the bar, cleaned it with sandpaper and covered the bar with dark lacquer for refinement.
Measured two pieces of a multicore installation wire. In the end he stripped the insulation and tinned.
The rest is described above.
Now that the prefix can and how to work with it.
Turn on the multimeter in semiconductor dialing mode. The magnet under investigation is slowly brought closer to the circuit board with reed switches until a sound signal appears. We read the distance to the magnet on a scale (ruler). We write the result in a notebook. We take the magnet back until the sound signal disappears. Expand the magnet on the other side. Repeat the operation as the magnet approaches. We write in the notebook a new result. Similarly, we obtain a lot of data on the effect of a magnet on an object, depending on the position of the magnet relative to a stationary object. Difficult, huh? But it’s clear.
Next, take another magnet and repeat these operations. Now we have the opportunity to compare two magnets in the same conditions.
Now we examine the antimagnetic properties of materials, how much they weaken the effect of the magnetic field. To do this, take any magnet, preferably more powerful. According to the method described above, we determine and record the distance to the magnet at which the signal begins to sound. Without changing the position of the magnet, we remove it on a scale - a ruler until the signal stops. Immediately in front of the reed switches we place the investigated antimagnetic material. The area of the material sample should be such as to completely close the reed switches from the magnet. Zoom in the magnet. When a beep appears, stop. We read and write the result. The distance (result) should decrease. From this we conclude how much this material weakens the magnetic field. This is similar to how materials attenuate radioactive radiation. It was very interesting to compare the properties of tin, brass, permalloy tape, transformer screens and more. Now think about why I used wood for the base of the console, and a plastic ruler for the scale.
Recently, I was engaged in research work "on the influence of a magnetic field on water meters." Thanks to this prefix, I was able to explain the “phenomenon” why a vaunted neodymium magnet cannot stop some counters, but a regular, ferrite one, from the speaker can.
You can make not a prefix, but a functionally complete device. In this case, you can replace the multimeter with just two parts. Battery and "tweeter" with a built-in generator, collecting such a circuit.
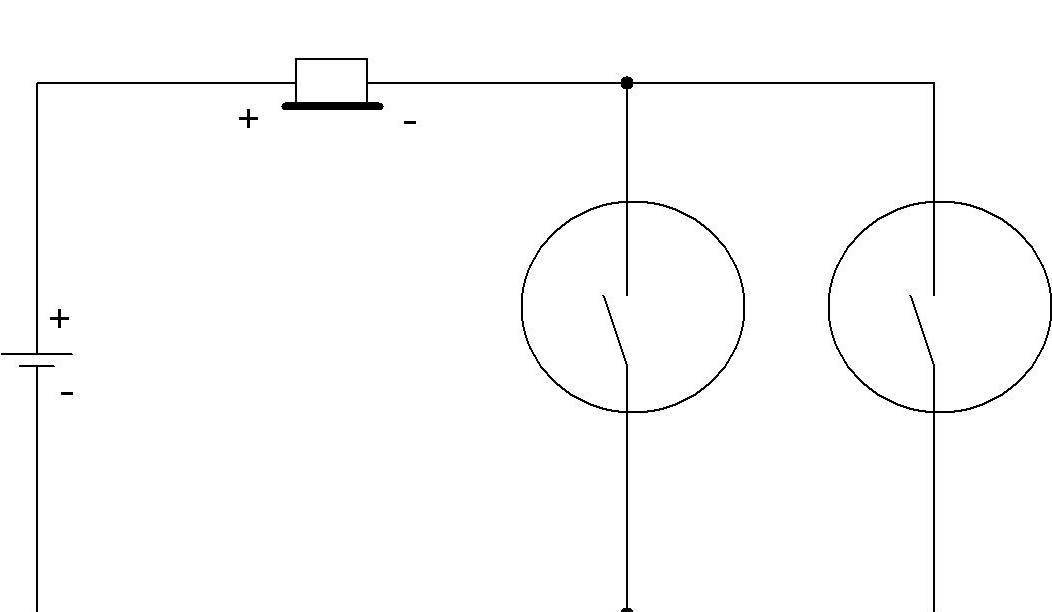
A power switch is not required; in the absence of a magnetic field, the circuit consumes nothing.
Or by replacing the multimeter with three parts. Battery, resistor and LED, as in the diagram.
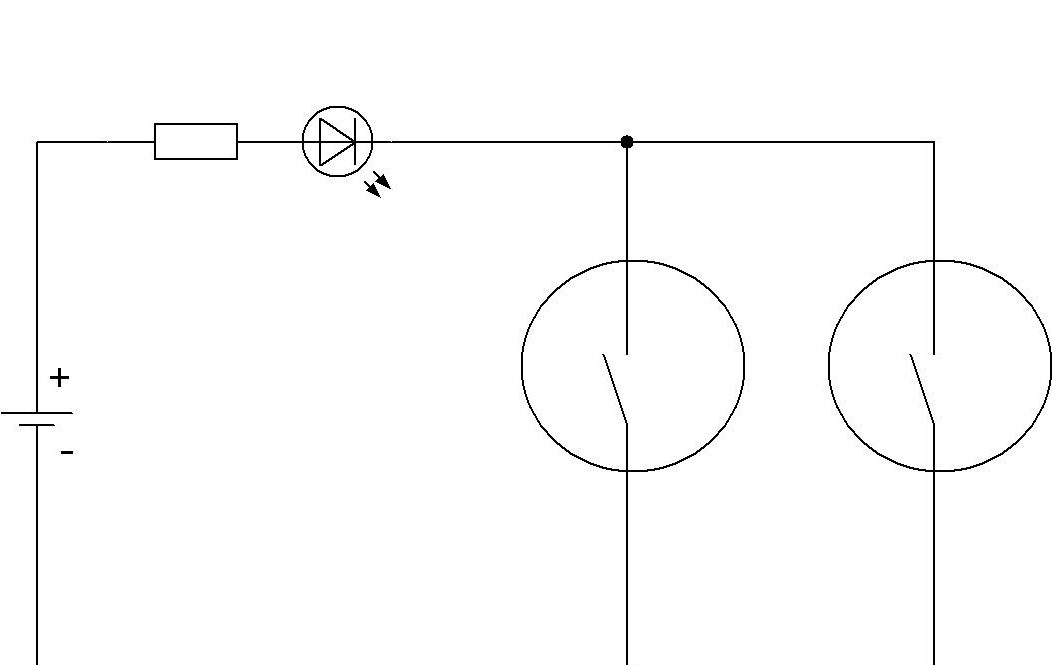
A power switch is also not required, in the absence of a magnetic field, the circuit consumes nothing.
In conclusion, I want to add. Magnets, if they are large, can be approximated from the sides of the console, also read the result on a ruler. For this reason, I took a block rather than a flat board as the basis. The ruler has a scale on both sides, which makes it convenient to work with different positions of the console relative to the experimenter.
I hope this article was interesting and useful to you.
I will be glad to your comments and suggestions.
Sincerely, author.