 Content:
1. Accessories
2. Jewelry
Accessories
This French word translates as "minor subject, complement to the whole." Accessories bring to your clothes the aroma of originality, uniqueness. Tempting to make them do it yourself. But this will have to work hard. The tips we offer will help everyone who loves needlework and not afraid of difficult painstaking work.
In search of materials for our models it is not at all necessary to go to the store. Put what you have at home at work. These are small pieces of leather or suede from old bags, boots, rags of dense fabrics - cloth, drape, canvas or old knitwear, fur trimmings. From them you can make the most diverse and fashionable accessories: belt, bag, hat, mittens. Therefore, do not rush to throw away old bags and boots, coats and sweatshirts. Of course, in order to make a new thing out of old materials, they should be put in order: wash the wool or knitwear and steam through a wet rag; pieces of leather cut from an old bag or boots, iron the inside out with a warm iron, pull the fur and comb the pile.
In this work, in addition to ordinary tools and auxiliary materials, you will need: a long thick needle or an awl for sewing leather on your hands, durable thick cotton or linen threads such as twine, a metal crochet hook, a long ruler and a sharp knife to cut the skin. A hammer with a nail or with a special punch for holes will come in handy. Instead of basting and when bending the edges of parts, use glue: rubber, “Moment”, BF-6, “Mars”. And as a decoration, choose what your imagination will tell you: buttons and beads, metal rings, buttons and blocks, chains or ribbons.
The cut details of the models presented here can be composed of small pieces of different materials. Try to pick them up so that you get a beautiful mosaic in terms of color and arrangement of parts.
You can connect pieces to each other in several ways. For example, end-to-end, with a tight braid up to 1 cm wide, superimposed along the connection lines. The thing will look most interesting if you use a leather trim as a braid. To do this, cut narrow beaks from thin skin (cut them with a knife on a ruler). Sweep pieces of cut end-to-end with a seam over the edge, glue the beaks onto the seams with rubber glue and sew them to the edge with a regular stitch or zigzag seam.Such processing is suitable for a “mosaic” composed of parts of a geometric shape, for example, in the form of a Christmas tree. If your pieces are of an indefinite shape, connect them by sequentially stacking one on the other and making a line with a “zigzag” seam along the very edge of the cut. From the inside, cut off excess material along the seams. You can connect these pieces and butt. But for this you will need to precisely fit them to each other along the contour. Having done this, glue narrow strips of fabric from the inside to the seams, and on the right side lay a zigzag seam so that the needle captures the edges of both parts.
The patterns that are given here are given in a scale of 1: 5, that is, the side of the cell is 5 cm. It is convenient to construct the pattern on graph paper. When cutting bags and belt allowances for seams do not.
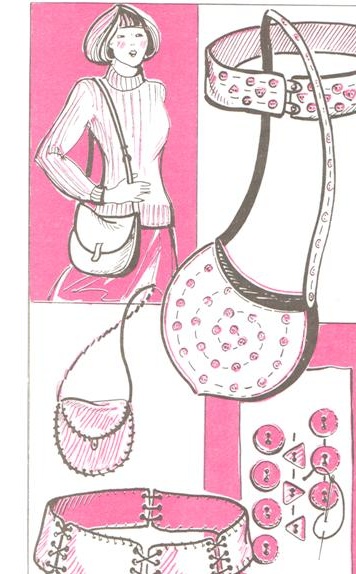
I model - handbag and belt (Fig. 1). Buttons accumulate in any home. Pick them up in one size (from 1 to 1.5 cm in diameter), but in different colors. Embroider a set of bags and belts with these buttons. The bag is soft, in the form of a bag with a rounded bottom. The fabric for it should be dense, but not very thick: thin cloth, canvas, raincoat fabric. The pattern is given in Figure 2.

Sew both halves of the bag on the wrong side, turn it over, hem the top and iron it. For the same pattern, reducing it along the contour by 0.5 cm, prepare a lining, but do not sew yet.
Start sewing buttons on the bag from the center in a spiral. Preliminary sketch with a pencil the points on which the work will be carried out. Sew buttons with a “forward needle” stitch. After each sewn button, sew one free stitch. When the entire bag is embroidered, hem the lining. Make the handle to the bag long so that it can be worn over the shoulder. Trim from which the handle is made, also trim with buttons. Use them to attach the handle to the side seams of the bag.
For a belt, take a piece of fabric twice as wide as the width of the finished belt. Choose the length of the belt depending on your size. Place the buttons in three rows in a checkerboard pattern in the middle of the fabric. The middle row can be made of buttons of a different shape. When all the buttons are sewn, attach with
on the side of the belt is a corsage or a tight collar, bend the upper and lower edges and sew them in the center from the wrong side by hand. Gently close the ends of the belt by inserting on the right side two loops from the cord or inlay for the fastener. The loops should be located at the top and bottom rows of buttons. Sew the buttons for the fastener separately from the others - “on the leg”, so that it is more convenient to fasten them.
II model - pendant wallet and leather belt (Fig. 1). A belt of 6 pieces of leather, preferably thick. For density, the skin can be glued with a cloth (rubber glue). After cutting out the details, sew a decorative seam on all edges of the belt. To do this, pierce at an equal distance from each other with an awl or punch holes with a nail. Work with strong and thick colored thread or a narrow leather ribbon cut from a whole piece of thin skin. A long ribbon can be made up of several parts glued together with rubber glue. When parts of the belt are braided, break through the blocks for lacing. You can do this in a metal repair workshop. Connect the parts of the belt together with a lace from a leather ribbon.
Make a small elegant purse worn on the chest in the kit for the belt. Sew the wallet, like a belt, over the edge with a strong thread or braid it with a leather ribbon. Make the valve double and in the center insert a loop for a fastener.
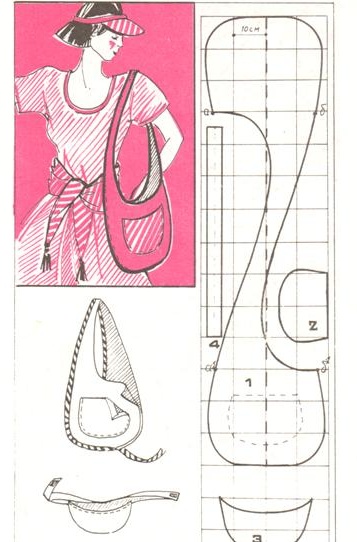
III model - a leather bag (see. Fig. 1). The bag consists of the following parts: web (part 1), valve (part 2), clinch (part 3) and shoulder strap (Fig. 3).
Hide one part of the canvas and two identical parts for the valve and the clinics without allowance for seams. For the shoulder strap, cut two strips 12 cm wide and one 60 cm long, the other 30 cm long. If you decide to make the bag on the lining, hide it in the same pattern and duplicate the details of the bag with the lining, placing them one on the other with the outside facing out. Start processing.
1.Sew the valve to the fabric: fold the two parts of the valve and the fabric together, aligning them along the concave edge, and make a stitch at a distance of 4-5 mm from it. Then edge this edge with a braid or inlay of thin leather about 2 cm wide.
2. In the same way, turn the valve around the edge, having previously connected both its parts with glue. In the same way, make the upper edges of the clinics and the front edge of the canvas.
3. Bend the parts of the shoulder strap vertically and stitch along the edge. Stitch the ends of both parts on the clinches with a cross-stitch so that the distance between the lower edge of the belt and the upper edge of the clinch is 6-8 cm.
4. Sew along the face, having previously swept or gluing, the clinics with the blade (the valve is already sewn to the canvas), aligning the upper edges of the blade with the edges of the canvas. Bend along the edge of the clinch before this inward as well as the ends of the shoulder strap. The bag is almost ready. It remains only to insert one free end of the shoulder strap into the rings (metal or plastic) and fasten it with a line, and insert the other free end into the rings, as shown in Figure 4. It is not necessary to close the bag with a lock, but you can do it if you wish with a buttonhole or button or two leather straps fastened with a buckle or button.
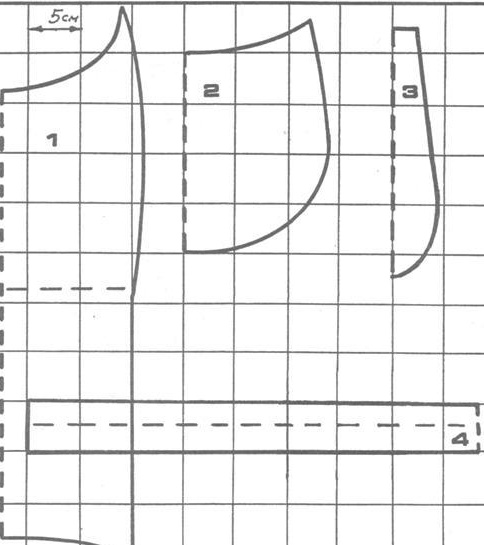
IV model - summer bag-bag, visor and belt-scarf. Make this kit from a dense decorative fabric with a bright pattern (Fig. 5).
For this pattern, cut the details of the top and lining. Laying them one on top of the other, facing out, sweep the parts around the edge. Stitch your pocket by folding its edges in advance. Now bend the entire part in half in the center of the handle, aligning the points a - ai and b - Bi and sew the edges of the bag with a long oblique band or elastic braid.
Hide the draped belt from the same fabric, observing the direction of the shared thread. Bend the edges of the belt twice by 0.5 cm and stitch. Decorate its ends with large beads.
In addition to the fabric, the visor requires an elastic gasket of thin plastic (for example, from a transparent folder for papers) and a piece of Velcro tape for fastening. Lay out the gasket 0.7 cm less than this pattern.
After cutting the details, gently grind the visor along the outer edge, turn it open and insert the gasket inside. Fasten it by basting along the open edge close to the gasket. Now you need to stitch a straight strip to the visor - a hoop. Put a visor on a strip for a hoop, do a line. Bend the free ends with the wrong side out, grind and turn it over. The area of the hoop that has not been sewn up is bent and bent to the visor.
Stitch it and continue stitching along the edge of the entire hoop. Sew a Velcro to fasten at the ends.
V model - panama and belt (Fig. 6). The fabric for the panama needs to be taken denser: linen, a harsh canvas, a cloak, cotton dive, velvet. Trim the panama by making the lower side of the field of fabric of a different color.
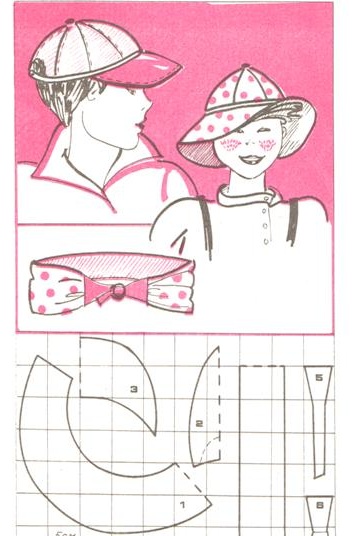
The parietal part of Panama consists of six wedges. Depending on the volume of the head, add up to 1.5 cm on both sides of the wedge and 1 cm per seam. This pattern is designed for size 55 (without allowance for seams). Recall that the side of the cell is 5 cm.
1. Stitch wedges with internal seams.
Make two parts of 3 wedges, and then connect both halves together.
2. Fields must be double. Sew the back seam of each part, then lay both parts face-to-face, sew from the wrong side along the outer edge and turn it straight. Stitch the seam and iron well. You can stitch all the fields in a circle with a finishing line with a distance of 0.7-1 cm between the lines. Sew the finished fields to the main part.
3. From a thin fabric in the same pattern, but reducing the wedge by 0.3 cm, make a lining. Sew the lining to the panama in your arms.
If you sew a visor to the head of the wedges, you will get a hat like a cap. Visor unlike panama fields should be more dense. Therefore, inside you need to lay a dense thin cardboard or plastic. Make the gasket pattern smaller so that the visor can be sewn to the head. Turn the bottom edge of the head 1 cm and sew along the edge. Lining is also needed here.
A belt made of the same material is a flat strip of fabric with a small drapery at the fastener.Details of the fastener and the edging are made of dense fabric. Turn over the edges of the belt. Turn the fastener details, and adjust their open ends and tighten.
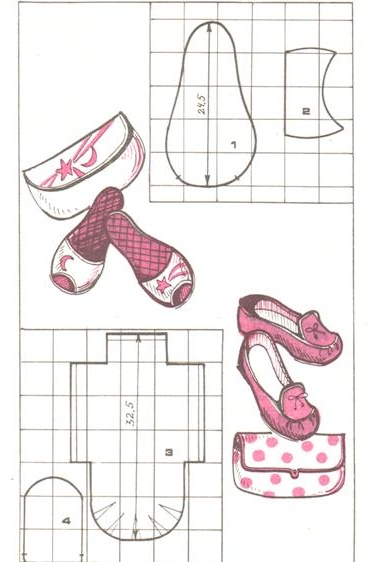
I offer you two models of beautiful slippers. They can be sewn from beautiful dense fabrics, and if they are intended for a gift, then make a handbag. This kit is convenient to take on the road, on a trip (Fig. 7).
For slippers you will need different materials:
- dense fabric for the top;
- bortovka, canvas or calico for lining;
- batting, synthetic winterizer or thin foam for laying;
- elastic braid with a width of at least 3 cm for edging slippers;
- leather of medium thickness for the sole;
- strong threads like twine for sewing on hands;
- glue for fabric and leather.
Let's start, as always, with the construction of the pattern. The side of the cage is 5 cm. After making a pattern on thick paper, cut it out and specify the length and volume of slippers on your foot. Make the necessary changes to the pattern, given that it should be 1.5-2 cm longer and wider than the foot.
VI model. Perform it in the following sequence:
1. For the top 2 and the sole 1, hide three parts each: from the main fabric, batting and lining. Put them together and sweep them away. Quilted soles in a slanting cage. The upper part is either quilted or trimmed with applique.
2. Two sides of part 2 - top and bottom, trim the braid. Place part 2 on the sole and sew the top to the sole along the side cuts.
3. Trim the edge of the sole so as to cover the thickness of the sole and top. Close the ends of the tape on your hands.
4. For the sole, hide the leather outsole. It should be 0.5 cm smaller than the finished slippers. Glue it to slippers and sew it on your hands for durability.
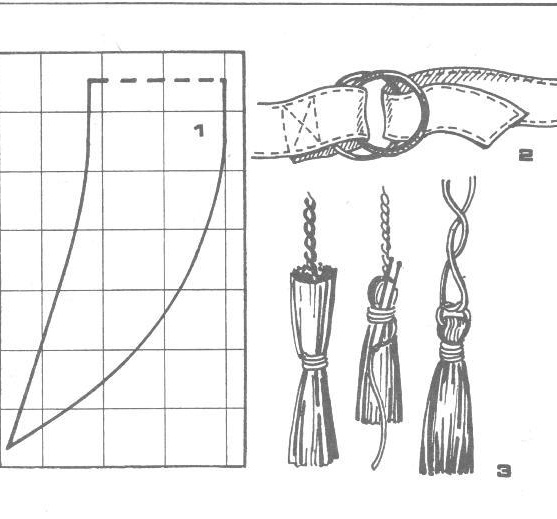
VII model - slippers such as moccasins (soft shoes), where the toe is formed using assemblies or tucks. The work goes in the following order.
1. Hide two identical parts from the main fabric and the lining.
2. Fold part 4 with the lining facing each other and sew the part that will be the “tongue”. Turn the part open, iron the seam.
3. Fold part 3 with the lining facing out and sweep each other along the edges and in the midline so that the fabrics do not move. Lay and tighten loose tucks well.
4. Sew the main seams of the slippers - two back and top, connecting parts 4 and 3. Depending on what material the slippers are made of, this can be done both on the hands and on the machine. If the fabric is thick and does not crumble, sew the seams along the face on the hands with a seam across the edge with a cross. For thinner fabrics, work on the machine with a seam. To do this, first make a stitch on the wrong side at a distance of 0.5 cm from the edge, and then a second line along the face at a distance of 0.7 cm from the edge. As a result, seams in the form of scars will be obtained on the front side. Since it is difficult to scribble these seams on the machine, we recommend partially doing the work with your hands.
5. Bend the edge of the slippers inward by 1.5 cm and hem the stitch “zigzag”. Insert an elastic band or cord inside and gently pull off the top of the slippers. At the wig points, make fasteners of strong thread.
6. Inside the slippers, insert insoles or, as in the first model, sew pieces of leather to the soles.
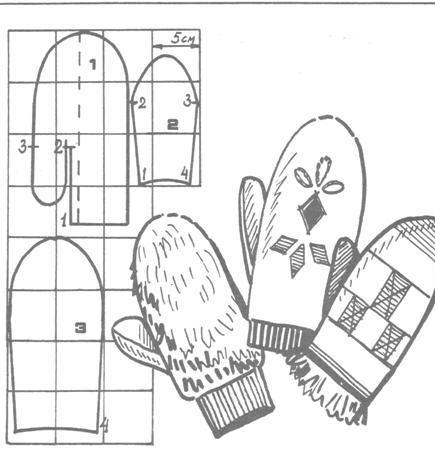
VIII model - winter hat and mittens (Fig. 8). We recommend making the head of a hat made of leather or suede. Hide six wedges for the top and lining, adding 0.5 cm to the seam. Sew the wedges with each other, stacking them one on top of the other. Take 0.5 cm to the seam, and make a stitch along the very edge. Use glue instead of basting. Stitch the lining with internal seams and attach to the finished head. Sew a fly band first on top, then, having rounded the edge of the head, attach it to the wrong side of the cap. Sew a fur swab upstairs.
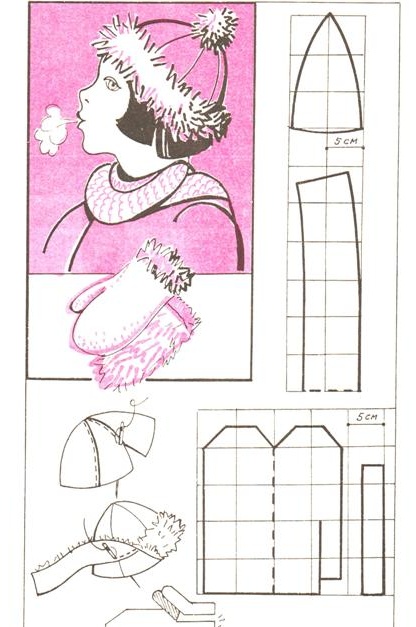
In the kit for the cap, make mittens by sewing a piece of fur to the finished mittens from the outside. Mittens can be sewn from dense, crumbling knitwear and fur. Pattern in figure 9.