» Topics » Advice »Installing an exhaust hood with an external ventilation duct: it turned out well

Installing an exhaust hood with an external ventilation duct: it turned out well


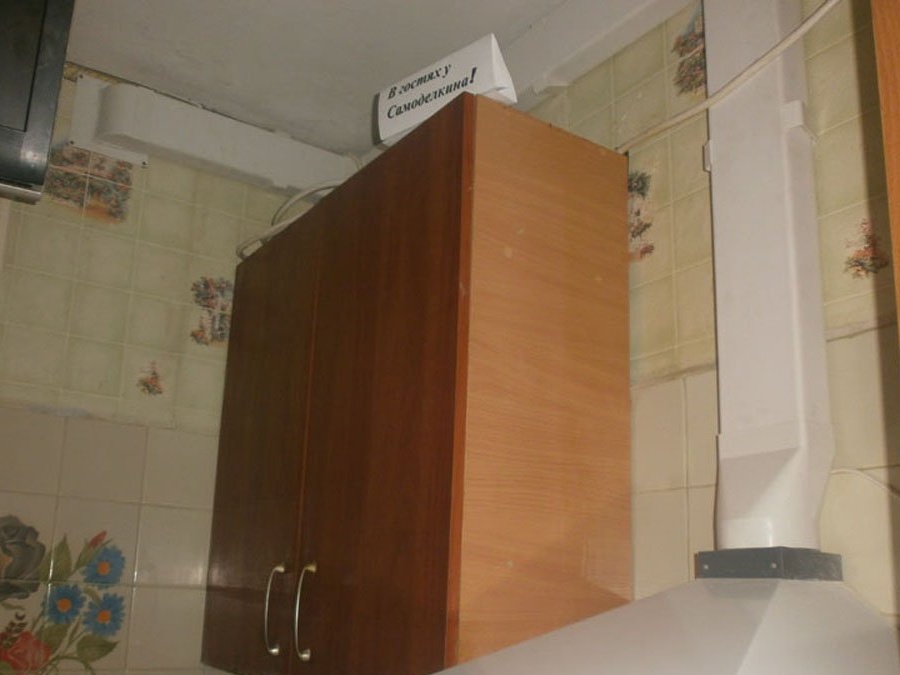
Decided, morally and financially, to replace the kitchen. I drew a sketch, counted the cut, was already ready to order it ... But a friend who has “part-time” his own cabinet-making workshop of furniture suggested: first hang the hood, if you plan to make an external ventilation duct, then everything else. Practice shows that almost certainly the final drawing is no, no, but corrected a little. Looking ahead, I’ll say that my case is no exception.

But I got a little distracted. I chose the hood, so there was practically no alternative. I did not find detailed reviews on it, so I bought it at my own peril and risk. And on the other hand, its price does not “bite” at all, so I ordered it.

But while she was walking, I came to the conclusion: I do not want to use the classic ventilation corrugation, which means that installing an external ventilation channel turns into a “choice without a choice”. Moreover, the seller of the elements, in order to lay it, turned out to be not a “kettle with a whistle”, but a competent owner of the corresponding assortment, who advised well and in detail. Actually, this entire master class is based solely on his advice and recommendations.

In my case, the ventilation shaft in the kitchen, and the place where the stove is on adjacent, but still different walls.

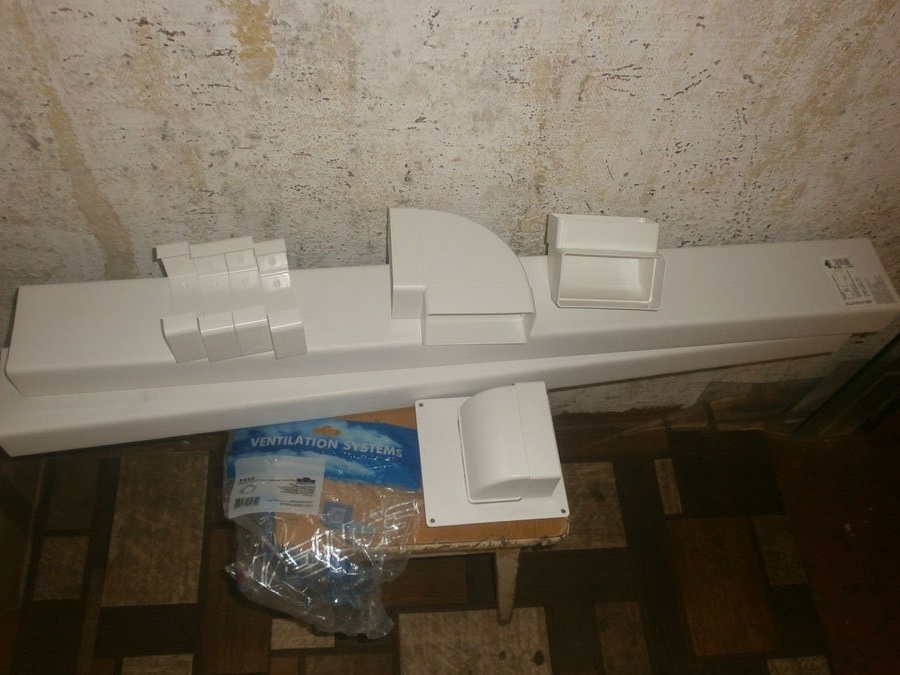
Therefore, I had to buy:
• three pieces per meter of the box: section size 50 to 100 mm for a four burner stove is enough with the head;
• one circle-rectangle adapter from the hood to the duct;
• 2 + 1 angles of 90 degrees, allowing you to bend the box;
• five mounting brackets for the box from the same plastic;
• wall overlay;
• 14 screws and the same number of dowels.

Plus - two tiny self-tapping screws and a sealant: why they are needed - at the very end.
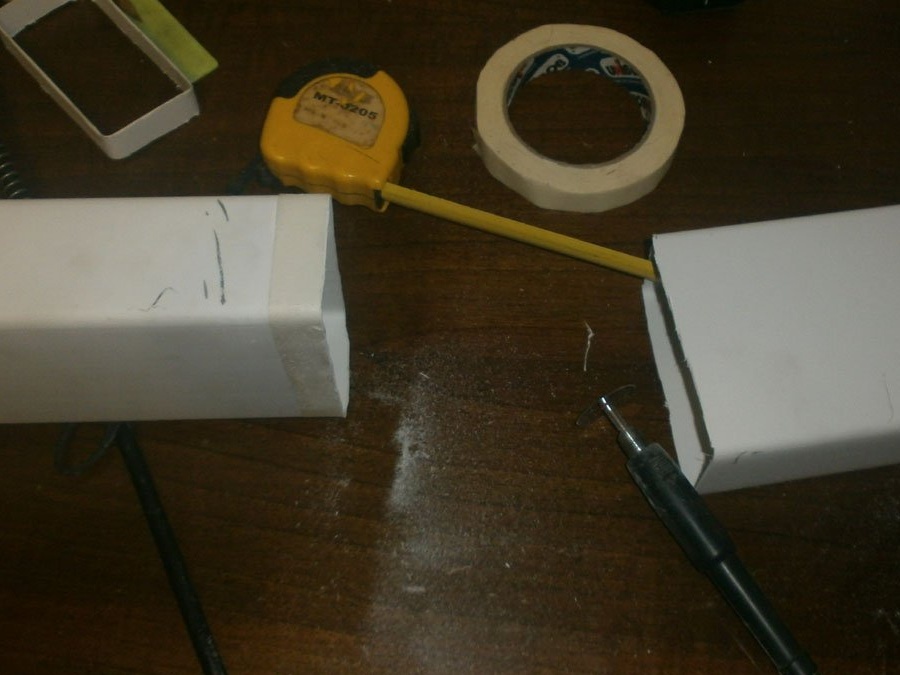

Of the tools used:
• drill with a drill;
• a screwdriver with a cross head for twisting - you can get by with a screwdriver;
• any hacksaw that can cut plastic; and masking tape to mark a straight line;
• tape measure, level, pencil and marker for marking;
• screw the screws with a screwdriver and hammer in the dowels with a hammer;
• glue the pad and one corner with “liquid nails”: in principle, any other glue can be used.

That's all.
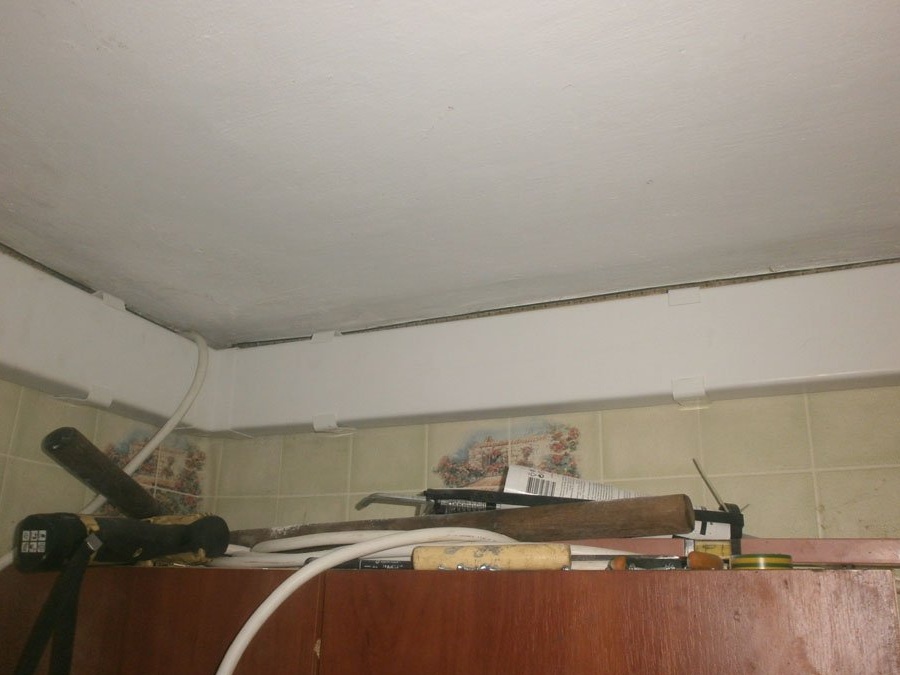
We start directly from the hood itself. Installation - as simple as possible: two self-tapping screws.

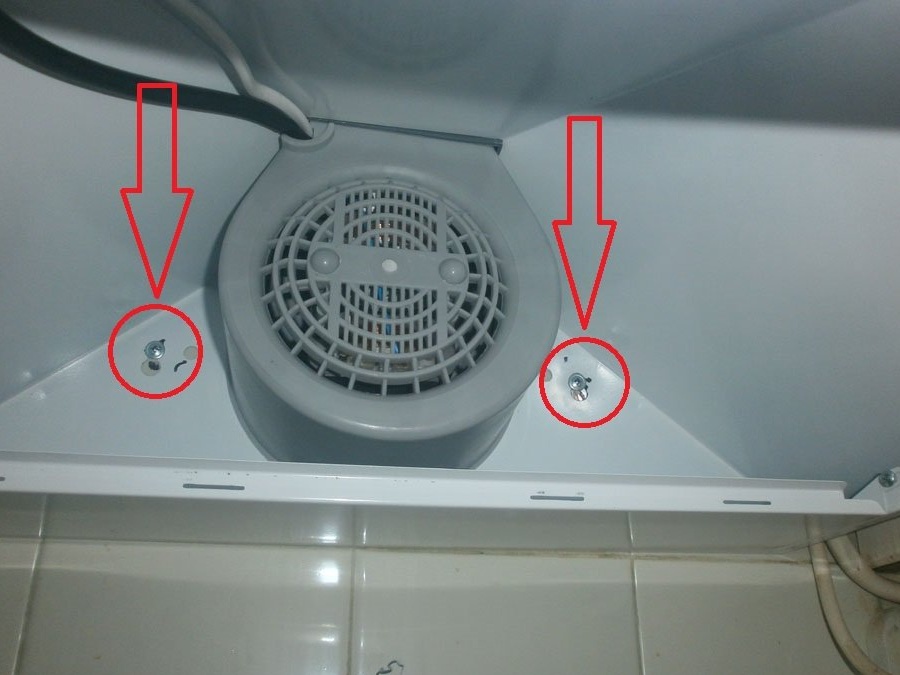
Directly, the hood burns-works.Now we turn to the box: the device from the kit that does not have a back wall at all causes at least a smirk from such a manufacturer’s saving.

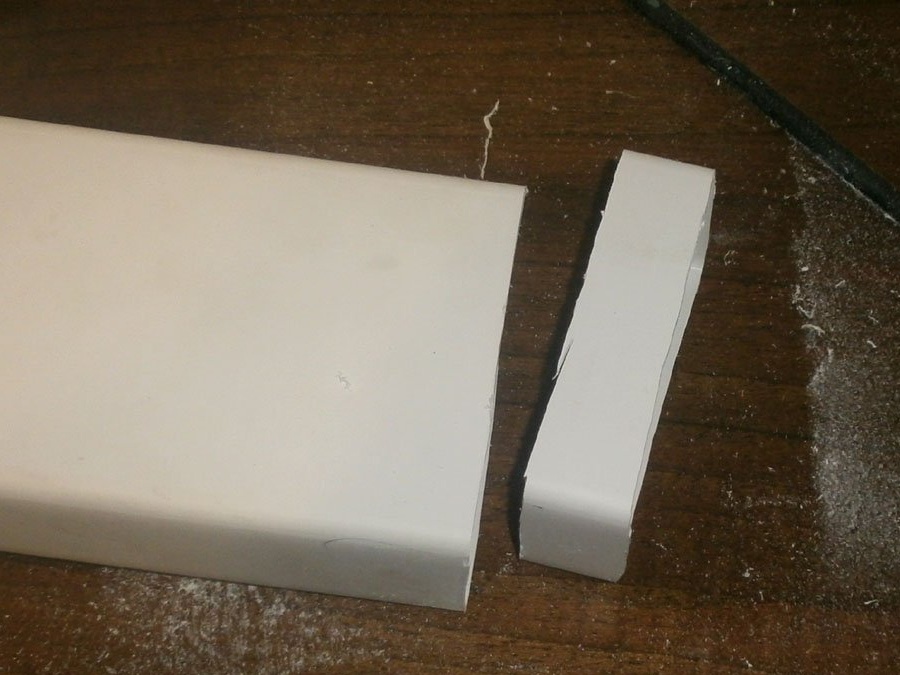
Cutting plastic is incredibly easy

and the first piece of wire was ready in a minute.

Just figuring how he would go further, he realized that he should not go under the very ceiling, 3 cm had to be retreated so that the overlay on the wall fit without distortion and it was easier to drill holes for it.
No sooner said than done: minus three centimeters.

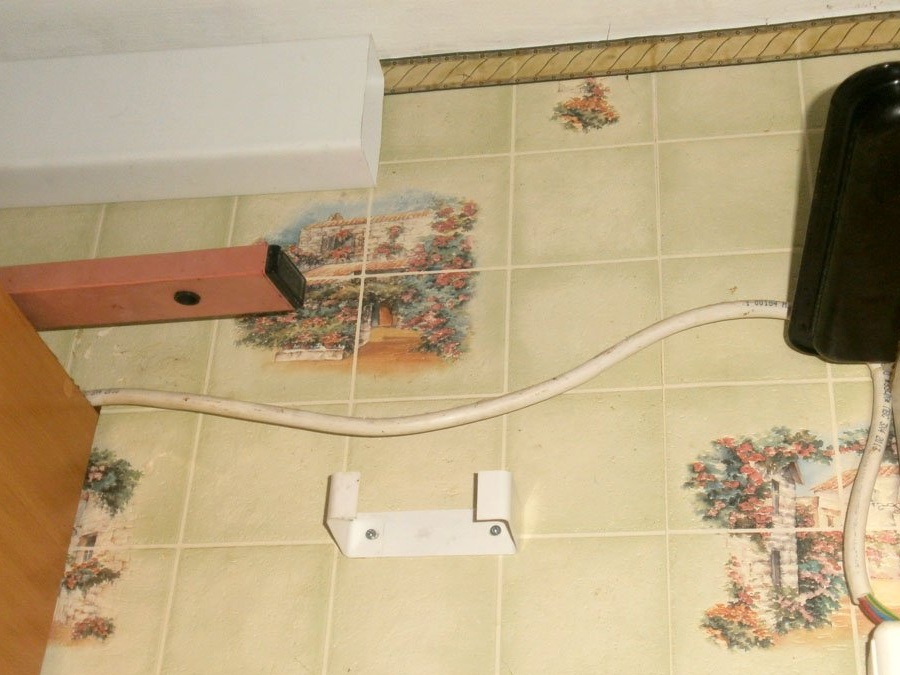
By the way, there’s a bit of a hole for the corner attached to the wall, but I still had to modify it: the hole in it is designed for a box, and I will insert a corner that is a bit wider.

Used “liquid nails” for fastening: that's all, even the smallest crevices, it completely seals,

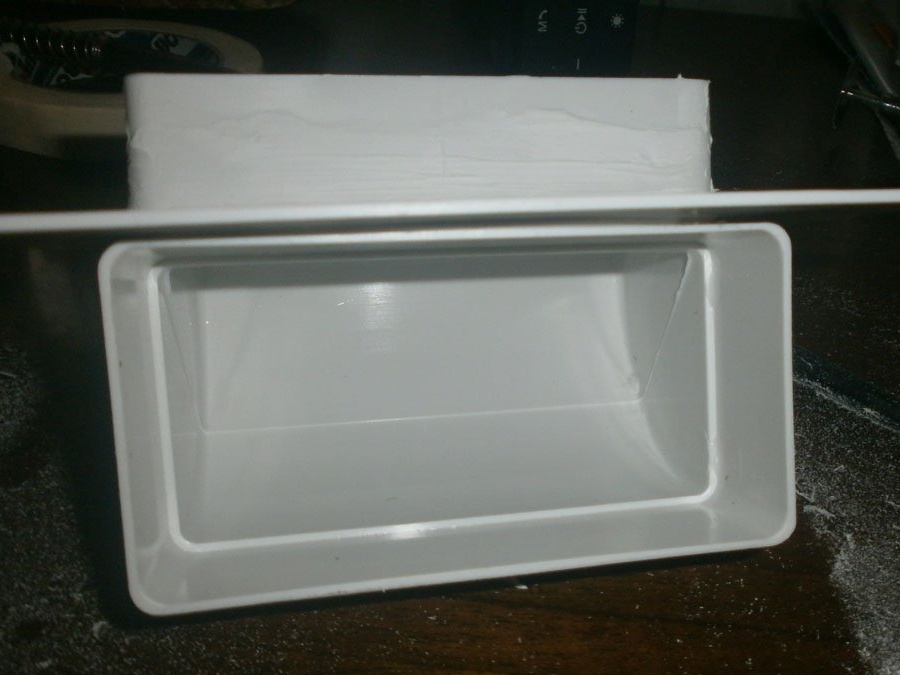
and when dried, both parts will become one.

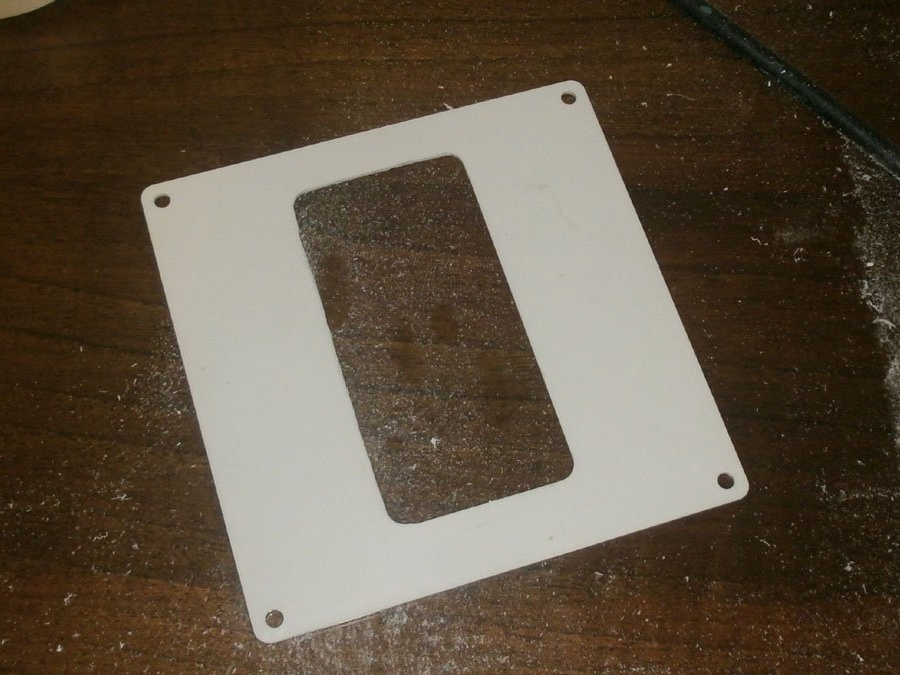
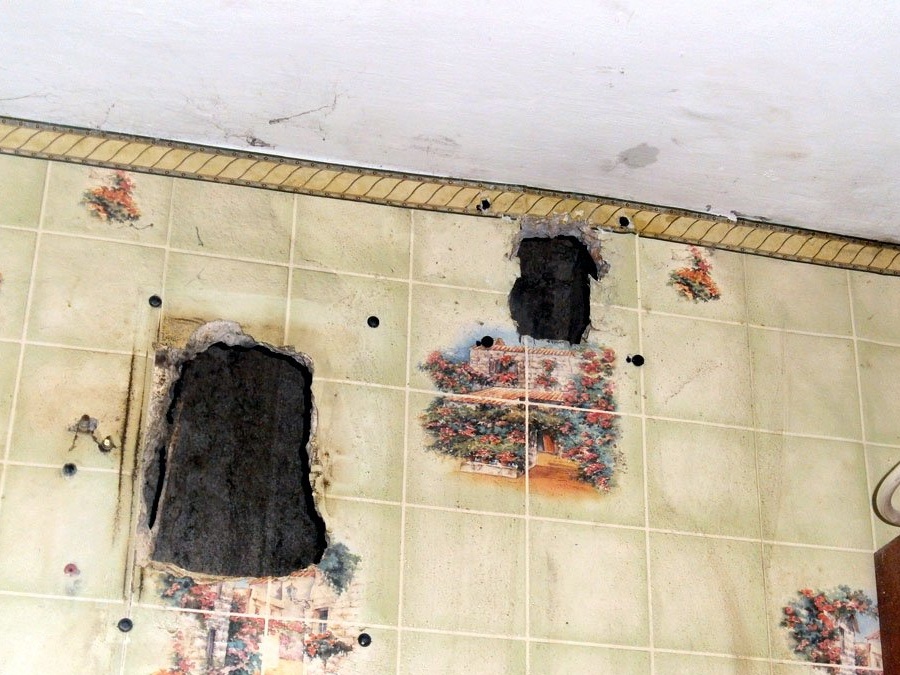
The part is ready, now it’s worth making a hole under it in the ventilation shaft.

I did not use the one that is already there, but made another one. Moreover, given the very thick wall, it took quite a bit of time.

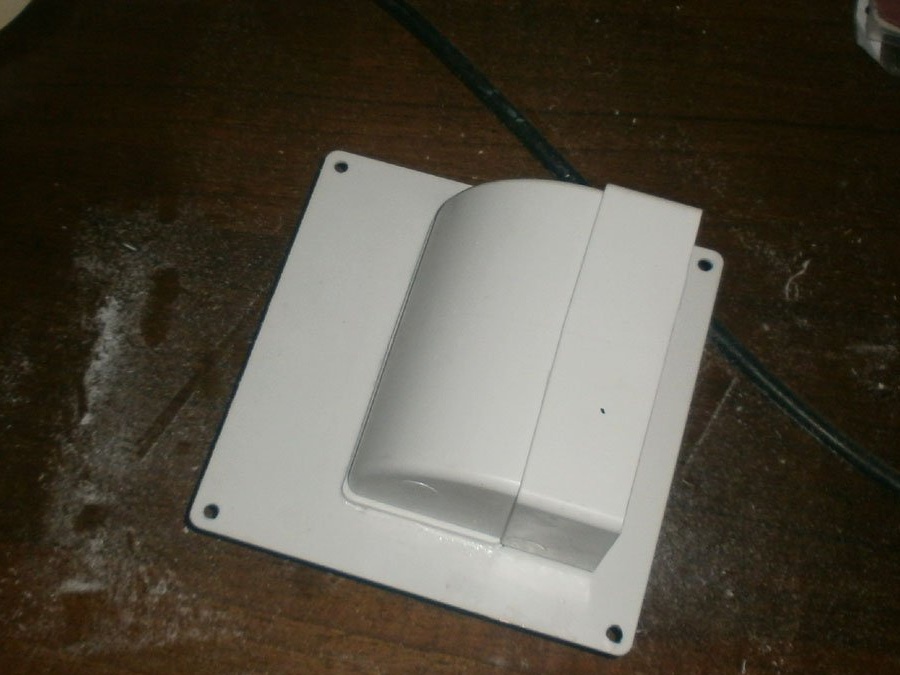
Now we apply it to the wall and mark four mounting holes. We drill the bulls and insert the dowel.

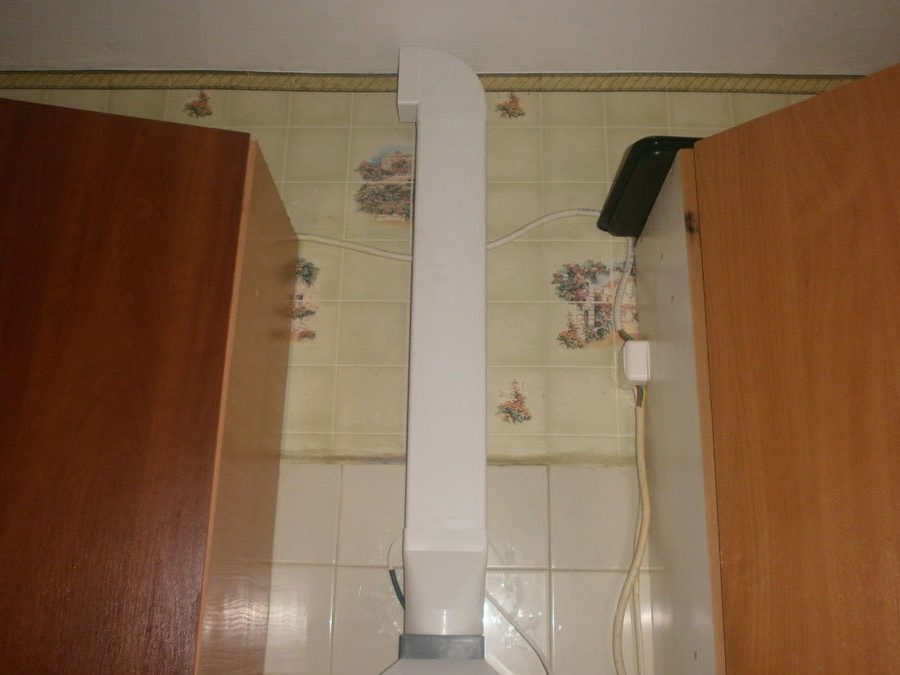
We fasten the overlay on the ventilation shaft.

Mount the ventilation shaft. Where the fragment length is about half a meter, one eye is enough,

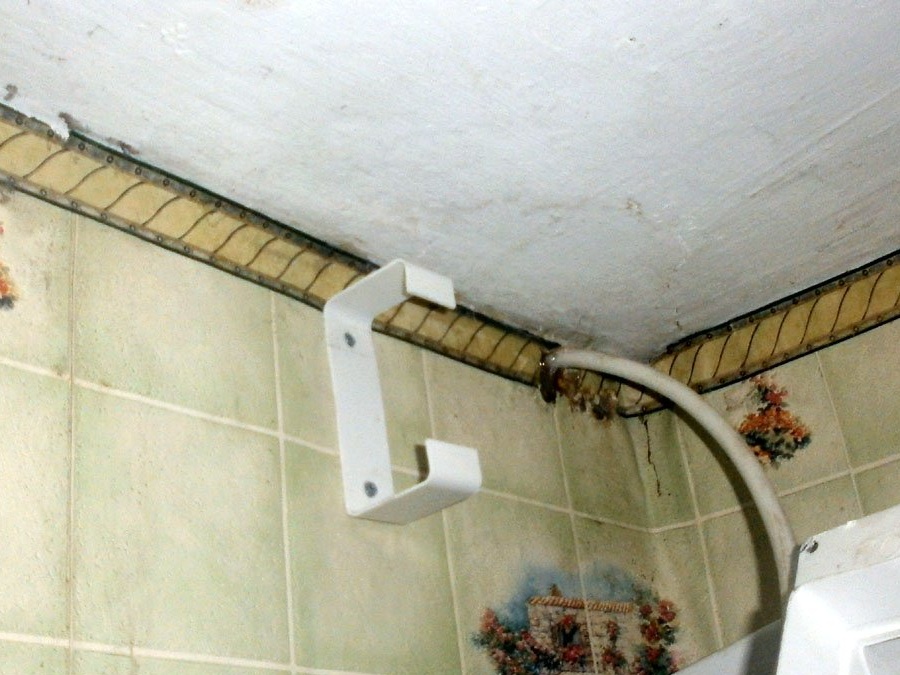
and where more is better to use two.

Moreover, as the owner of the store suggested, where I bought all these components, during their installation you need to move in the opposite direction, from the ventilation shaft to the hood. I did not begin to clarify why this was so, but simply follow the recommendation.

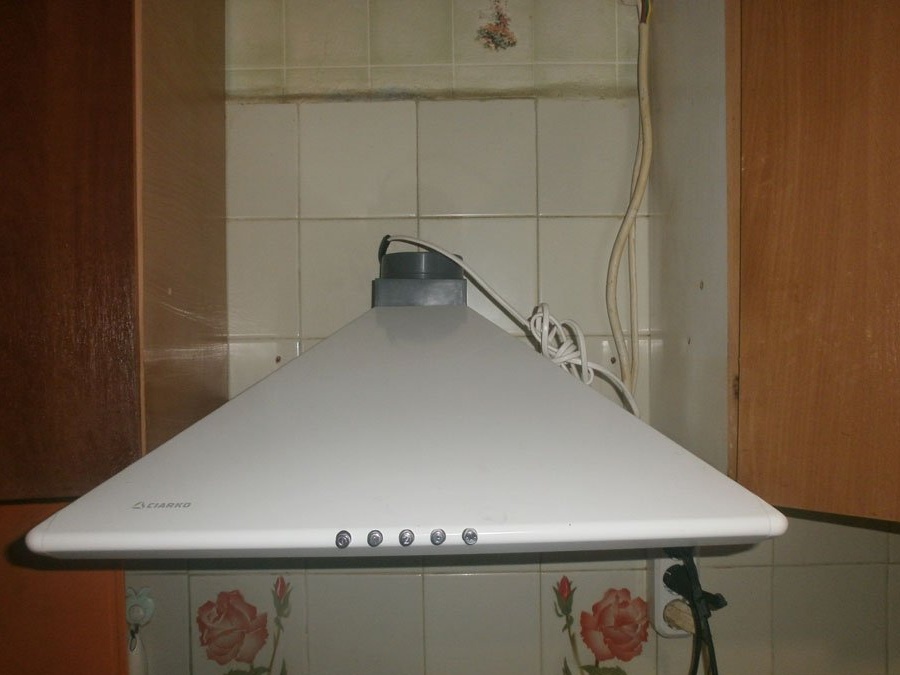
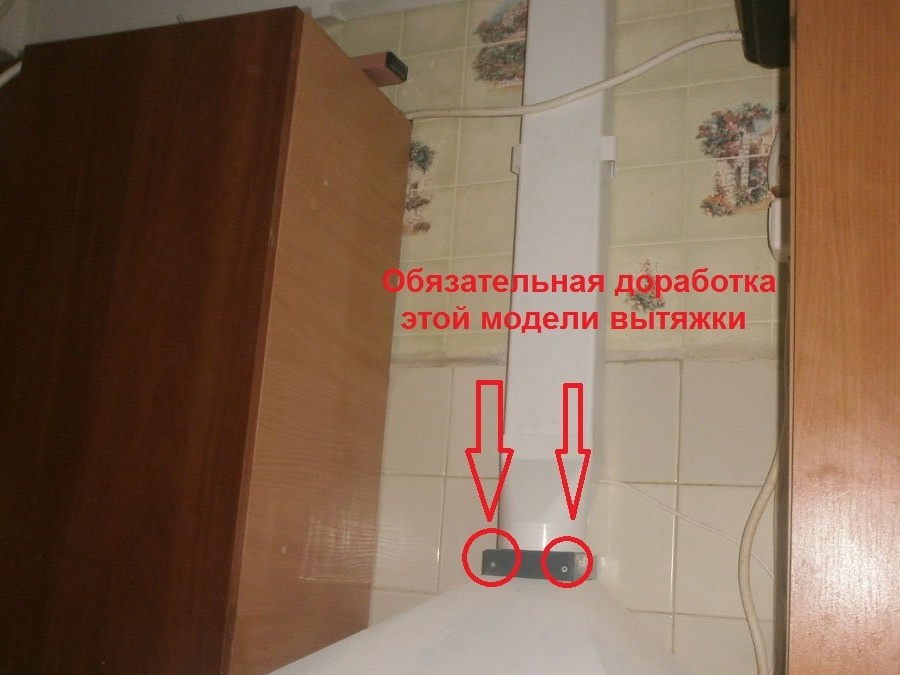
The final part of the box is connected, you can insert the hood into the network and try out the result.
But the first test on the second (this model has three) showed that the vibration is crazy. Moreover, the hood itself is screwed very tightly to the wall, you do not even need to lay a strip of sheet rubber to reduce vibration.
And the hood rattles here:

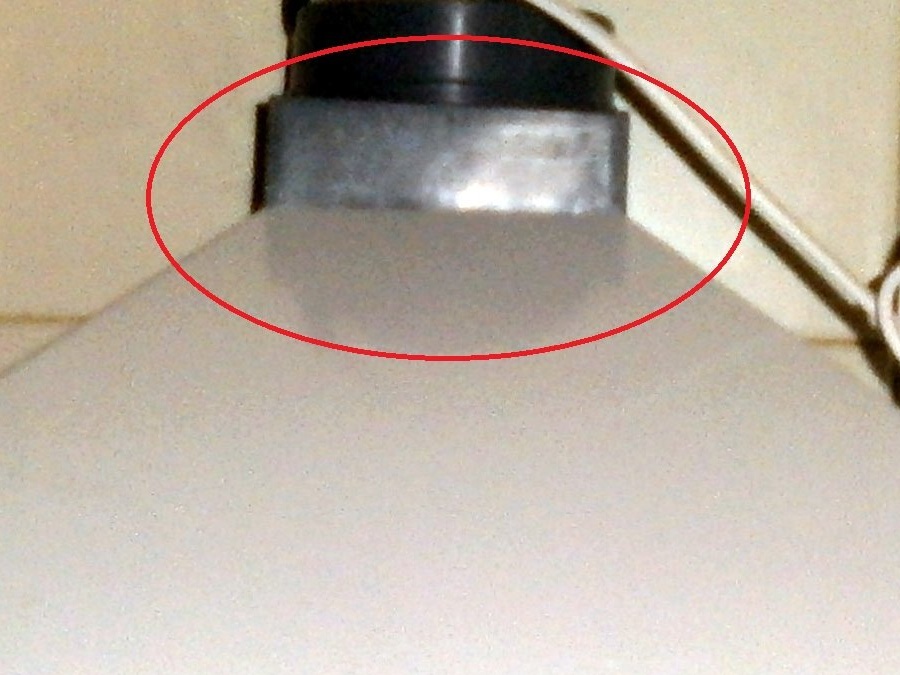
Therefore, the simplest option is to grease the joint with a sealant and tighten two small screws. After such a simple refinement, vibration and noise emitted during operation decreased significantly.

The installation of the hood and the installation of the ventilation duct were successful.

And at night, one more refinement came: between the ventilation shaft, the mounted duct, the hood itself there is only one filter: directly, in the hood itself. The wife, just panicky afraid of cockroaches and other inhabitants of the hidden corners of the house, demanded to do something with this.

The idea was born by itself: a grid is put on a piece of the box (I took a piece of non-woven fabric, the same one that is sold in a sewing store, although a piece of women's tights is great for this role),

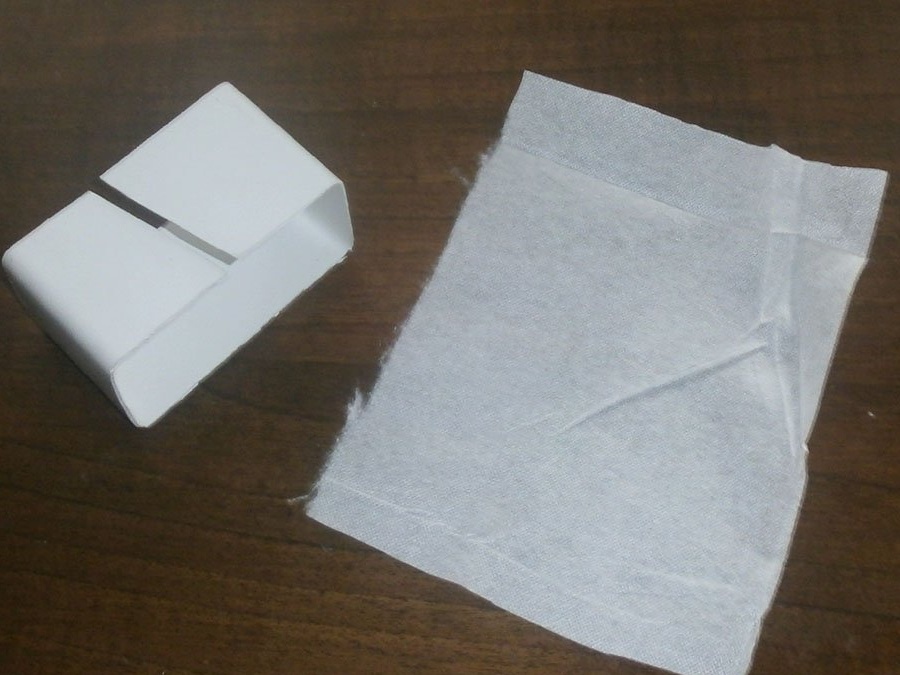
and inserted from the inside of the box:

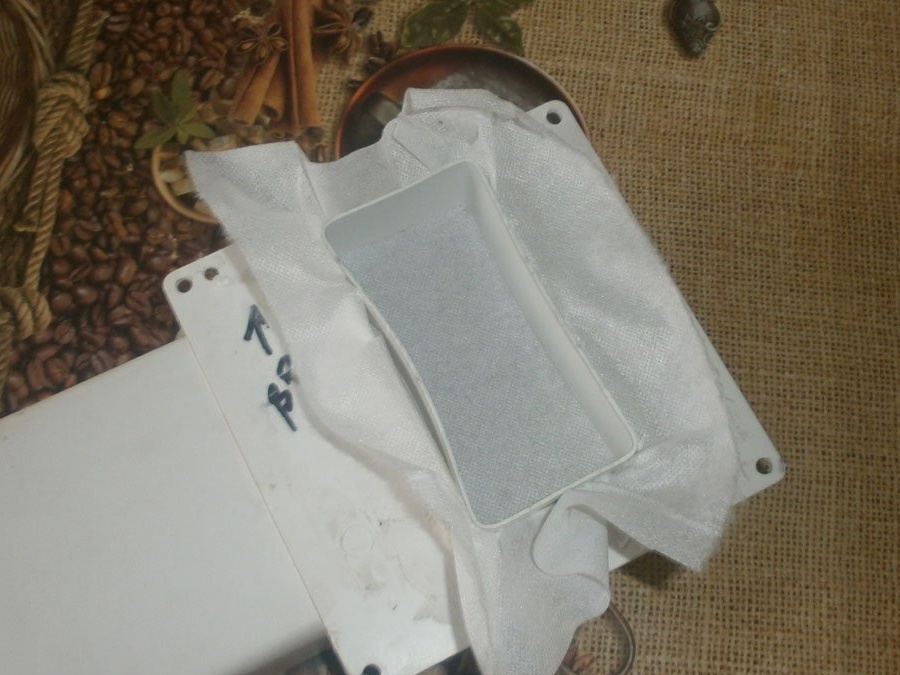
But as I later realized, even it could not be removed, but crawled through a regular ventilation hole. Anyway, several times a year I remove the ventilation grill and either wash it or simply change it to a new one.

So if the labor costs for the routine maintenance of ventilation were added, then it is not very strong. Now in my case it’s worth adjusting the sketch of the kitchen and ordering the appropriate cut.

Suitable for topic

Related topics

Add a comment

    • smilesmilesxaxaokdontknowyahoonea
      bossscratchfoolyesyes-yesaggressivesecret
      sorrydancedance2dance3pardonhelpdrinks
      stopfriendsgoodgoodgoodwhistleswoontongue
      smokeclappingcraydeclarederisivedon-t_mentiondownload
      heatirefullaugh1mdameetingmoskingnegative
      not_ipopcornpunishreadscarescaressearch
      tauntthank_youthisto_clueumnikacuteagree
      badbeeeblack_eyeblum3blushboastboredom
      censoredpleasantrysecret2threatenvictoryyusun_bespectacled
      shokrespektlolprevedwelcomekrutoyya_za
      ya_dobryihelperne_huliganne_othodifludbanclose
25 comments
Akril
..and then came the controllers from the gas office and said to remove all this fucking fuck .. the end of the story.
Guest Vladimir
For such interference in the engineering systems of an apartment building (MKD), real terms must be given. People live around you and drive their stink into their apartments by forced exhaust, well, somehow not in the neighborhood and, in general, is a reconstruction of the MKD (changes made to engineering networks) and can only be carried out with the consent of all owners. Direct road to court.
Author
and a hood, not 600 but 500 wide.
Facades - plastic in the hem.
Author
I repeat: I will not argue for sure. I’ll do it, I’ll post an article, and there I will express myself.
Please write me a magomed-amir dog mail dot ru
and 21 - in depth

This is strange !!! Depth of wall cabinets - from 300 tons !!! Otherwise, they are not needed in the kitchen))))
.
The hood took a mantelpiece, pyramidal type, not flat. So, you have to make some kind of transition from it to the cabinets: well, do not do the same hinged depth of 500 mm.

Why make them 500? Make a standard depth of 300 mm. It will simply be, as usual, transversely located. The hood is the same standard (600). She just goes into the square cutout at the bottom of the box and partially hides there ...
width top I got an additional cabinet 730 mm wide and 21 in depth. As you know, nothing standard of such sizes is released.

Well, firstly, the width of the top is the same as the width of the bottom below it !!! Cabinets are always symmetrical !! Otherwise, it’s not beautiful! That is why the standard "kitchen step" is 30 cm! Doborny - 20 cm. So you can choose a cabinet above (under) any equipment - stove, refrigerator, range hood.
The last cabinets you had to do "30 + 20" cm, (You can have one with asymmetric doors, you can have two separate ones. Well, certainly not 73 cm! 3 cm on the length of the kitchen can be completely "lost" ... (By the way, which Facades Are you going to hang?
Good day, Valery!
I do not have the opportunity to write you a personal message. After reviewing your work, I came to the conclusion that I should contact you for a proposal that I hope will become interesting to you. Please be so kind as to indicate your email or phone number (vatsap, vibera) in your reply letter (comments) [/ b]
Author
and so, according to a new sketch, the width of the upper additional cabinet I got 730 mm wide and 21 - in depth. As you know, nothing standard of such sizes is released. In any case, when I make the kitchen, I will post an article about this on the same site.
And About to hide completely the boxes - you can’t do it well. The hood took a mantelpiece, pyramidal type, not flat. So, you have to make some kind of transition from it to the cabinets: well, do not do the same hinged depth of 500 mm. Nothing better than making shelves (one or two, as it happens), did not come up. And since they will not have a back wall, then the box will be visible.
I will repeat, I will make a kitchen - appreciate it.
Author
exactly missed
That's how it happens!)))) And they "missed" the same thing! ... Well this is not according to the norms ...
Some strange conclusions, to be honest ... What is your strange love for putting boxes on display? Although the box, even the corrugation, there is one rule - they SHOULD NOT BE VISIBLE !!! You do not live in the workshop))))). And if they are not visible - what's the difference, is it a corrugation, or a box? Sorry, but any fume hood in sight is, in my opinion, squalor !!! Well, can’t you really hide them if you are doing everything from scratch?
Of course, if you do not select an option from the finished ones, but do it to order.
Now imagine if an open hole with a size of 50 by 120 mm gaped in your brand new kitchen: to put it mildly, not ice.
What such a hole can turn out ??? Even from ready-made modules, it is tightly selected for the entire length! Leave a MAXIMUM of 10 cm at the far end. (Sometimes curtains are then hidden behind them, if any.
After all, there are upper hinged cabinets, and additional ones - 20 cm each.
So I say - first a headset, and then air ducts. And, depending on the design of the headset - either in the far horizontal corner, "on the roof" near the wall, or lift up to the ceiling and decorate there. (For example, I made a suspended ceiling made of drywall over the headset and laid a box under it. It protrudes figuratively above the working area and the backlight is mounted in it.)
The lower boxes are also In the "monolith".And for any then covered with a single countertop. (With them, the formation of the kitchen set begins). And already under them the top ones are selected ...
And even more so, if you make it to order, or yourself !!! Well, really there was no way to hide these boxes ???
Author
corrugation, terrible, terrible? No thanks. Mom, where she stands, saw the box and asked her to do the same. As for me, everything is clear.
And about the headset first, and then the hood: nonsense. Of course, if you do not select an option from the finished ones, but do it to order. By the way, after installation, I had to greatly adjust the sketch: one cabinet became wider by 50 mm. Now imagine if an open hole with a size of 50 by 120 mm gaped in your brand new kitchen: to put it mildly, not ice.
Author
So what? I take off the ventilation grill two or three times a year, a little more body movements, and that’s it.
Author
did not guess: joints (which I did not use), corner-turns - with a larger diameter. A box on the contrary, with less. And they are inserted into the corner-joints.
And why I do not move from the mine to the hood. By the way, the joints are tight, so even without sealant, nothing siphons from them. And the length on which they are inserted (specially measured) is 34 mm and a small overlapping emphasis. Made really simple and reliable.
Twisted in a hardware store another option, there yes, indeed, the whole structure is assembled "Christmas tree". I didn’t like it at all.
Author
I agree to all 100%. When the neighbor above smoked in the TOILET, it also stank in my apartment. But again, in the toilet.
Author
the ventilation duct itself in the wall, and not the grate, is wide and occupies the entire wall. And yes, the lattice in the wall of the neighbors is shifted. Here are just the box itself at the entire riser, both at the neighbors above and below me - ONE. I know all the rules and regulations, but here is such a "gift" from the builders who were building my house.
When I sawed a hole under the box, through the hole from the removed ventilation grill, from the inside, I held the cut piece so that it would not fall into the shaft. How is this possible if the ventilation was designed-made in accordance with all the rules?
And what are you talking about, separate channels for the 1-4-7, 2-5-8 and 3-6-9 floors in my house are done. But only - in the TOILET. And in the kitchen - a single ventilation duct. he even specially removed the lattice and photographed the box up and down: he, MADE AT ALL THE WIDTH, cannot see the end and edge.
So I know what I'm talking about and what I’ve done.
the solution squeezed out the grate, and in addition to sticking the whole bath, he also tightly sealed the toilet !!!!
Figuratively presented the picture: a man sits on the toilet, and then on his head ... xaxa
And you did not start from that !!! First you need to mount the headset !!! And then let the box not under the ceiling, for all to see, but on the "roofs" of the upper boxes, near the wall !!! Where they will not be visible. (By the way, then you can put an ordinary corrugation ... And do not fasten it to the wall ... Just lay it in a corner)
But "we are not looking for easy ways!" )))))
Thus, he shared all the smells of his kitchen with at least one neighbor living above. Unless the author has the last floor.
Or all the sounds from your kitchen with a neighbor living below, even if it's the top floor !!! ))))

And about the wise men who cut their own ventilation, wherever they want, I also had a story ... A friend complained that the neighbor from below constantly smokes in the toilet. And then he smoked not only the toilet, but also the corridor. (And he feels the “more natural” neighborly smells in the toilet so that he can’t always go in there himself ... (And the house is new! Just put into operation!) I told him that, most likely, the builders cheated on installing the vents - boxes - they did not condense with mortar, or the broken edge was blinked in. A professional builder was present during the conversation (he worked on the construction of this house, and he got an apartment in it).He confirmed my words and advised taking out the grate and throwing a bucket of a sufficiently thick solution into the box. Not fluid, but in the consistency of thick mud. What did he do next Saturday.
And he helped !!!
As it turned out later, it did not help !!! Simply, the neighbors from below left on Friday evening until Monday, and didn’t "stink" therefore ... And when they returned, they sued him!))))
They re-planned the bathroom (made it combined), and cut out another vent. Hole, because the old one was closed with a closet! His solution squeezed out the lattice, and, in addition to slurping the entire bath, he also tightly sealed the toilet !!!! ))))
By the time of their arrival, the solution was seized !!!))))
They complained to the housing cooperative. They replied that they themselves were to blame - it wasn’t worth the illegal re-planning!
With a widespread-moronic excuse "So what? !!! What does it have to do with this ?!", the neighbors went to court with a claim for damages .... (Bathtub, toilet bowl, Italian tile, etc.)))
The court recognized his actions legitimate (he could not know about their violations, and therefore, did not know what would cause damage). And he was ordered to restore everything as it was and to pay a fine for unauthorized redevelopment.
I really know all these people ... I live now in this house.
The idea was born by itself: a grid is put on a piece of the box (I took a piece of non-woven fabric, the same one that is sold in a sewing store, although a piece of women's tights is great for this role),

Anyway, several times a year I remove the ventilation grill and either wash it or simply change it to a new one.

So if the labor costs for the routine maintenance of ventilation were added, then it is not very strong.

Strong! Now you have to remove the grate not several times a year, but several times a month. To change to a new one, or to wash off your interlining from fat. )))
Moreover, as the owner of the store suggested, where I bought all these components, during their installation you need to move in the opposite direction, from the ventilation shaft to the hood. I did not begin to clarify why this was so, but simply follow the recommendation.

Let me guess? Each next element is inserted with its end INSIDE what is already installed ??? (And, if so, then I’m not at all talking about whether it’s more convenient or not more convenient to mount this ...)))). I'm talking about the subsequent movement of gas inside))))
Sheer nonsense: ventilation shaft in 9/10 storey buildings - a single for the entire riser. Therefore, what to bring the hood into a separate hole, to use the same bore hole that is already in the kitchen, the same.


Absurd stupidity - what you wrote! Climb up to the neighbor from above and see where he has the grill. She is DISPLACED !!! Do you know why? Because it is embedded in another channel !! In Not in yours, but in the one into which your neighbors are also insidious from the bottom (as a rule, it alternates through two floors ... And already these channels are combined with the upper part with a single common one, which is from the bottom to the top.
Author
Sheer nonsense: the ventilation shaft in 9/10 storey buildings is the only one for the entire riser. Therefore, what to bring the hood into a separate hole, to use the same bore hole that is already in the kitchen, the same.
Thus, he shared all the smells of his kitchen

The main thing is not to forget to add “Shish kebab” flavoring to this hole-))))
I did not use the one that is already there, but made another one.

Thus, he shared all the smells of his kitchen with at least one neighbor living above. Unless the author has the last floor.

We advise you to read:

Hand it for the smartphone ...