» Fixtures »DIY valve expander

DIY valve expander


Today I will show my version of a very necessary tool when repairing an engine, this is a valve drier. When repairing the cylinder head, you can’t do without a dry oven. If you can disassemble it with improvised tools, using a hammer and tube, then it will not work to assemble in the same way. Although some craftsmen cope with this task with a wrench, I can not imagine how.

To build a dry oven, I need:
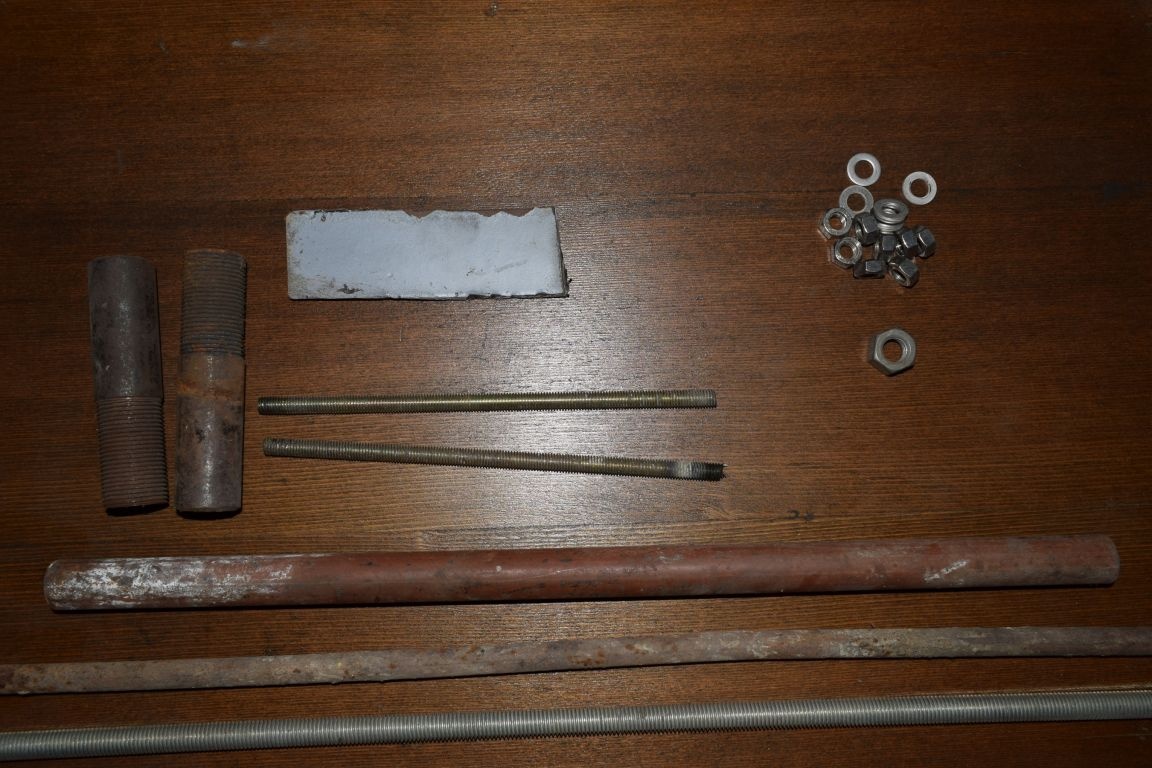
Materials:
  • iron pipe D20 mm. about 40 cm. and D25 mm about 20 cm.
  • two 8 mm studs.
  • one stud per 14 mm.
  • piece of strip 4 x 40 mm.
  • nuts, washers, 8 mm engravers.
  • 8 mm bolt.
  • 14 mm nuts.
  • grease

Tool:
  • welding machine, electrodes
  • Angle grinder (grinder)
  • spanners
  • pliers
  • hammer
  • and most importantly, good mood and straight arms.


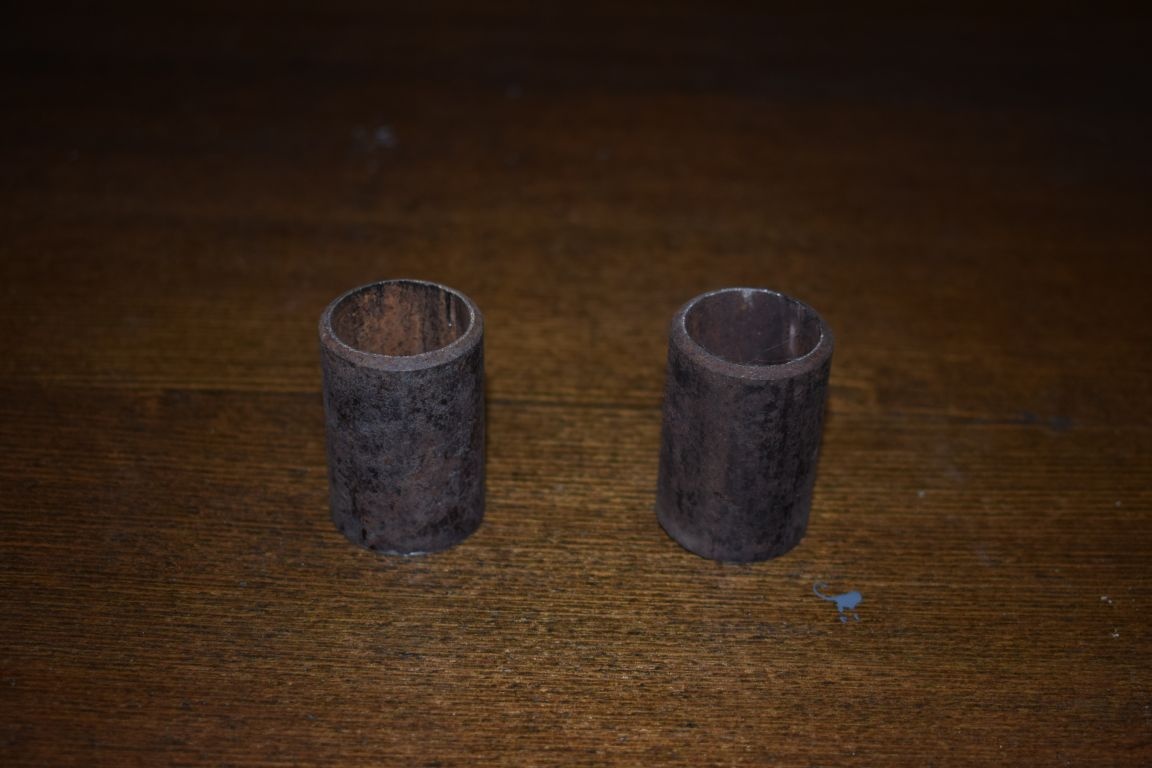
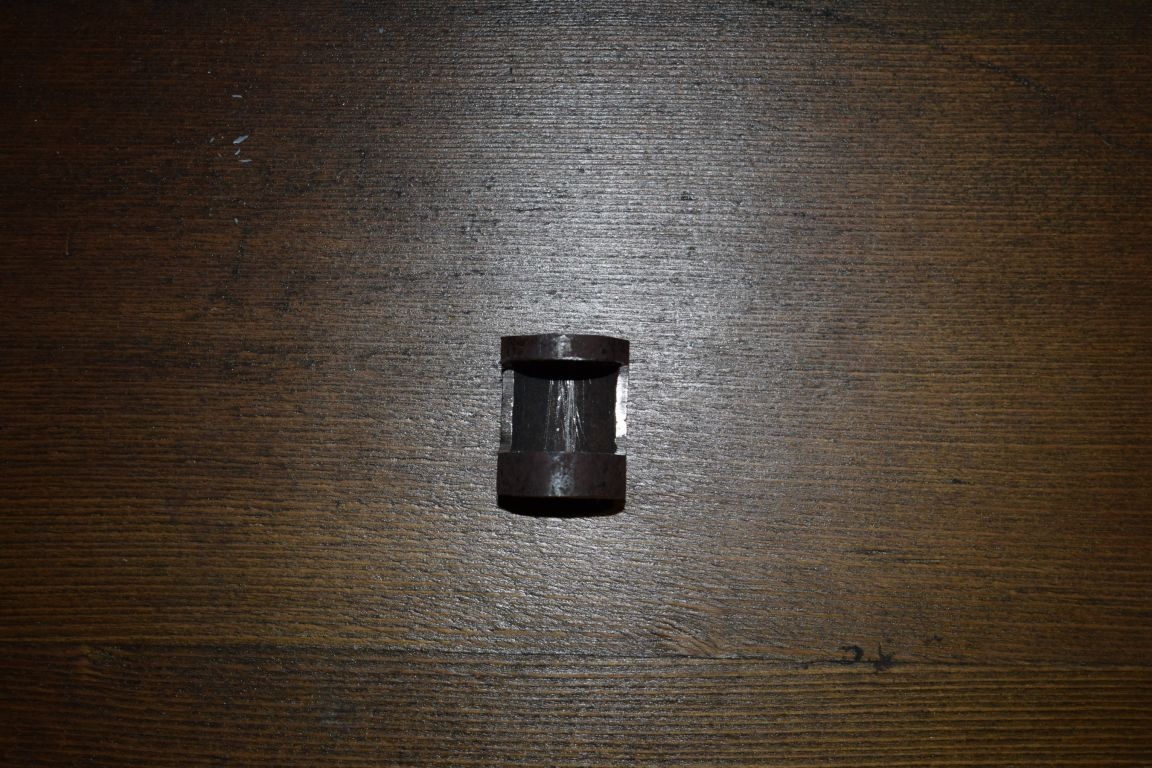
And so let's get started. First you need to cut two 40 mm tubes from the D25 pipe. (I did not find such a pipe at home, so I took the drives, they were). If there are droplets from welding along the seam in the pipe, they must be grinded off. You also need to remove the burrs at the cut site. A D20 pipe will be inserted into these tubes.


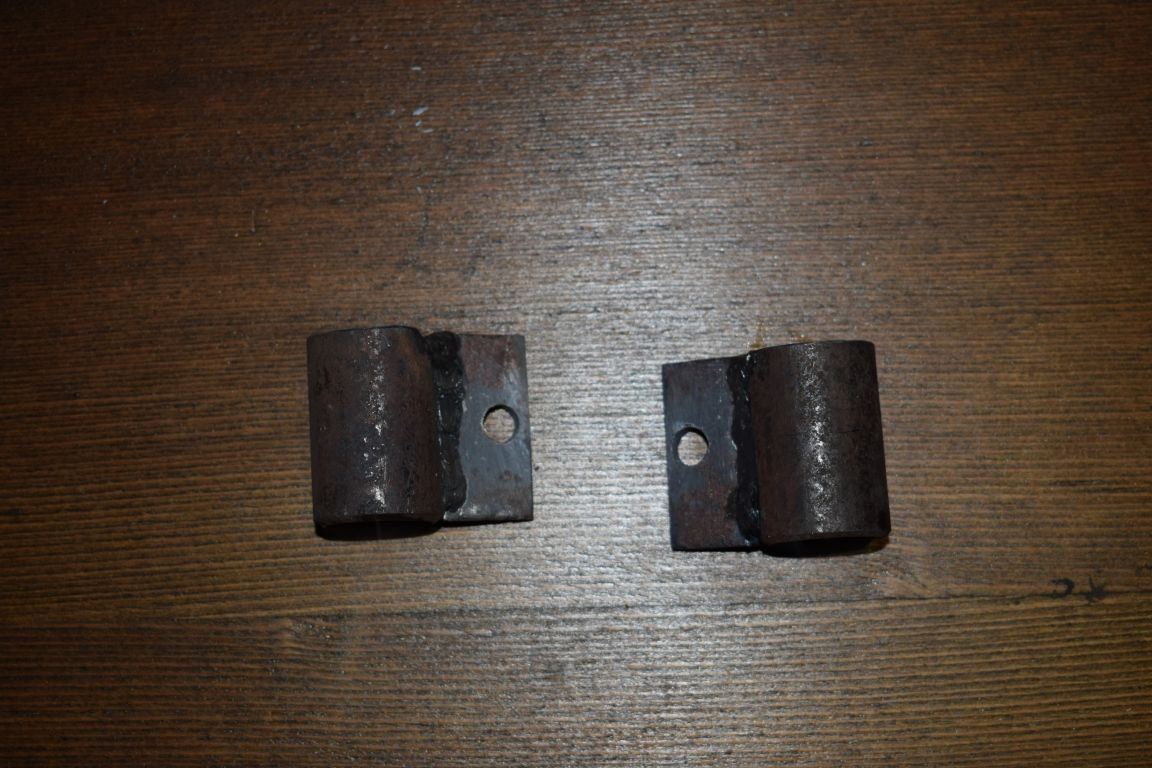
Now from a strip of 4 x 40 mm. I cut two pieces of size 20 x 40 mm. Drill holes of 8 mm in these plates.


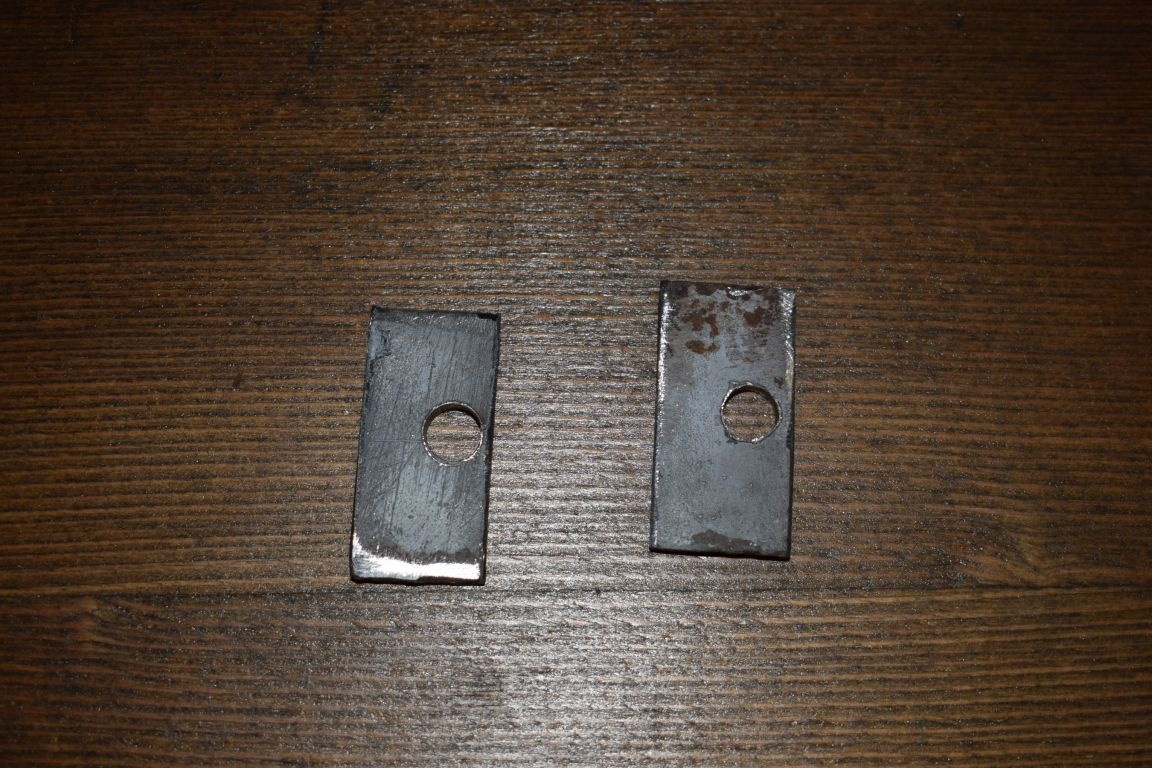
I weld these plates to the pipe D25. and set aside, let it cool.


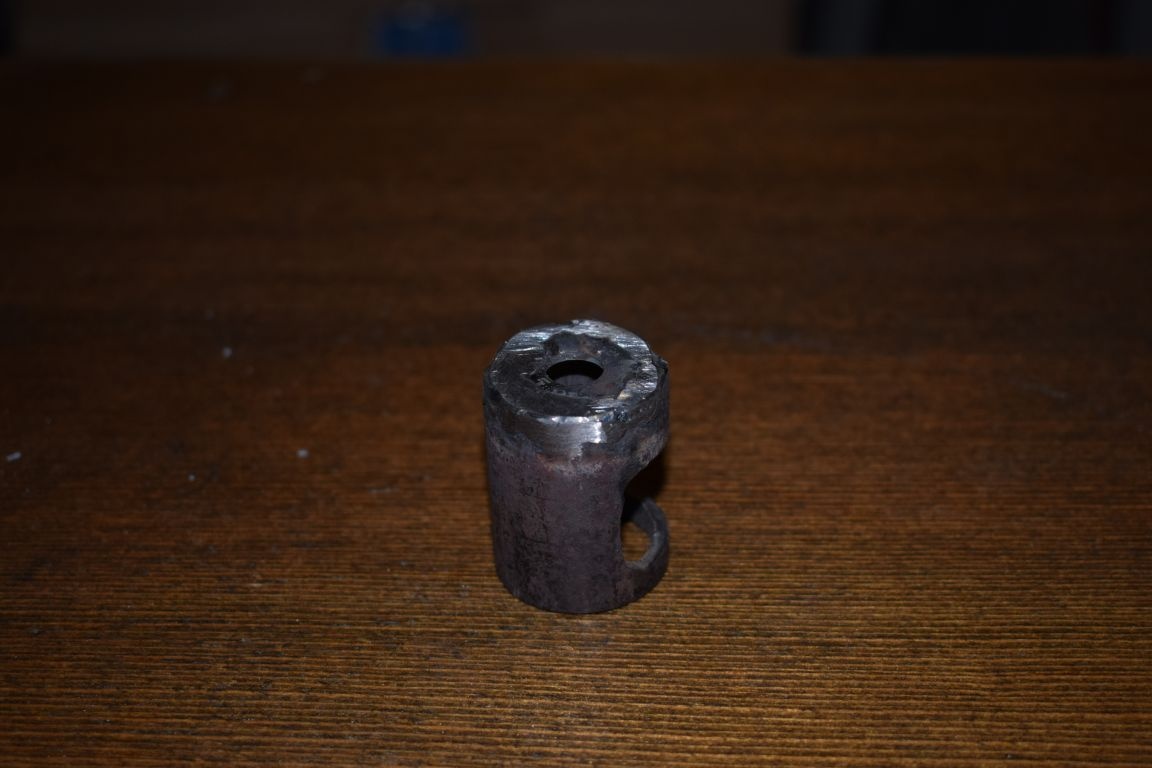
Next I will need another D25 tube measuring 20 mm. It also needs to be treated with burrs and welding droplets from the inside. A 14 mm nut must be welded to it.


Again I take a pipe of D25 mm. from it you need to cut a piece of 8 centimeters (I got less). This pipe will abut against the spring and compress. Therefore, it’s better to make it bigger, it will be more convenient to install “crackers”. I cut out a “window” in it.


I weld an enlarged washer by 8 mm to it.


I weld a bolt to 8 on a 14 nut, strictly perpendicular. I took a too long bolt, the extra had to be cut off.


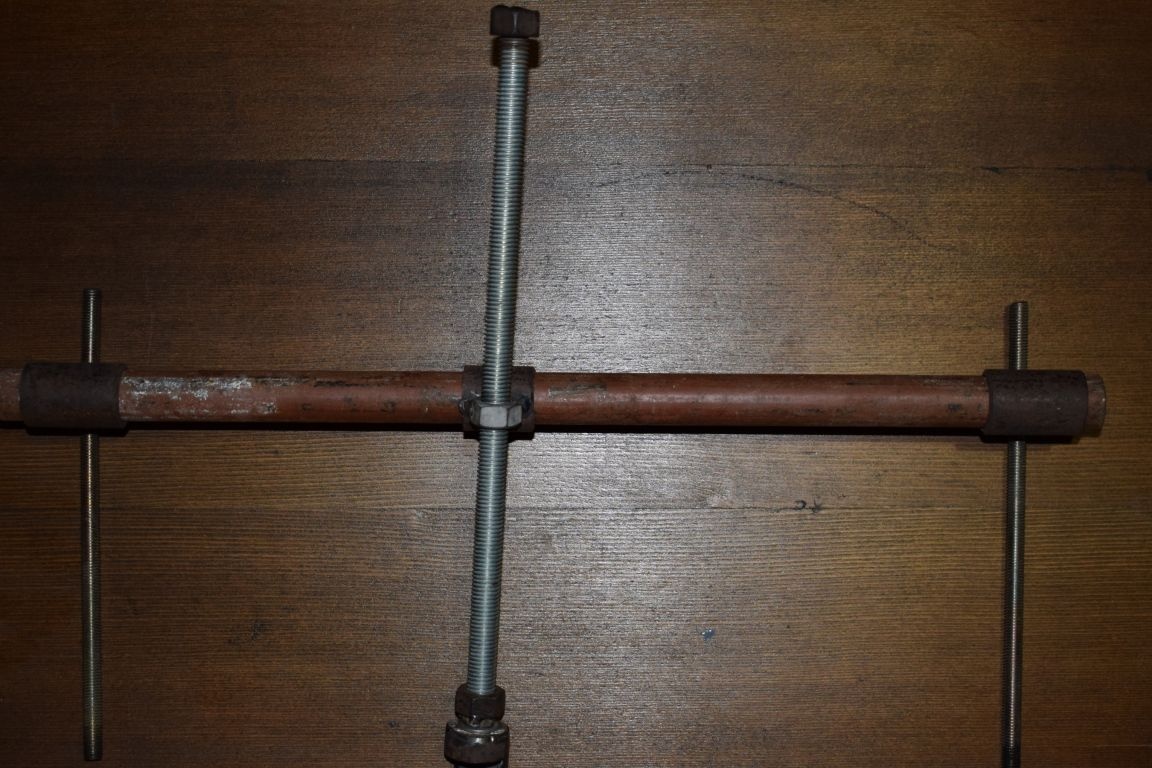
Now I collect this node as in the photo below.


Install the washers on both sides. I tighten the nut so that the tube can rotate freely. I fix the nut by welding.


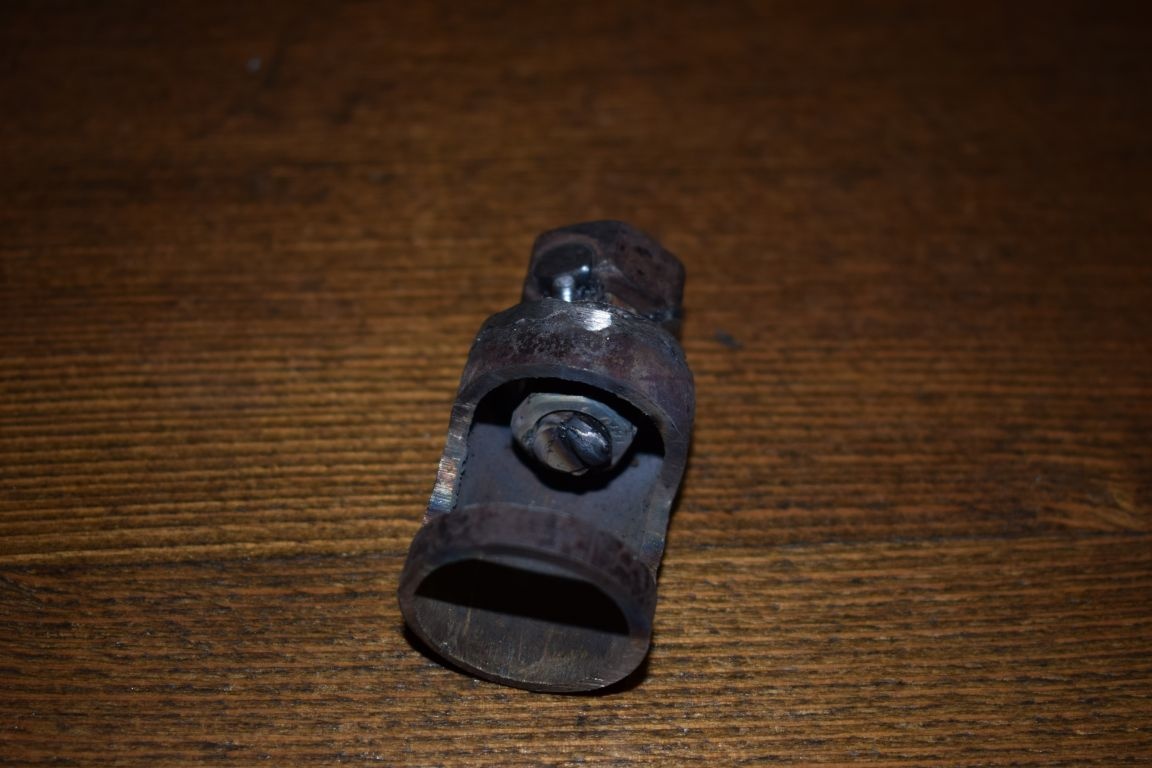
This compound is anointed with oil for better gliding.
On a hairpin of 14 mm. screwed the nut and welded it. I collect.
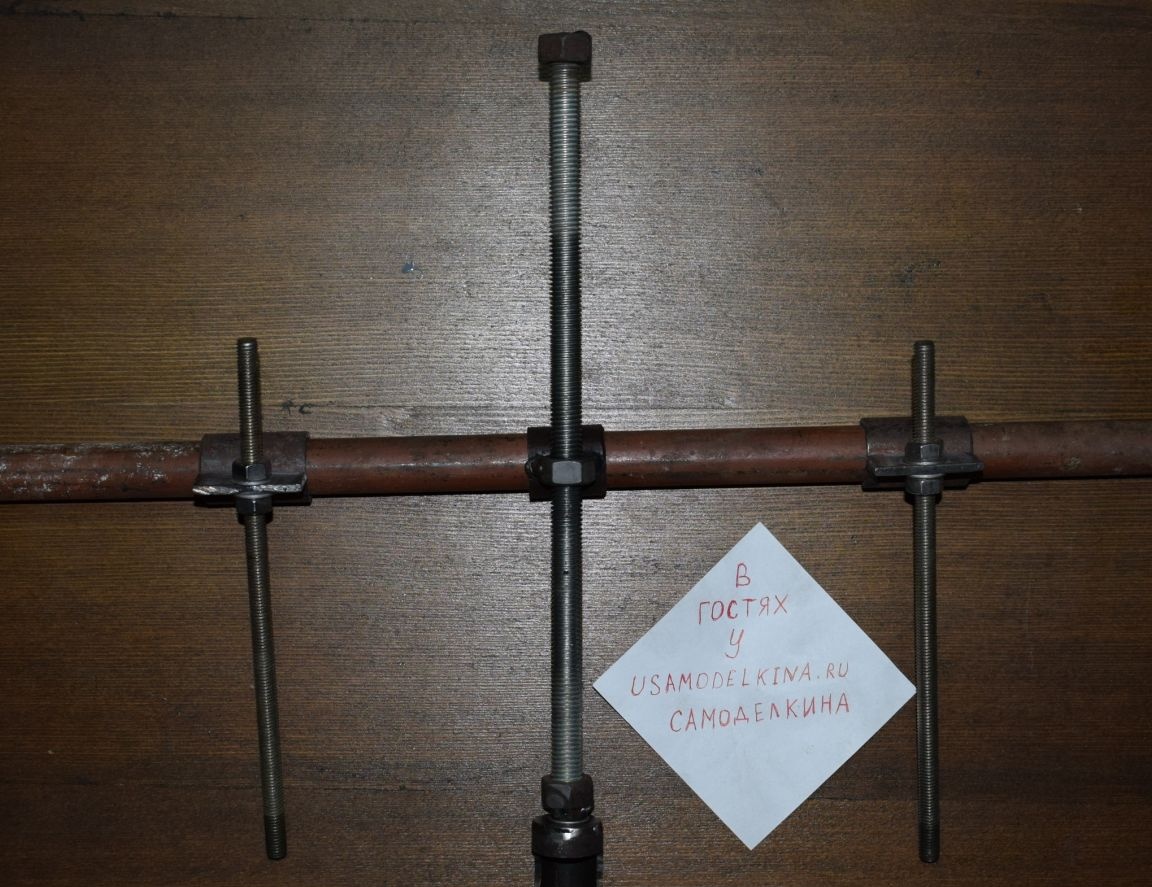
Here's what happened.


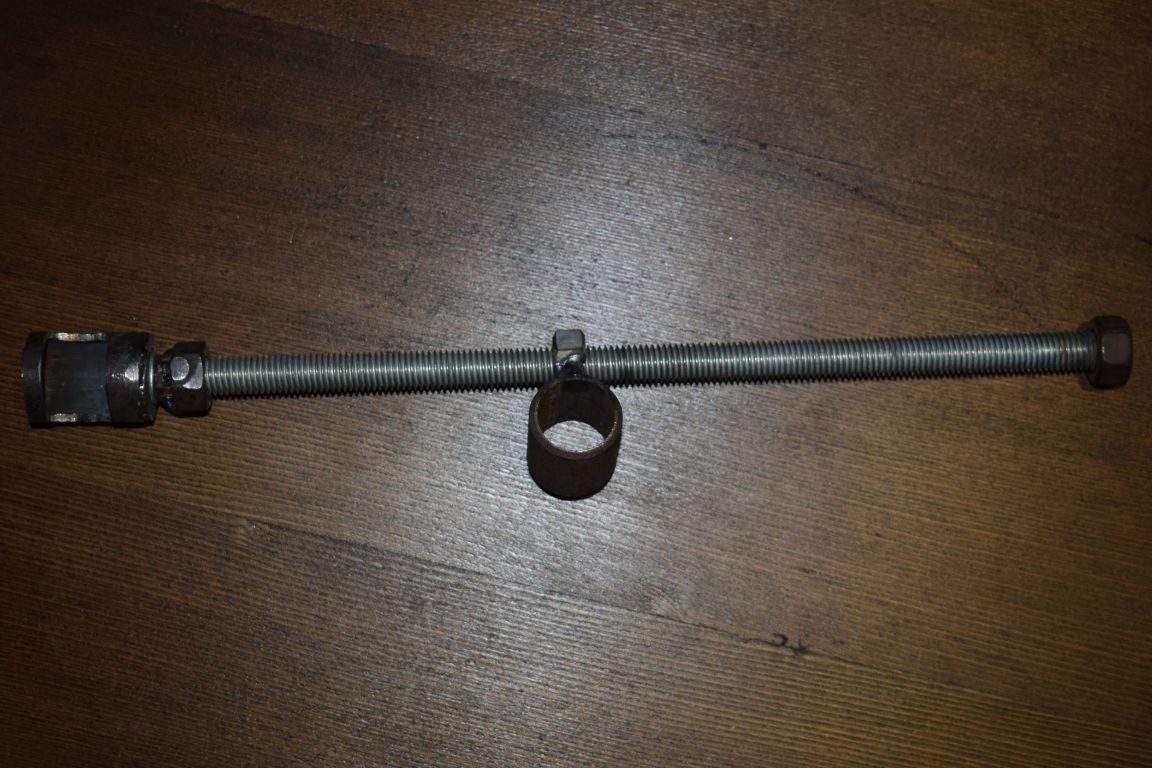
The result was such a dry cakes. Minimum parts, maximum benefits.


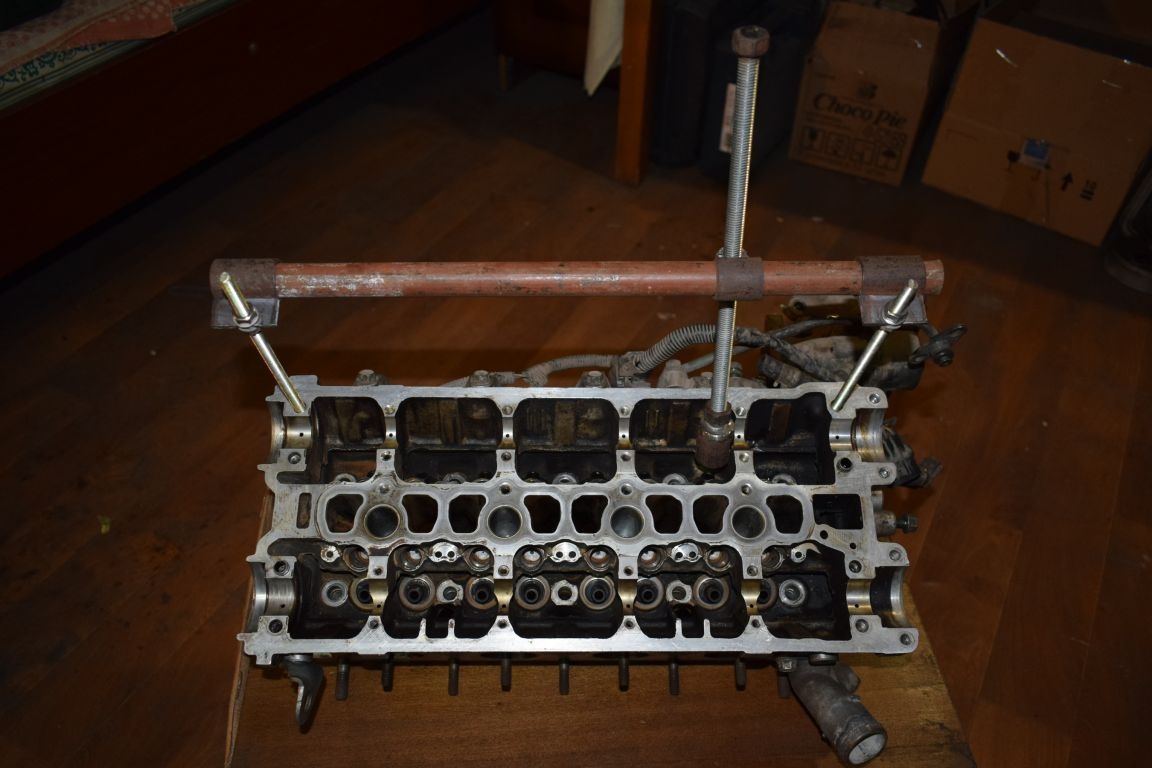
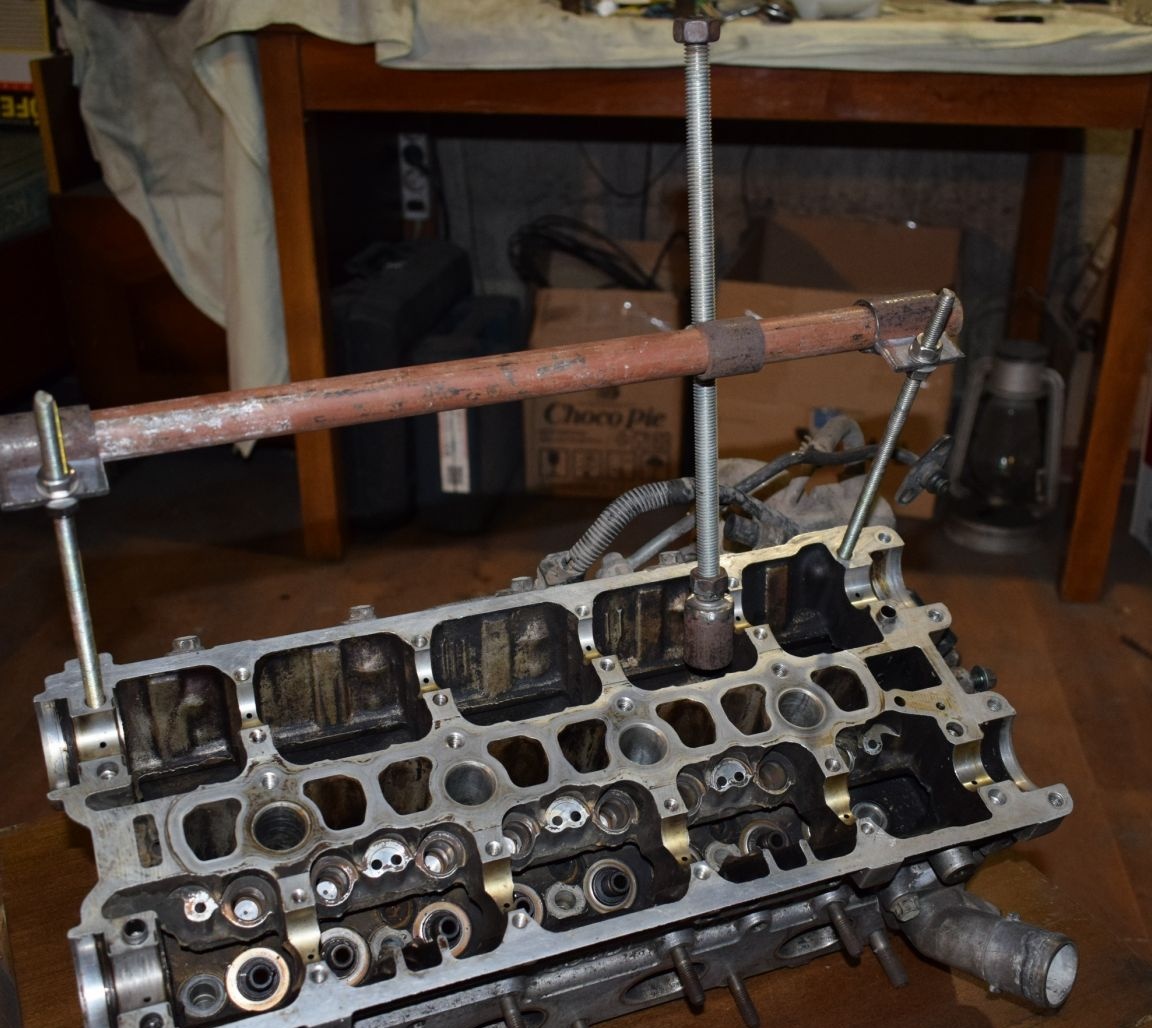
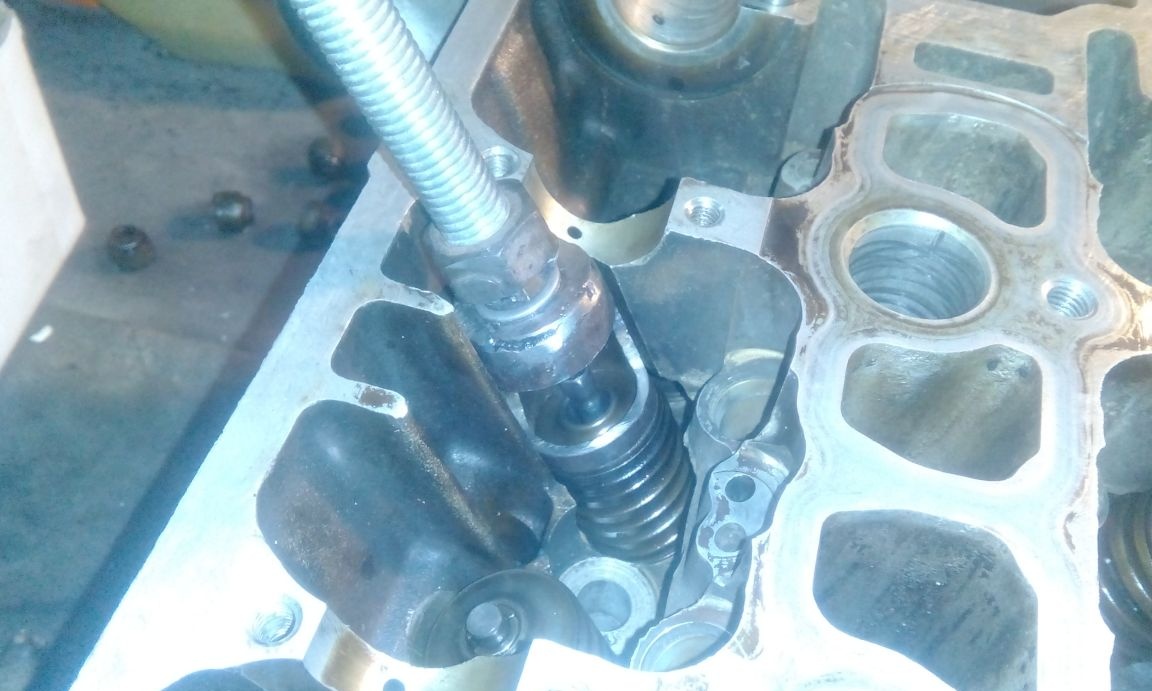
Now you need to install and check how it works. For installation, you need to screw with 8 mm studs. into existing holes in the head. Point the cooker to the installed spring and turn the pin clockwise with the key. Thus compressing the spring. After installing the “crackers”, unscrew and move to the next valve and so on all 16 valves.


Conclusion
Here is such a necessary and not difficult to manufacture tool I did. I used this cooker to repair the cylinder head of the 4G93 engine in Mitsubishi Legnum. I think it will come in handy when repairing other engines, and if it doesn't, in the garage There are always pieces of iron, a welding machine to modify. I hope you enjoyed this article, and homemade will be helpful.
9
10
10

Add a comment

    • smilesmilesxaxaokdontknowyahoonea
      bossscratchfoolyesyes-yesaggressivesecret
      sorrydancedance2dance3pardonhelpdrinks
      stopfriendsgoodgoodgoodwhistleswoontongue
      smokeclappingcraydeclarederisivedon-t_mentiondownload
      heatirefullaugh1mdameetingmoskingnegative
      not_ipopcornpunishreadscarescaressearch
      tauntthank_youthisto_clueumnikacuteagree
      badbeeeblack_eyeblum3blushboastboredom
      censoredpleasantrysecret2threatenvictoryyusun_bespectacled
      shokrespektlolprevedwelcomekrutoyya_za
      ya_dobryihelperne_huliganne_othodifludbanclose
13 comments
Author, do not listen to empty comments. When repairing the cylinder head, this homemade product is simply interchangeable. There are a lot of such pullers. But the principle is the same for everyone - to compress the spring or springs and remove the crackers. Yes, there are engines that have two springs on each valve.
The only thing that the author missed from the description is that when the spring is pulled by the puller, the valve itself also drops under the action of compression until it hits the plane of the repair table. Therefore, an emphasis in the form of a nut or just a plate of suitable diameter and thickness is always placed under the valve plate. If the valve works at an angle to the vertical, then you have to be smart and tilt the head itself so that the valve plate rests against such a nut with its entire plane. Otherwise, the valve may be bent.
To the author for the idea and design +100500 !!!
The worst thing is that modern engines nursed an order of magnitude less.
pogranec,
Until it burns out, touch the nefik, he is ground and tight
Well, if the valves are normal, why change? In my Nissan one valve 500 p. And there are 16. And this is just a valve. And the model is not the most expensive. And there is no guarantee that the new valves will be better than the old ones. There was a case at the service station, the guys told. Changed the pistons. Pistons delivered branded (at least packaging). I drove a car 80 km. The piston has fused.
I have never removed valves to put them back ... Once removed - new valve-guides-caps ....
And yes ... Previously, it was possible to make at least instruments from the valves ... There’s all kinds of chisels ... round and square punchers ...
And now I’ve removed all 16 ... or 24 .... And you can release it ... Anyway, there’s no sense ...
Oh ... Toko-Toko wanted to describe this technology ... (Stress in the verb on "a"))))).
Author
On Nissan, he collected it like that.
On the Volgov engine (402) I have never done all this with wrenches. The key is worn, you put it on a hairpin, and tighten it with a nut. And then cheto-planted and pressed the lever. But all this, of course, is a collective farm ...
It rolled on old cars. On modern valves it is painfully flimsy, it is better not to experiment with a hammer. The springs are also weak. Therefore, they do so. They dry it just by pressing the key on the plate, there are enough forces. Dried like that. A plate of crackers is placed on top of the valve (crackers inside the opening of the plate). The key is wrapped with rubber or a rag to stretch. Sharp press and crackers in place.
Author
A friend works at the service station, he said that he wrenched it with wrenches. I don’t know how this is possible.
Author
It is convenient to take out I will not say. Took out with a candle key (tube) and a hammer. It was not very convenient to dry out because of a small "window", but did not want to redo it. The rest is normal.
We put a piece of pipe, or a tubular socket wrench of a suitable size (Slightly narrower than the diameter of the plate) on the plate and beat it gently with a hammer on it ...
Rusks themselves pop up inside the pipe ...
But this is only a "decongestant" ... "Dropping" does not work out that way, of course ...
I took in the store for 150 p. It is inconvenient that you need to twist under each cylinder. This one is not needed. But on this, it seems to me, it is not so convenient to remove and install crackers.

We advise you to read:

Hand it for the smartphone ...