

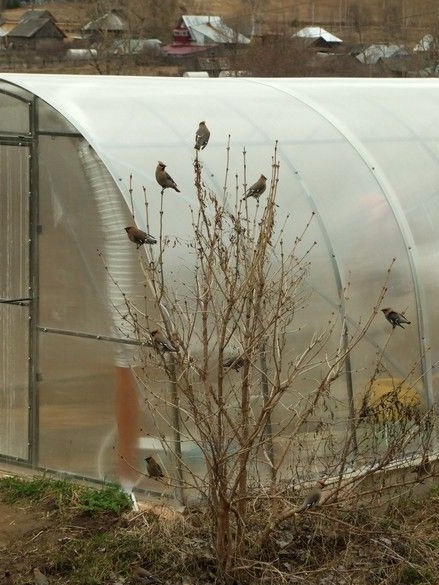
Last year, in late spring, we had greenhouse with soil heat accumulator . This spring, he completed the next batch of work to improve the design. First of all, it was equipping the greenhouse with a system of temperature sensors for collecting data and controlling a powerful air heater - in case of night frosts. This spring we had a long and cold spring, so that with the plants being protected from freezing, they ran in - to cover, open, put a light in them for the night - and warmer, and if one of the tomatoes is afraid of the dark ... Well, in a word, we fully felt .
Last fall, the workshop-greenhouse made a thorough wiring. Buried in the ground ... And the inscription wrote. I was not too lazy to pull the set of wires into a thin metal-plastic pipe, I pretty tinkered with it - it was about 20 m, but I defeated it. In general, schematically, the entire electrical system should look like this.
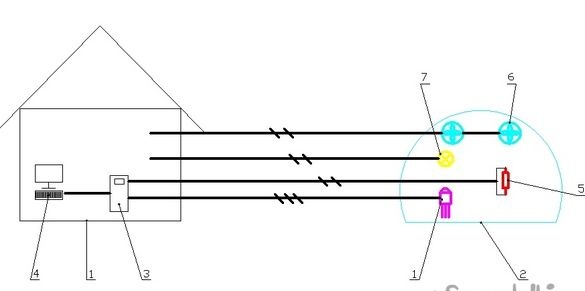
Where 1 is a workshop, 2 is a greenhouse, 3 is a control unit (timer-thermostat), 4 is a personal computer, 5 is an air heater (electric "oil" radiator, fan heater), 6 are duct fans of a ground heat storage unit, 7 are re-lighting lamps (seedlings).
General considerations.
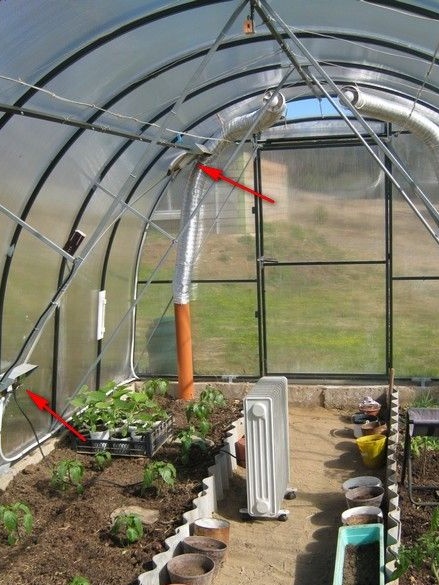
Fans work continuously day and night, connected directly to the network. Heater set at the time of potential frosts, and the thermostat is configured to maintain the desired temperature from the internal greenhouse sensors. At the same time, working fans very efficiently distribute heat throughout the entire volume. Seedling lamps - a separate power line has been laid for them, which can automatically - in time, be switched by the control unit through a relatively low-power thyristor (triac) key. While there was no need for lamps, but what are our years? Maybe it will come, in a word - to growth. Temperature sensors - for my control unit we need digital DS18B20 - in fact, this is a chip in a three-legged, transistor TO-92 package. Temperature range - for the "environment" - -55 to 125 ° C, fairly high accuracy.Conveniently, the sensors can be connected to a common three-wire bus - the microprocessor recognizes them by a “wired” individual number. This greatly saves wires, especially in the case of remote measurements. To celebrate, I decided to instruct in the greenhouse, as many as three sensors - under the top of the head, in the middle of the height and near the soil. Well, one on the street, so that was something to compare.
Wires, cables - relatively light wires were used for light and fans - the load is very small, for the heater - two-wire 2x4mm2, for the temperature sensor bus - network computer cable. I twisted the twisted pairs in two, and there was still a couple ... Primus, a pub, a couple more ... Yes, the wires were paired and drawn into pieces of a plastic pipe. In one - for lamps and fans, in the second for heating and sensors.
Control block - multifunctional timer thermostat based on the radio designer Masterkit NM8036. A good thing, but very universal, because you have to tinker with the settings. The thermostat was supplemented with a powerful thyristor key equipped with a hefty cooling radiator, precisely for safe, long-term and uncontrolled switching of a heater of reasonable power. The thermostat is connected to a remote personal computer via the serial "Som" port. Here, the computer is within the workshop and only 4 ... 5 m away, however, controlling the device is so much more convenient than using the standard 7 buttons and a two-line indicator. In addition, a “cabinet” with a thermostat was convenient to place under the ceiling and climb a ladder to it - somehow, not outrageously. Yes, in the case of working through a personal computer, several additional possibilities arise, for example, collecting data from sensors and writing to a file.
Well, let's get started.
What was needed at work.
Tools, equipment.
Tool kit for electrical installation, understandable soldering iron with accessories. A sharp knife, a hair dryer, construction for working with thermotubes. Screwdriver. Brush, dishes for varnishing. A powerful drill with a long drill came in handy - I drilled an “input” for the wire through a wooden wall. Scissors for metal, mallet - for tin works.
Materials
In addition to wires, cables and radioelements, Penoplex 20mm thick were needed. Trimming boards for an outdoor temperature sensor. Pieces of roofing steel for visors. Sockets, terminals. Nylon ties for electrical installation. Pieces of thin PCB for thermal sensor bases. Fasteners. LKM, cotton rags.
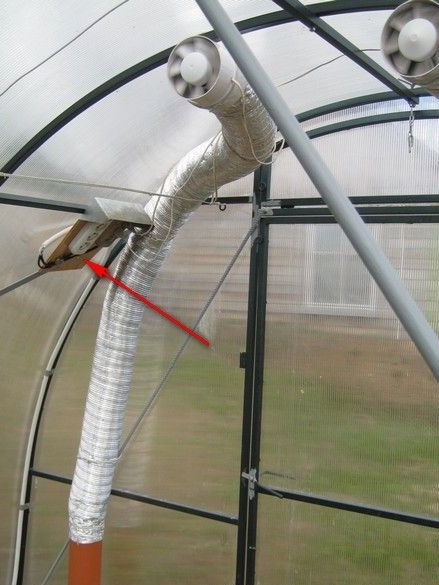
The first step was to cultivate one of the ends of the pipe with wires - low-current, to fans and lamps. The pipe itself was molded and guided along the metal arches of the greenhouse, fixing in several places with home-made clamps made of galvanized steel roofing. Short flat-head screws. In a convenient place I installed an electric “shield” with two blocks of sockets - for lamps and for fans. The plate for installing outlets was made of 8 mm plywood, covering it with several layers of yacht varnish. From moisture and delamination. He fixed it on the metal structures of the greenhouse with the same screws. Sometimes, large drops of water condense on the "ceiling" of the greenhouse. To protect against the possible ingress of water “from above”, I made a visor from the roof “galvanization”. A simple plug, the length of the visor is such that it protects sockets with plugs in.
Temperature sensors. I had to creak my brains to spawn a simple and effective enough design and choose a place to install them. There are also several considerations here - on a sunny day, the internal glands in the greenhouse are pretty hot, and by placing the sensors on them, we will inevitably get somewhat higher readings.The location of the sensors near the walls of the fence is also undesirable - the temperature there, on the contrary, is lower. Moreover, if you place the sensors below a convenient inclined pipe (diagonal), so that the warm air rising from the piece of iron warms the sensor less, they will act fairly in the “surgical field” - there is a high probability of their accidental damage.
He put up with a possible error, preferring a more “recessed” arrangement in space. The design of the sensors is as follows - on a PCB plate, a sandwich made of orange polystyrene is attached by nylon electric ties. There is a sensor between the plates. A window is formed around it for unhindered washing of the sensor with air. Under the bottom, lying on the textolite foam plate, a little sealant has flopped so that the sandwich fidgets less. I placed a piece of the same screed under the sensor so that the case of the microcircuit does not lie on the foam.
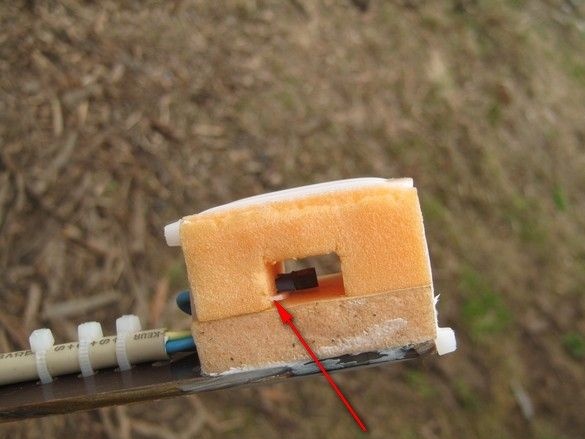
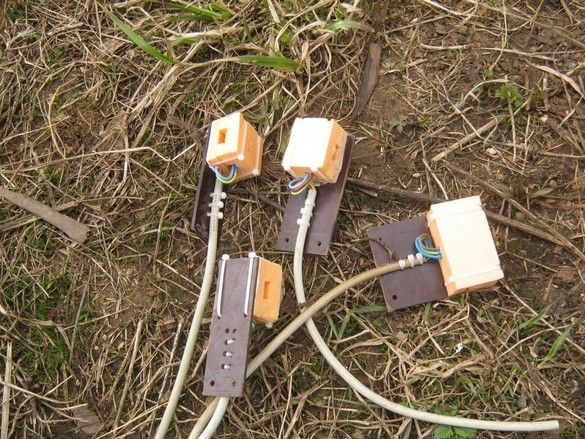
Cables were used by network accumulated from old computer equipment - durable, flexible, three colored cores reduce the possibility of confusing with the connection of several sensors. A total of four pieces were collected. All sensors are connected in parallel.
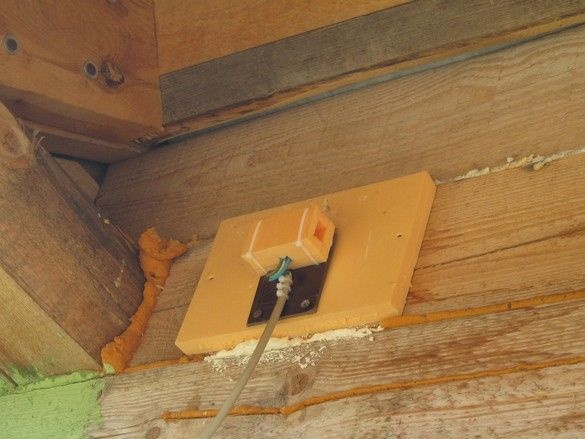
It was much more convenient to place a street sensor on the wall of the workshop, under a roof overhang, on the east side a place protected from precipitation, direct sunlight falling on it is weak, only in the early morning, the sensor is protected from them by a visor with thermal insulation. The terminal inside the room, where all the ends of the cables came together - literally behind the wall.
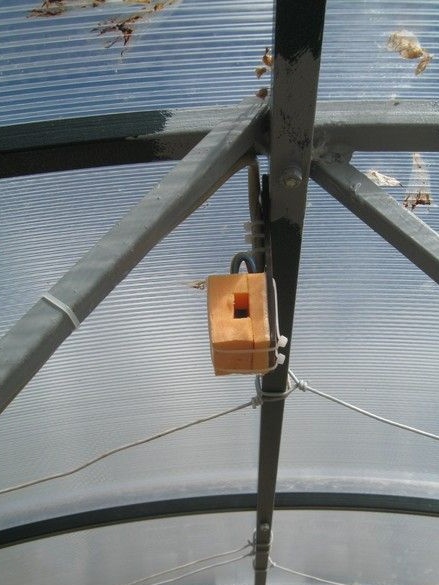
I installed the sensors inside the greenhouse on square pipes with short galvanized self-tapping screws with wide caps. Under the ceiling, and in the next photo - the middle of the height and near the ground. The window of the lowest sensor is located somewhat poorly - at a certain time in high sun, its direct rays briefly fall on the black sensor housing. It looks like a somewhat abnormal increase in temperature by a dozen degrees. For a short time - from a quarter of an hour. Yes, and practice has shown that the temperature is almost the same in height - the fans work very well. And with closed windows and with one or two open. It was possible to put one sensor in a convenient place.
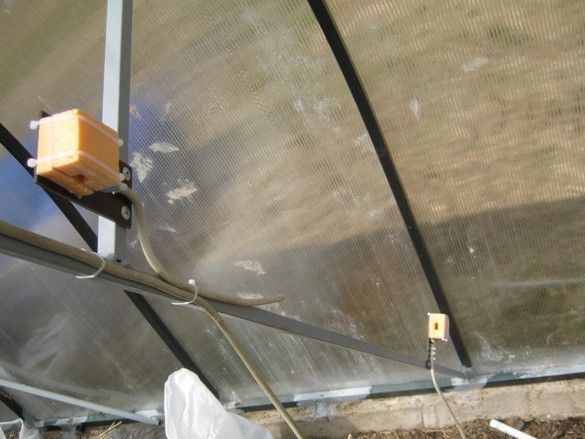
Sensor cables are connected in parallel and connected to the “underground” from the workshop. The connection was covered with a tin "socket." Nearby is a socket for a fan heater or some other heater. Everything is fixed on a plywood varnished from dampness with a tin peak from drops.
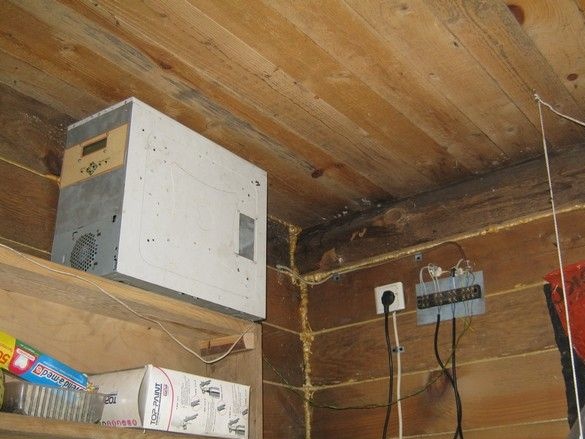
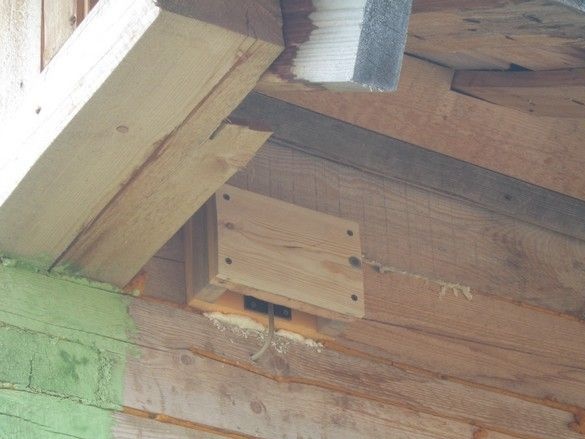
In the corner of the workshop, under the ceiling, is a terminal block on which cables from the greenhouse are cut and connected. Both power and “data” from temperature sensors. A control unit is conveniently located next to it, in the case from the system unit.
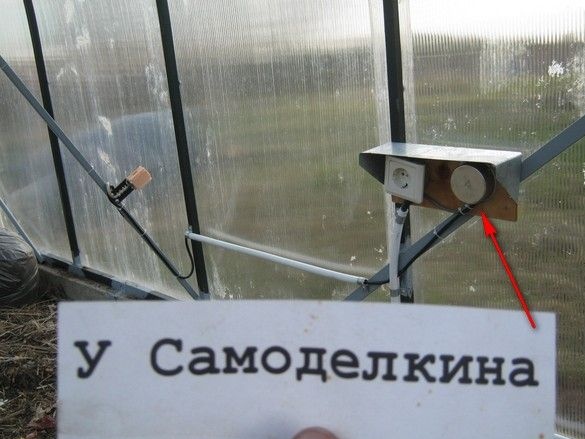
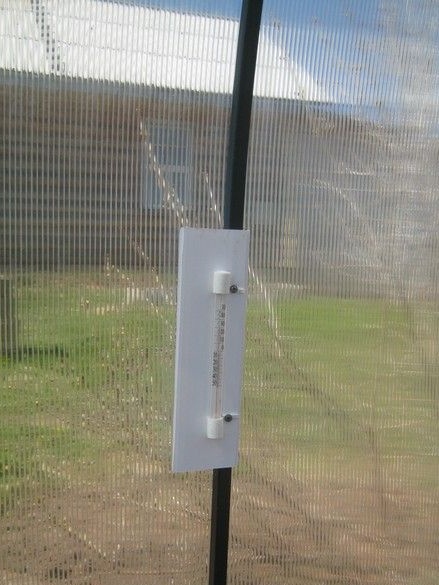
Well, so as not to get up two times - a few more improvements on the little things - I fixed a "analog" thermometer in a convenient place. I chose a place where there is less sun and where direct rays cannot be avoided, I covered it with a piece of “honeycomb” white plastic from the slopes of plastic windows.
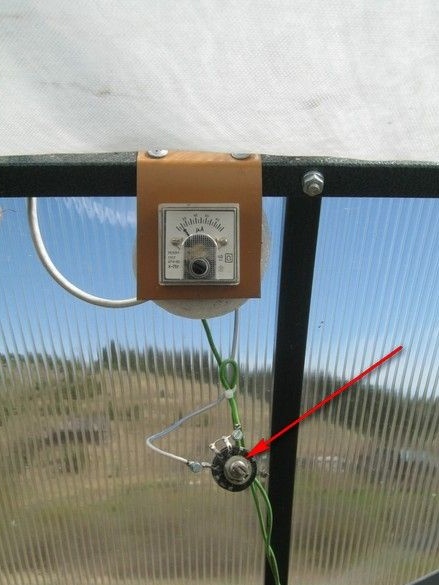
Device for electrical stimulation of roots, gave a bigish current from the solar battery, all sources write about positive results with currents much less. Added a variable resistor of 0.5 W, 470 MΩ to the circuit break, with it a smooth adjustment was provided, almost from zero. Set 10 μA.
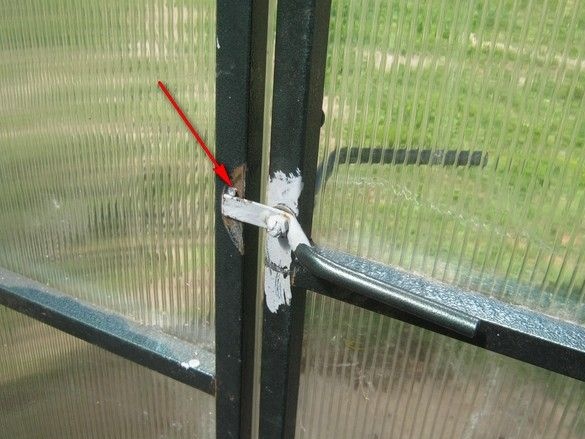
We live in a very windy place, the factory greenhouse, on the basis of this, has been finalized. Another unpleasant feature was found out - with strong gusts of wind directed into one of the "gables", the doors easily open, and then they are blabbed by the wind until this thing is discovered. The mechanism is as follows: the wind presses the door from the outside, and the tongue of constipation is not held by friction on the “jamb”. A handle on one side of the axis, much heavier than the tongue on the other. She falls, freed, the tongue unlocks the door.Especially unpleasant when it happens at night.
It was possible to neutralize this small flaw quite simply - on the “jamb”, a little stubborn screw was made of a self-tapping screw. Now, the non-held handle does not open. The only moment - I had to get used to the day, not to press the lever of the handle, but to turn it up.