
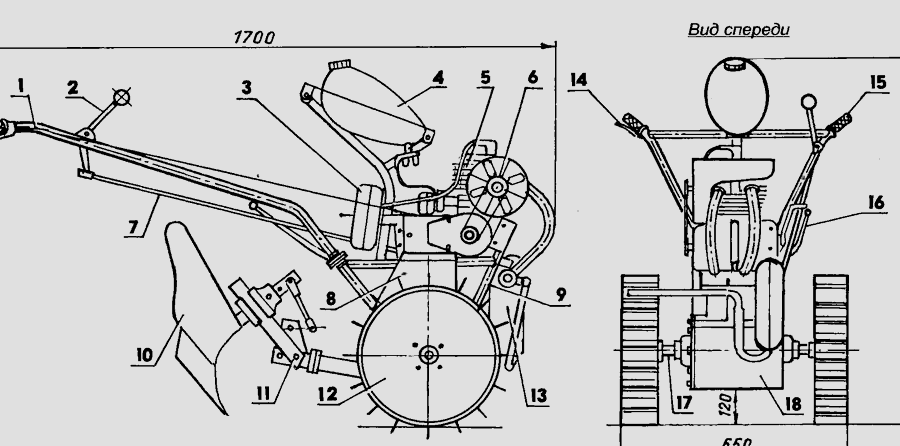
The power plant was borrowed from the old Voskhod-ZM with a power of 13.5 hp (working volume is 173.7 cm cylinder diameter 61.72 mm, piston stroke 58 mm). The ignition is installed from the Vyatka-Electron scooter. To maintain the normal operation of the engine, forced cooling had to be made; one supply fan handled this.
The kinematics of my walk-behind tractor are standard, except for the implementation of a reversing mechanism in the chain (more on this below).
Since the device was conceived without a differential, the use of reverse for turns or sharp turns greatly simplifies management. The implementation principle is simple. From the engine gearbox, through a chain transmission, the load is transferred to the reverse shaft with an asterisk installed. Further, through a selected gear pair, it goes to the gearbox shaft, from which, in turn, directly to both wheels.
The general device of a homemade walk-behind tractor
The housing for the main gear reducer was taken from ZIL-130 (steel drum with a radius of 120 mm and a depth of 250 mm) and served as the basis for the frame. I welded the engine subframe struts and fasteners to its body.
A motor with a carburetor, a silencer, as well as a gas tank and an ignition system unit from a scooter are mounted on a subframe. A portal is fixed to the struts of the subframe, to which steering levers are attached through connecting flanges. A hitch with a bracket is attached to the gear housing by welding for attaching home-made attachments to the motoblock. Sheds also did himself.
As I already wrote, the part from the ZIL-130 truck served as the gear case - this is a receiver from the air brake system. The receiver had to be cut to 243 mm. The body is welded on both sides. On the left side is a steel 7-mm sheet with a round flange with a central hole. A holder for the 207th bearing is clogged and welded into the hole.
For the right side, I cut a ring from the same 7 mm steel sheet and welded it flush with the edge of the receiver. There are 12 holes for M8 bolts in the ring. A removable flange is attached to it with the corresponding screws, made, like the ring, also from a 7 mm steel sheet.In the same as in the left flange, the same cage is inserted under the 207th bearing and fixed by welding.
The clips are closed by caps with stuffing box seals. For this, 4 more threaded holes with a diameter of M6 were drilled in the flanges. I did the covers myself, there’s nothing complicated.
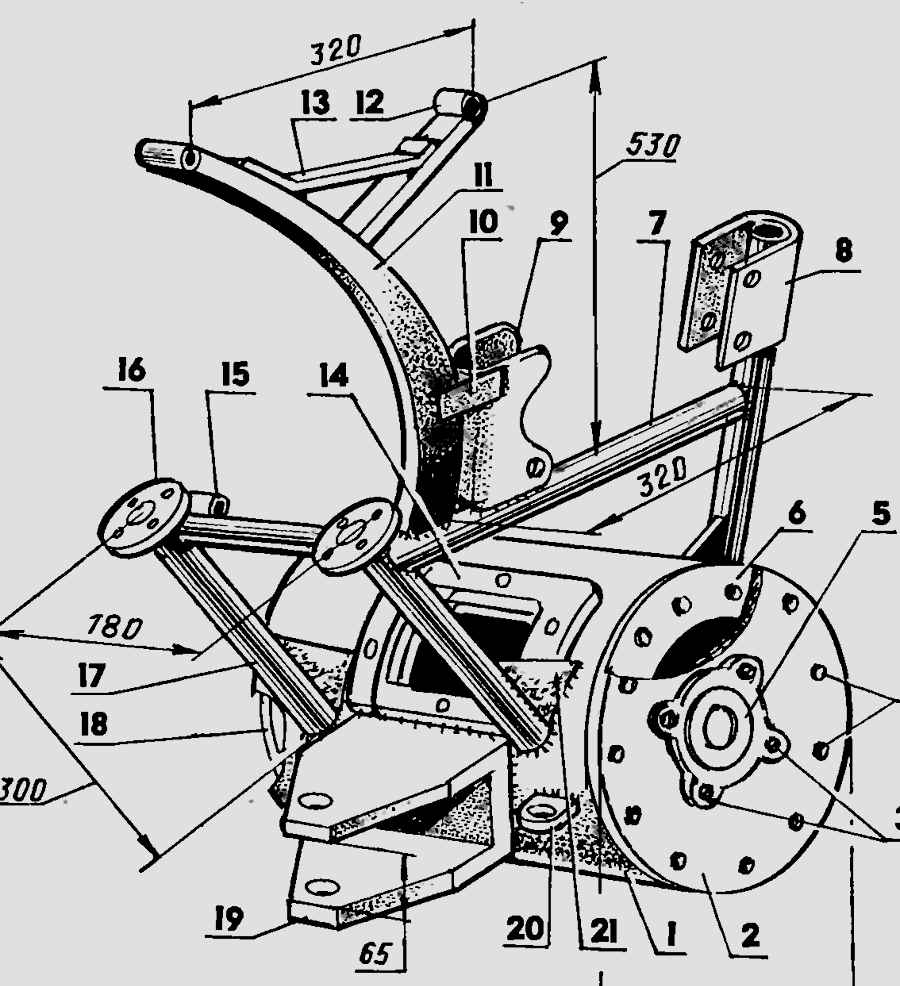
The drive shaft was assembled from three segments of splined shafts: the middle part was taken from the gearbox of the ZIL-130 car, and the two end parts are elements of the transfer case of the GAZ-66 car. The gear of the first gear of the ZIL-130 gearbox is installed on the middle part of the shaft.
Tumbler
The reverse gear housing is mounted through a welded rectangular spacer to the gear housing. It has a window cut out for engaging the reverse gear and gear. The gear housing of the reverse housing, protruding through the window, engages with the gear and is thus driven.
From the power take-off ZIL-13, I made a reversing mechanism together with the crankcase, the box practically did not require any modifications. A driven sprocket with 40 teeth (from Sunrise 2 motorcycle) is attached to the flange of the output shaft of the box (now it has become the primary shaft of the reverse). And in turn, through the roller chain, this sprocket is connected to the drive sprocket of the gearbox output shaft.
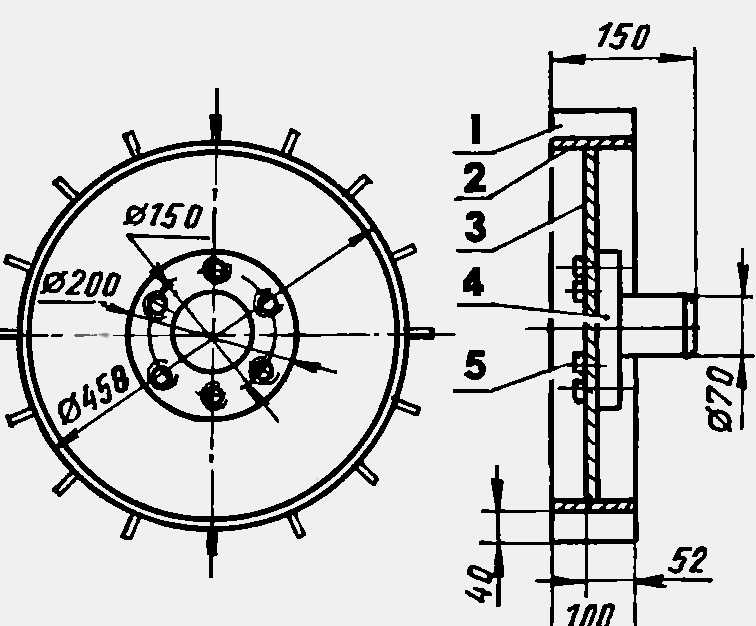
Homemade wheels
The wheels on the walk-behind tractor are completely home-made, steel. The design is very simple. All parts are made of 4mm sheet steel. A steel rim is welded to a 450mm diameter disc. Sixteen lugs are welded onto the rim, along the entire circumference with equal intervals. The wheel hub is the GAZ-66 propeller shaft flange. This makes it possible, when the cultivator is used together with the trolley, to install 155 R13 car wheels. See the figure for more details.
The trolley itself is homemade, with a brake on both wheels. Trailer for the walk-behind tractor also did do it yourself, on it are the same wheels 155 R13, in the arsenal there is a makeshift plow, bed maker, potato digger, cultivator.
I made all control levers of the walk-behind block from steel pipes with a diameter of 23 mm. In the upper part, for rigidity, the levers are connected by a cross member from the same pipe. Flanges are welded to the lower ends of the levers, these are the mating parts of those that are mounted on the gear housing. On each flange there are four holes for M8 bolts with spring washers, with these bolts the levers are attached to the base. I placed the gear knob on the left control lever, because there were problems with the cable being jammed in a motorcycle arrangement.
To connect the attachments, I made a suspension with several adjustment nodes. The suspension is attached to the device through the bracket using one kingpin.
Since the self-assembled walk-behind tractor does not have a differential, it is necessary to apply rather large efforts to the control levers at turns. But there is also a plus, with a correctly adjusted plow, the car goes very well, practically without requiring adjustment by a plowman.
Cooling system
As I wrote, an air-type forced cooling system is installed on the walk-behind tractor. Otherwise, the engine would overheat very quickly given the standard speed of the cultivator. Making a fluid system does not see the point.
The principle of the cooling system is taken from motorcycles. From the crankshaft of the engine, through a round-time transmission with pulleys of the same diameter, the force is transmitted to the fan drive of the cooling fan.

A thread is cut at the end of the drive pulley and it is attached to the crankshaft with a long M7x1 screw. The supply fan for cooling is made of four-fan. I cut it out of 1mm steel sheet and mounted it on two ball radial single row bearings (80018) with dust washers. The fan shaft is the bottom part with a driven pulley of a belt drive (diameter 7 mm).
The shaft bearings are installed in one housing from different sides (see the figure for more details). I made a protective ring from 3 mm steel sheet, the ring width is 40 mm. Housing with bearings mounted on four steel spokes in the center. The bearing ring is attached to the engine with three brackets. From the found duralumin sheet, I made a guide casing to reduce the dispersion of the flow from the fan.
I would like to note that the time it took to create my walk-behind tractor took about 3 months from the moment of the first sketch. In principle, I am satisfied with the result. Now I am already working on the third version with a differential.
Video of a homemade walk-behind tractor: