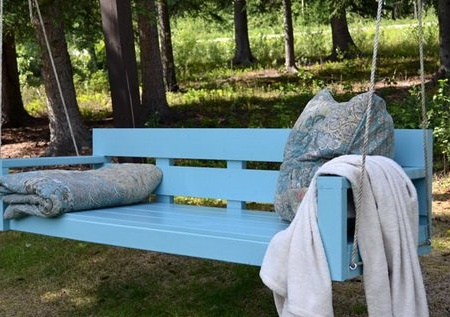
If you often relax in the country with children, then you can not do without a swing. However, not everyone wants to buy them when you can make a swing yourself. The proposed lesson should interest you: according to it, the author obtained a solid swing, the drawings are extremely simple, and finished swings are made in a modern style. It is worth noting that, if you wish, you will spend no more than 5 hours assembling the swing if all the necessary materials are at hand.
Here is a drawing of the finished swing:
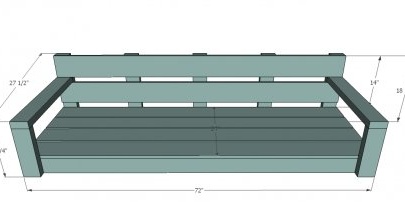
The design seat is designed for one pillow 180 centimeters in length, 60 in width, or you can take three small pillows of 60x60 cm.
We will need:
- nuts and bolts with an eye (76.2 mm);
- rope (but better chain - will be more reliable);
- fasteners for hanging;
- finishing nails 50.8 mm;
- cogs 63.5 mm;
- screws for blind holes (63.5 mm);
- wood filler, special wood glue, primer, sandpaper, paint, paint brush, wood conditioner.
From the tools, prepare:
- square, tape measure, hammer;
- hearing protection and safety glasses;
- drill, nailer, circular saw, tool like Kreg Jig;
- level;
- countersink drill;
- grinding machine.
Boards necessary for a swing:
- seat boards: 6 - 1 (2.55 cm) x6 (15.24 centimeters) @ 72 ”(182, 88 cm);
- back supports: 5 - 2 (5.08 cm) x 4 (10.16) @ 18 1/4 ”(46.355 cm);
- swing armrests: 2 - 2 (5.08 cm) x 4 (10.16 cm) @ 25 1/2 ”(64.77 cm);
- the front armrest part of the swing: 2 - 2 (5.08 cm) x 4 (10.16 cm) @ 11 1/4 ”(28.575 cm);
- back / front boards: 2 - 2 (5.08 centimeters) x 4 (10.16 cm) @ 72 ”(182, 88 cm);
- support beams: 5 - 2 (5.08 cm) x 4 (10.16 cm) @ 21 ”(53.34 cm).
Before making a swing, be sure to carefully read the whole lesson! Take the necessary precautions, you must work exclusively on a clean surface. Boards choose straight lines. After each step, do not forget to check with a square. Be sure to drill holes before screwing. Wipe off any excess glue immediately, as the paint will not stick to it later. If you can’t do it yourself, then call for helpers!
Step 1
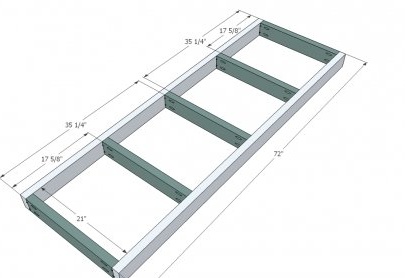
So, first assemble the seat frame of the future swing. For this, use screws with a set of blind holes (required with a margin of 1 1/2 "(3.81 cm), or glue and screws 2 1/2" (6.35 centimeters).
Follow the drawing!
Step 2
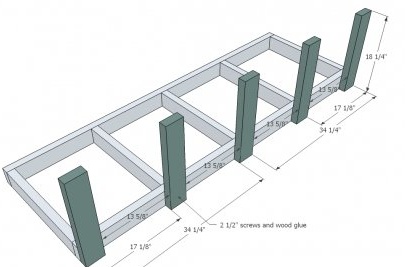
Next, attach the back supports (on the back side) to the frame of the summer swing using screws (6.35 cm), as well as wood glue.
Step 3
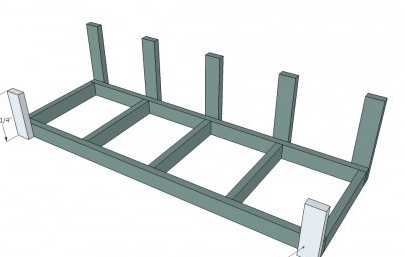
Repeat the same procedure for the palm rest. Use wood glue and the same screws from the previous step.
Step 4
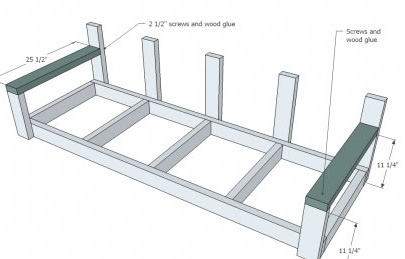
Place the armrests on top. Use a square to adjust the structure to be neat and even.
Step 5
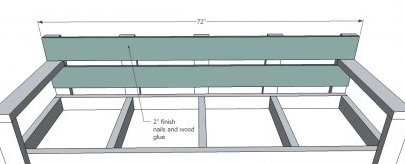
Fix the back parts of the back with trim nails, keep them level with the lower and upper sides of the swing armrests. At this stage, glue is also used in addition - do not forget about it.
Step 6
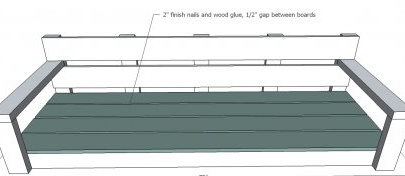
For this step, the author took facing nails, as well as glue on wood, between his boards, the gap was 1.27 centimeters.
Do not forget to check the drawing!
Begin to attach the seat boards from the front, first glue with glue, then - nail with nails.
Step 7
Swings are almost ready. It remains to finish them: all openings must be filled with a filler. Then grind (sandpaper will help you with this). If necessary, use air conditioning or a primer. Paint the bench for cottages can be in any color you like!
Step 8
And it remains to hang dried and painted swings. Suspend them on the seat frame to the side planks - after all, this place has more weight. And in order to increase the level of comfort, the author hung up the finished country swing at an angle of about 50 degrees.
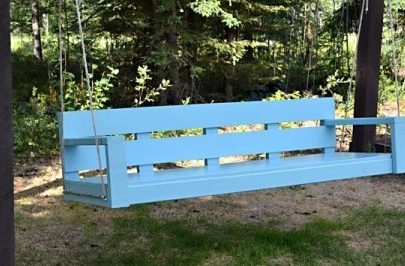

So we got a comfortable swing do it yourself for a comfortable pastime in your beloved cottage! Lay pillows, sit back and experience the design you created!
