We constantly face the need to keep things in order. Hundreds of ideas were invented by mankind in order to solve this seemingly insignificant problem. And many of these ideas have long turned into classics.
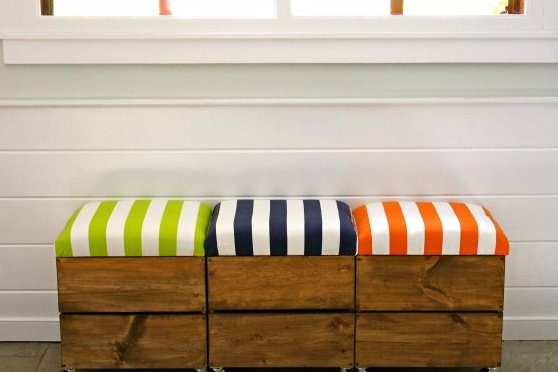
In this master class, you will learn how to make a mobile bench with soft top wheels. It is perfect for a nursery or hallway and will perform several functions at once.
The bench is made of plywood, its design is simple to obscene. The most difficult stage here is, perhaps, the upholstery work of the soft top. However, everything is not as complicated as it might seem. This workshop is specially designed to answer all your questions, and step-by-step photos will help to avoid mistakes.
So, in order to do it yourself to make a mobile bench with wheels for storage, you will need:
Materials:
- plywood for the manufacture of banquet hulls;
- metal wheels with rubber coating - 4 pcs;
- foam 40 - 40 mm thick, preferably furniture;
- batting or thin soft foam with a total thickness of up to 10 mm to give the seat additional volume and the correct shape;
- a suitable dense fabric for upholstery of a seat, second-hand fabric can be used;
- strong threads;
- wood screws;
- glue for gluing wood materials;
- primer-toner or protective-decorative oil-toner for processing plywood;
- resistant varnish for woodwork.
Instruments:
- circular saw or jigsaw;
- sandpaper for processing the edges of plywood parts;
- screwdriver;
- electric drill and drill for wood of large diameter;
- a furniture stapler with staples of a suitable size;
- scissors;
- tailor meter and ruler;
- paint brushes, soft tissue without lint;
- building tape measure and square;
- a pencil.
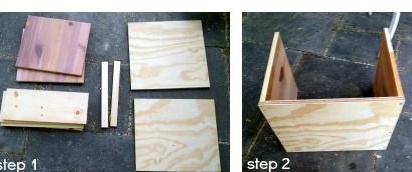
Step one: mark up the details of the bench
The choice of plywood in this case is not accidental. It is cheaper than natural wood and easier to work with, as with any other sheet material. Although, with a great desire, all plywood parts can be changed to parts made of a thick, but wide board. In addition to this, you will also need reiki.
In this master class, every detail is made of plywood, even the slats of the banquet cover. Choose plywood of such thickness that it would be convenient for you to connect plywood elements together with self-tapping screws. Plywood should be dense, have an even cut and a pleasant smell without pronounced extraneous odors.Unscrupulous manufacturers in the manufacture of this material use cheap adhesives that are toxic in nature. This is the cause of the bad smell.
Decide on the size of the future banquets. They depend on what things you plan to store inside, and for what room the banquet is intended. If we are talking about a nursery, remember that children love to ride such of furniture. If this does not bother you, then the banquet should be made small, light, comfortable in height - in short, to match the age of your child. If the banquet is intended for the hallway and shoes, for example, will be stored in it, the banquet should be voluminous and, possibly, wider at the base.
Mark the parts using a building angle to draw right angles at 90about. Use a pencil to remove unnecessary lines if necessary.
Step Two: Saw and Cut the Parts
Saw the details. The author used circular for this purpose. You can also use a jigsaw or a saw machine designed to work with curly parts.
Edges of plywood blanks should be processed. Here you will need sandpaper. Walk along the edges of the sandpaper, smoothing the edges. It makes sense to finish grinding after the assembly of the banquet, so you can not be too zealous at this stage.

Step Three: Bench Assembly
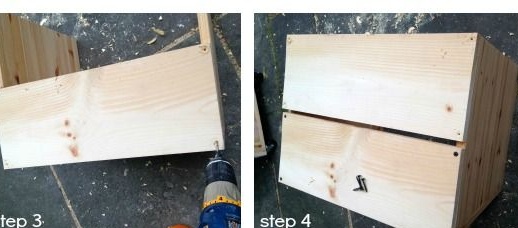
No pocket connections this time — it's still easier. The details of the banquets are fastened joint by joint with wood screws. For additional strength of the final design, the author used glue. In such small projects this is enough. The main thing is that you are confident in the quality of the glue you choose.
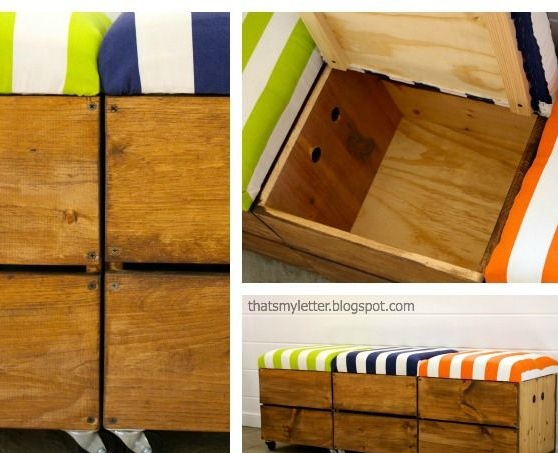
Assemble a bench. As conceived by the author, two of its walls are solid, and two consist of a pair of horizontal parts each. Do not forget to use glue and assemble the perimeter of the bench. Fasten the bottom to the back.
Screw two plywood strips to the cover part. They do not bear any load, but rather are grooves that prevent the cover from skewing during operation of the bench. The location of the planks is determined empirically by making the necessary notes.
The author cut out two round holes on the whole sides of the banquets. In part, this is a decorative move, and in part, an element of ventilation. The openings of the upholstered bench will not hinder. You can perform them using a drill and a special drill on a tree of large diameter.


Step Four: Get a Soft Top
You will need foam rubber, batting, fabric, scissors and a furniture stapler. Cut a piece of foam to fit the cap. It may slightly go beyond it - it is a matter of taste. Cut the fabric with an allowance for a bend and a piece of batting - a little smaller.
Lay the fabric on a flat, clean surface, center the batting, then foam, and place the plywood cover with the strips facing out.
Bend the edges of the fabric to the back of the cover and fix it with brackets. When the perimeter of the fabric is fixed, you can process the edges of the upholstery. To do this, tuck the cropped edges of the fabric under the bottom and again grab it with a stapler almost at the very edge.


Step Five: Painting and Protecting the Bench Case
Plywood - the material is quite durable, but it also requires protection. Moreover, it would not hurt to decorate a banquet a bit. The author used a primer-toner to darken the surface of plywood and give it a more noble shade.
However, in addition to the primer or “3 in 1”, as it is also commonly called, you can choose a suitable protective and decorative oil. It is in no way inferior to the primer, and at times it surpasses it in effect.
There is also the most economical way to tint wood materials - alcohol stain. Stain the bench body with a stain and allow the surface to dry.
If you wish to keep your banquette clean, it should be varnished. Choose a resistant polyurethane varnish or nitro varnish. You can also purchase specialized furniture varnish. Apply it in several layers, but not less than two layers and let the product dry properly.
All painting work is carried out at the stage after assembly or before it. In the first case, painting all the small details is difficult, and sometimes even impossible. Although it is precisely this method that is most often resorted to. In any case, be careful not to stain the upholstery with varnish, as it will be very difficult to remove varnish stains, even using a solvent.
You can also varnish the inner cavity of the banquet with colorless varnish so that you can carry out the next wet cleaning at any time.

