Artificial marble. With such plastering the walls are especially elegant. The plastering process consists of two stages: simple plastering without grouting and applying gypsum mass. The gypsum mass is prepared in this way: the gypsum is mixed with colored pigment and poured onto the table with a scoop, alternating horizontal layers of different colors. Then, with a scoop, the mixture is transferred and poured obliquely onto a board or plywood shield, i.e. layers mix a bit, imitating colored veins of marble. The thickness of the poured layer should be twice as thick as gypsum marble after finishing. Then the mixture is covered with burlap and impregnated with a 2% adhesive solution (CMC glue, bone glue) until saturated.
This mass is brought to the wall on the shield, remove the burlap and quickly pressed to the plaster, compacted by tapping, then take off the shield. The surface is smoothed with a trowel. After 1.5-2 hours, when the surface of the gypsum marble has not yet completely hardened, it is planed with a planer. After 3-5 days, the surface is sanded with sandpaper or a grinder. Then the plaster is coated with a 2% adhesive and coated with mastic. Mastic consists of 1 part turpentine and 3 parts wax. Rubbed into the wall with a felt rag.
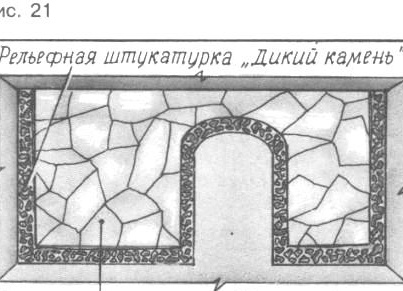
Wild stone. The relief plaster imitating a natural stone is made of cement mortar. To this solution add 10-20% of lime test to increase mobility. Plastering is done almost without tools, i.e. hands, and more like modeling.
The solution is poured onto the wall, the structure of the stone is created with your hands. One sketch is not enough, you need to do 2-3 tests. After setting the solution, it is wiped with a brush dipped in water. Remember, lime corrodes the skin, you need to work with gloves (Fig. 21).

Sawn stone. It is made from any solution. It is divided into two stages. The first stage: basting and smoothing the basting with a grater. The second stage: the handle is removed with a trowel handle, the seams between the stones are simulated. Then they take knitting needles, fold them in a fan and apply a light notch (the notch gives the impression that the stone was sawn).
These and other decorative plasters are suitable for both indoor and outdoor use. For example, for plastering a loggia. But before making relief plasters indoors, think about whether you have the patience to wash dust off them during operation.
When staining, the seams between the stones are coated with a different color than the stones themselves. For example, the stones are gray, the seams are black.Or come up with your own color. Need courage.
Color plaster. 10-20% cement is added to the mortar. The color is given to the plaster with pigments (powder paint). The technology is the same as with conventional plaster.
Terrazitic smooth plaster. Crumb of marble, broken bottle glass, mica, etc. are added to the cement-lime mortar. The plaster is applied to the wall, leveled, rubbed. Finally, the surface is treated in a semi-plastic state by electric grinders to expose the surface of the filler from the cement film.
Terrazzo relief plaster. An ordinary mortar is thrown on a wall and leveled with a trowel. And then a placeholder is thrown at him. The aggregate mixture is poured with a trowel or a plaster bucket, you can sprinkle on a “falcon” (square 50x50 cm plywood shield with a handle at the bottom and in the middle) and press it against the wall.
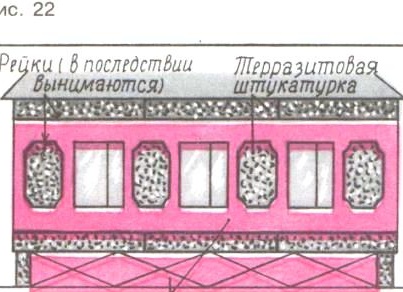
Plasters win when using white cement or white sand. Decorative plasters also win when they are not made in the entire wall, but with a certain ornament (Fig. 22).

Ornaments are performed using wooden slats, planed in the form of a trapezoid. Reiki is nailed to the wall with small nails. After setting, they are taken out. Semicircular reliefs are cut with a trowel when the solution is in a semi-plastic state.
Perhaps the example I have chosen is not suitable for you. There are so many beautiful houses around, take a closer look, choose something for yourself. And if an artist lives in you, then you will have “cards in hand”.
Fur coat plaster. The simplest plaster is not bad for plinths. Sketch a sketch and leave it as it is.
Repair existing plaster.
Damaged areas are cleaned from exfoliated plaster to the wall. The cleaned places are blown out of the vacuum cleaner and moistened with water with a brush. Throw in a solution, leveled with a trowel and rubbed with a grater.
Cracks are cleared with a knife or metal spatula. Fill with a solution and wipe.
The mortar for repair is better to use the same as was used in the old plaster. Lime mortar - light to yellow, cement-lime - light gray, cement - gray, gypsum - white.

