
An ordinary drill is easy to learn to mow grass and even cut bushes. The main working body of this mower is the cutting unit (Fig. 1).
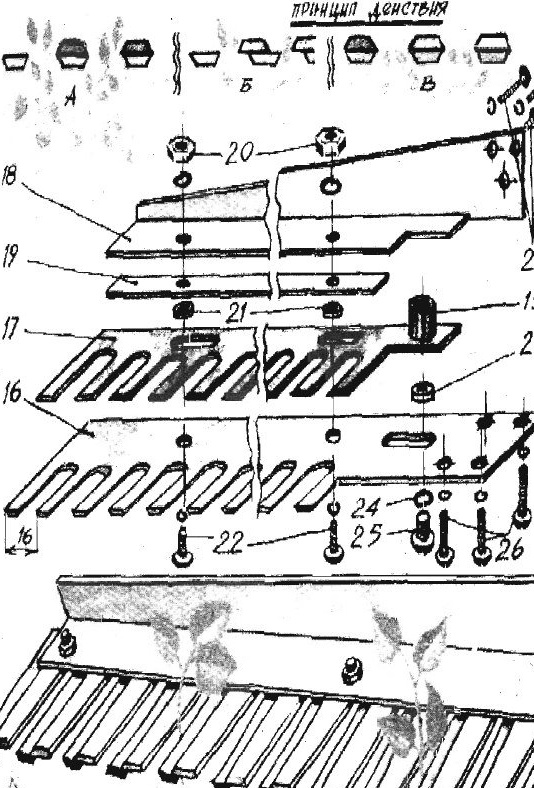
Fig. 1. Lawn mower from a drill. Operating principle.
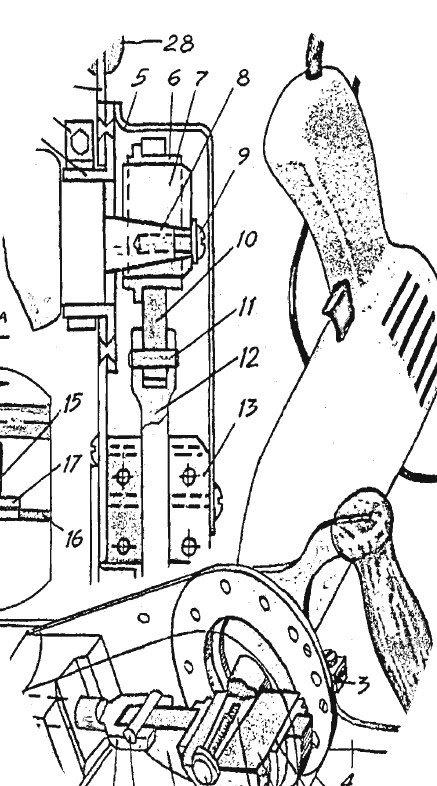
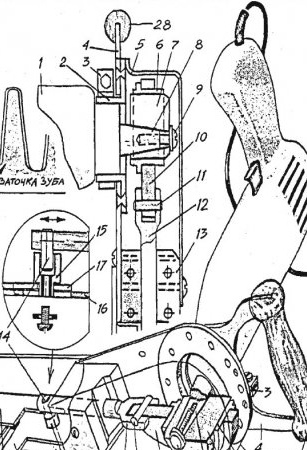
The teeth of the movable knife 17 slide along the teeth of a rigidly fixed comb 16 and, like scissors, cut grass and flowers. The movements of the knives are reciprocating, and therefore the main task in the kinematic scheme fixtures - convert the rotational movement of the spindle 8 of the electric drill into oscillatory. The converter solves this problem (Fig. 2).
The teeth of the movable knife 17 slide along the teeth of a rigidly fixed comb 16 and, like scissors, cut grass and flowers. The movements of the knives are reciprocating, and therefore the main task in the kinematic scheme fixtures - convert the rotational movement of the spindle 8 of the electric drill into oscillatory. The converter solves this problem (Fig. 2).

Fig. 2. Lawn mower from a drill. Converter.
On the drill spindle / mounted cam 7c swing earring 10. It is she who transforms one kind of movement into another. And through the rod 15 transfers it to the cutting knife. The rod and knife are fixed by guides - in the body 13 and on comb 21. And so that the knife moves without distortions, it is strengthened by a rigid plate 18, which is divided to reduce friction by a gasket 19 made of antifriction material. The main parts of the mower are made on turning, milling and drilling machines. On a lathe, turn the bearing flange 2 out of a steel billet. Its inner diameter should be equal to the diameter of the electric drill neck. Since the flange is secured with a clamp 3, make six longitudinal cuts in the shank. Then the contraction will be more even and denser. Drill eight holes at the end of the flange to secure the base plate 4, cut from a 3 mm thick sheet of steel. Make it as shown. Then it will serve you not only for mounting the cutting unit and the transducer, but also with handle 28. Do not forget to drill holes in the plate — eight for mounting the flange, four for connecting to the rod guide 13 and three for attaching the knife cover. The eccentric 7 is also machined from steel. With an eccentricity of 8 mm, which ensures a knife stroke of 16 mm, bore a tapered hole in it corresponding to the end of the spindle. Please note that during assembly the eccentric fits tightly on the spindle and does not touch the neck of the drill (in our design, a gap of 4-5 mm is selected). Grind the outer surface of the eccentric, because the bearing slides on it - a bronze bushing 6. Earring 7 (7 is cut out of sheet steel 6-8 mm thick. Bore the bore for bushing 6 with a cutter on a lathe, and bore 11 under the axis with a drill and then process it Rod 12 is machined from a bronze bar with a diameter of 10-11 mm.Its cylindrical surface is ground to provide a sliding fit in the guide. At one end on the milling machine, a groove is cut for connecting to the earring and holes are drilled - one for the axis 11, the other for the pin 14. The axis with a diameter of 7 mm and a pin with a diameter of 6 mm are machined from tool steel, hardened, ground. The axis is pressed into the earring, and the pin is inserted into the stem shank after assembly with the guide.
Guide 13 is a beam with a base length of at least 50 mm. It is best to make it from steel. The main attention is paid to the fact that the axis of the working hole for the rod is strictly parallel to the plane of the base plate 4. The rest of the holes are fixing, with a thread for screws M5 or Mb. Making a comb and knife is the most time-consuming task, so let's dwell on it in more detail. Here, the canvas of an old two-handed saw can serve as good material for you. Draw an exact drawing of the knife and comb on graph paper (their dimensions are shown in the figure, we only note that the knife has 19, and the comb has 20 teeth). Stick the drawing on cardboard and cut along the contour. You got the patterns.
Having placed them on the canvas, transfer the contours with a scriber to the metal. Now with a drill - hole to hole - you can cut rough blanks. They still need to be processed with a file and emery. If the sheet is difficult to process, release it: heat until there are discoloration on the surface and slowly cool - it is best in a baking sheet with hot sand. On soft metal, finish cutting the teeth of the knife and combs (as shown in Fig. 16, at an angle of 45 °); drill the necessary holes for the guide washers 21 for fasteners 22, 24, 25, 26 and only then harden the metal; sand work surfaces. To assemble the entire device you still need: bolts and nuts 9, 20, 22, 24, 25, 27 — they are standard; guide washers 21, 23 - turn them out of bronze; grip for putting the knife in motion 75 - it is machined from tool steel. Inevitable vibrations will occur in the mower, therefore all screw connections will be countered by spring washers. The last detail of the final work will be a shaped casing 5 to protect the working bodies from dust. It is better to cut from sheet duralumin with a thickness of 1 - 1.5 mm. Before starting work, thoroughly lubricate all rubbing parts.