This drill combine can be used both in winter and summer: in winter in order to clean paths from snow, and in summer - to mow grass!
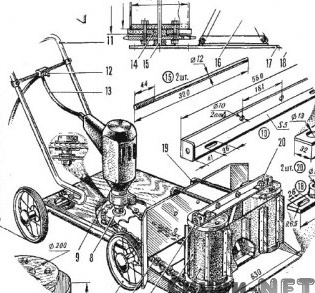
This harvester can be used both in winter and summer: in winter in order to clean the tracks from snow, and in summer - to mow grass. The figure shows a winter version.
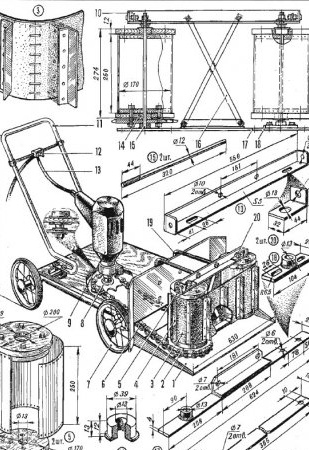
Fig. 1. Combine: lawn mower - snow blower
In summer, a snow removal unit is removed from the combine and a knife is installed in place of a small sprocket, like a lawn mower.
The harvester is able to remove not only freshly fallen loose snow, but also packed snowdrifts, dense bumps, and if the electric motor allows it, then strong crust is wet snow captured by frost. The harvester is simple (Fig. 1). An electric drive trolley and a mounted snow removal unit, consisting of two drums connected by a frame and a conveyor belt with hooks, a scraper knife with a shield, brackets - these are its main components.
Trolley 7 can be assembled from pipes, corners, plywood and wheels from prams or of bicycles. Its approximate dimensions: 800 x 400 mm. You can use the chassis of your old baby stroller. First, fasten the thick plywood on the cart, and then the handle 11, bent from a pipe with a diameter of 18-20 mm - the chassis is ready.
The main node is the working body. It is assembled from drums 5, axles 75, bushings 14, conveyor belt 3 with hook angles 4, frames (parts 10, 16, 17, 18, 20), brackets 19 and a scraper knife 1.
As the case of drums 5 (Fig. 1, a), you can use large tin cans, for example, from tomato paste, cutting out the lid and bottom in them and installing two pairs of wooden circles instead. If there are no such cans, then cut eight discs out of 12 mm thick plywood or a wide board: four external with a diameter of 200 mm, four internal with a diameter of 170 mm. Fasten them in pairs with screws or M5 bolts. Attach the large (pedal) bicycle sprocket 2 to the lower disks of one of the drums with the same bolts, having previously inserted the sleeve 14. From the sheet of roofing iron, cut a strip 250 mm wide and a length equal to the circumference of the inner disk: to this strip on nails or screws and you will fasten. Insert one more sleeve 14 from above into the drum 14. The second drum is assembled in the same way as the first, but without an asterisk.
The drums are mounted on a frame that is assembled from the upper transverse beam 10, the lower support bar 77 with the heel sleeves and the corner for the connecting cross 16.
Make a beam from a duralumin or steel corner with a section of 35 x 35 mm. Shorten the end parts of the side flange of the corner by 35 mm, in the lower flange, bend the end pads under the M5 tension bolts. Then, make in the corner grooves measuring 13 mm in diameter and 26 mm long. The grooves are needed so that the conveyor belt can be pulled. For the same purpose, the lower sleeve of the driven drum is mounted on the bar 15 movably, and the tension angles 20 are attached to the upper ends of the axes of the drums. The angles 20 are pulled to the end areas of the transverse beam by M5 x 65 mm screws.
Conveyor belt 3 connects the drums. For it you will need a rubber band and dural corners 4 with a cross section of 25 x 25 mm. They are attached to the tape with flat head rivets and washers. The tape joint can be sewn with a thick nylon thread or joined with metal clips curved from steel wire with a diameter of 1.5-2 mm.
The next important node is a scraper knife 1. It can be bent from a duralumin sheet with a thickness of 1.5-2 mm. A support bar is riveted to the bottom surface of the scraper knife, at a distance of 250 mm from the longitudinal bend line. Its overall dimensions depend on the size of the finished working body. Therefore, start making the knife after the drums are finally assembled on the frame.
And, finally, the last parts are the brackets 19, the working body of the combine is hung on them. They can be made from a duralumin or steel corner with a section of 30x30 mm or bent from a steel bar with a diameter of 12 mm. Bend and saw off the workpieces in place, after installing the electric motor and pre-assembly of the working body.
A powerful electric drill 9 with a long cable 13 and a switch 12 was used as a drive on the combine. How it is installed is shown in the general figure.
As the leading gear used bicycle sprocket 8 from the rear wheel. With a driven sprocket 2, it is connected by a shortened bicycle chain 6. For this, a corresponding hole is made in the shield in place. Shorten the chain so that it stretches slightly when the drum is installed.
First, rivet the support bar 17 to the scraper knife 1. Screw the crosspieces to the bracket bar 16. Insert the axles 15 into the bushes, put the drums on them 5. Install bushings or several thick washers on top of the axle. Throw chain 6 onto sprocket 2 of the driving drum. Then, put on the drums already sewn ribbon 3. Insert the upper ends of the axles 15 into the grooves of the transverse beam 10, install the angles 20 and fix the axles on the beam with nuts (until it is not final). Then fix the upper ends of the crosspiece 16 on the beam 10.
Screw the brackets 19 to the shield of the scraper knife 1, screw the frame with the drums on the bent ends (their length is approximately 200-250 mm). Then fasten the electric drill 9 with an asterisk 8 on the cart 7. Throw a chain on the sprockets and experimentally determine the place of fastening of the bent lower ends of the brackets 19. Install them so that after assembly the scraper knife 1 slightly touches the ground. With the tensioning bolts and the offset of the movable bar 18, adjust the tension of the conveyor belt 3. Then you can finally tighten all the nuts.


