
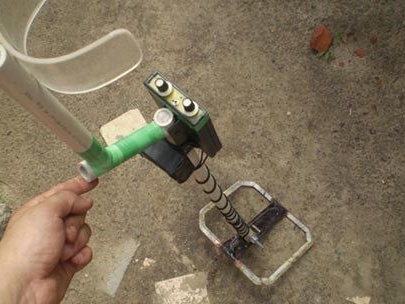
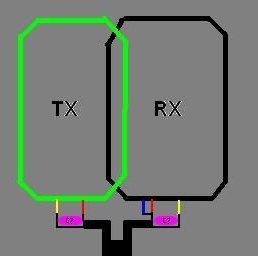
Consider another homemade metal detector, requiring a minimum of investment and not so much knowledge to build. The uniqueness of the metal detector is that it does not have a round coil, as in classical models, but an oval shape (or almost square). The type of metal detector can be attributed to balancers, it has two coils, RX and TX.
Unfortunately, practically no information is indicated on the technical characteristics, including the presence of a discriminator on the source site. Hypothetically, such a metal detector, like its counterparts, should see the target at a depth of at least 1-1.5 meters (for large objects).
Materials and tools for homemade:
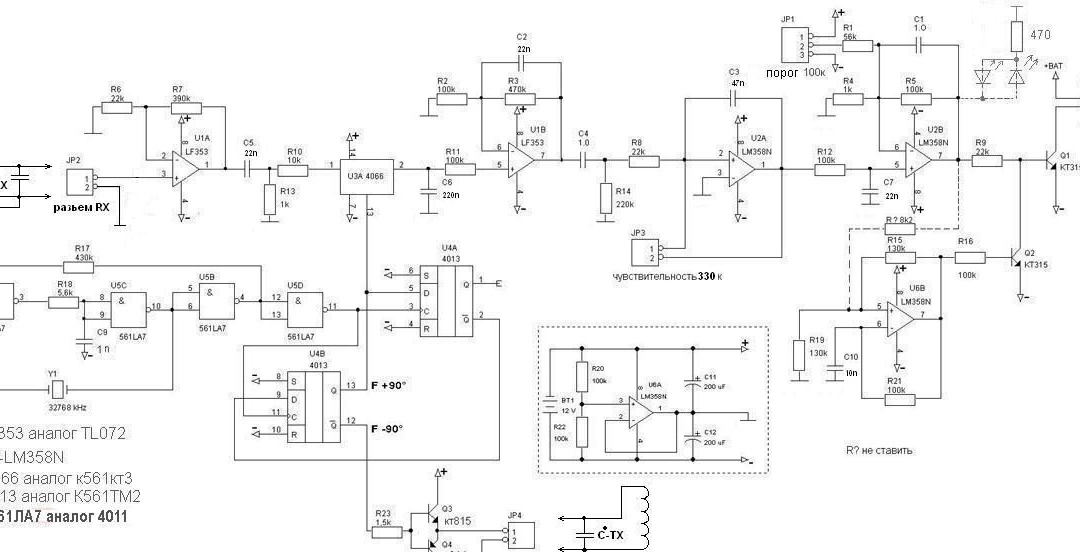
- electronic elements for creating a board (can be seen in the diagram);
- wire for the coil (sew 0.35 mm);
- multi-colored tubes (cambric with multi-colored wires);
- cloves, plank, paper, pencil to create a reel template (or other materials);
- foil;
- tinned wire (diameter 0.15-0.25 mm);
- electrical tape;
- soldering iron with solder;
-fum tape;
- materials for creating the instrument housing and more.
The process of manufacturing a metal detector:
Step one. Circuit assembly
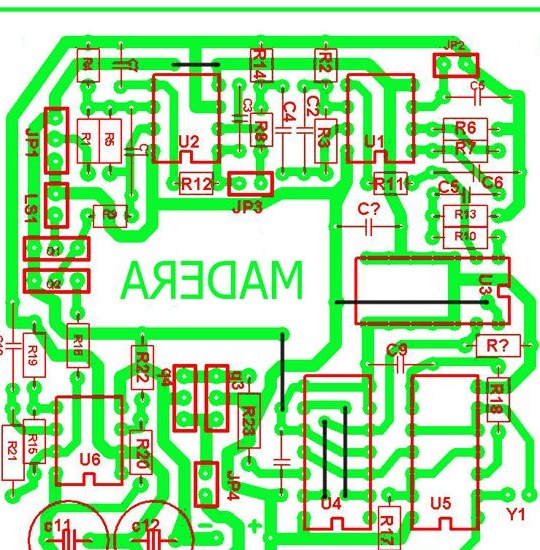
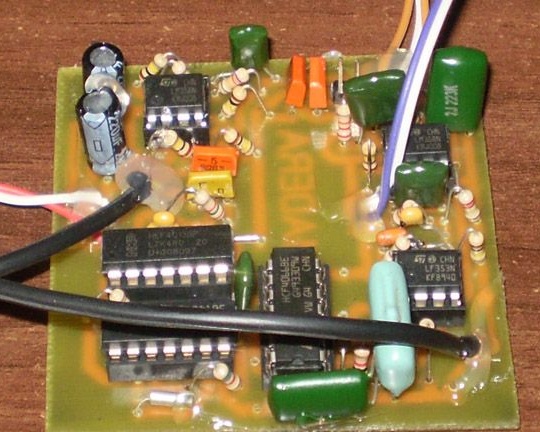
It starts as usual - with the assembly of the circuit. In this regard, the author did not provide much information. First you need to download and print the printed circuit board in LAY format:
Well, then a signet is created, all the details are carefully soldered and you can proceed to the next step.
Step Two Assembling a metal detector coil
First of all, you need to draw a reel pattern on paper. What it should be can be seen in the photo. The author also recommends drawing an arrow in which direction to wind the wire, since in the process of creating a coil you can get confused.
Among other things, you need multi-colored tubes (you can remove the insulation from a thin wire). These tubes are put on the ends of the wire, this will remember where the beginning and where the end. Also, the tubes protect the ends from breaking off.
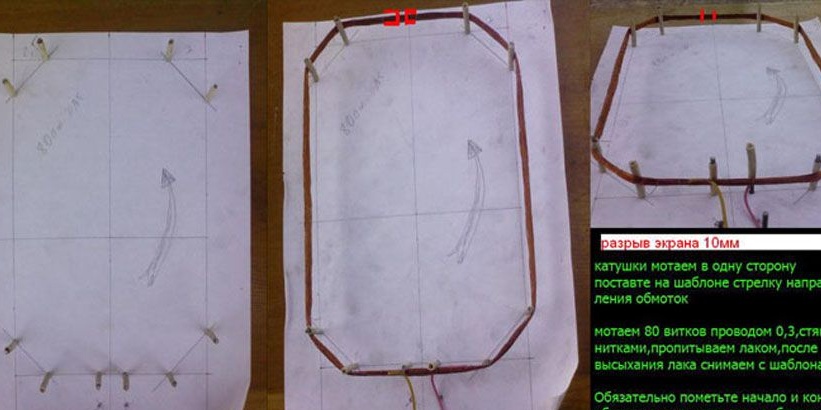
The template is made of boards, for this you need cloves.Nails need to be driven into the board, biting off their hats. Further, cambrices are put on these nails; they protect the coil insulation from damage during assembly.
In total, you need to make 80 turns with a sew wire of 0.35 mm. You need to try to wind the wire in the middle of the nails, this will allow you to crawl to the coil from all sides if necessary. Further, when the coil is wound, it must be wrapped, without removing from the nails, with a thick thread (as wiring harnesses). Subsequently, this whole thing is covered with furniture varnish. You need to try not to varnish the places where the nails are, otherwise you will not be able to tear off the coil. Well, when the varnish dries, the coil can be removed and varnished remaining fragments.
Step Three Coil setting
Next, the coils need to be tuned, they are tuned in resonance to a frequency of 32768/4 = 8.192 kHz. To configure, you need to select a capacitor of 0.1 μf, which is turned on in parallel to the circuit. You need to start with a capacitance of 0.06 microfarads, and then gradually increase until the resonance becomes as identical as possible with a digital variable voltmeter (parallel to the coil). The procedure must be carried out on the transmitting connector of the device.
A similar procedure should be carried out with the receiving circuit, for this it needs to be temporarily connected to the TX connector and configured.
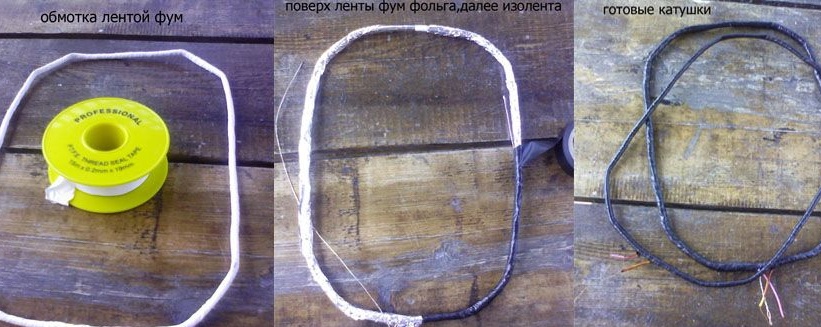
Further, the coil is wrapped with insulation, the author used fum tape for such purposes. Then the RX coil can be wrapped with foil; for such purposes, you can remove the tape from electrolytic capacitors. In the middle of the upper part of the coil, you must not forget to leave a gap in the screen 10 mm wide, in the figure the place is marked in red.
Next, you need tinned wire with a diameter of 0.15-0.25 mm, they need to wrap the foil. You need to start the winding from the point of tearing the screen to the initial wire of the coil, this is done on both sides. Then they twist together and form the earth with the initial one. In conclusion, the coil is wrapped with electrical tape.
Two LEDs are connected to pin 7 of U2B; they work as light indicators. They are connected in parallel-counter, using a 470 ohm resistor. The bar should not be metal.
The next step is to reduce the two circuits. The author mounts the transmitting coil statically, it is in plastic or textolite. The reception is superimposed on the first by 1 cm. At the first output of U1A, a squeak of 8 kHz will be heard, it can be controlled with an AC voltmeter, and it is best to use high-impedance headphones. The setting is that the receiving coil needs to be moved until this squeak is quiet down to a minimum, or the voltmeter readings are not reduced to a few millivolts. When the coil is brought together, it can be fixed.