
Stages of making a casket: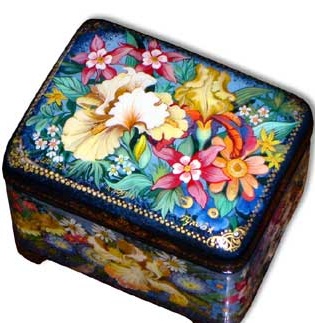
- The main types of products
- Necessary equipment
- Materials for making papier-mâché
- Winding and gluing blanks of the body
- Pressure testing and drying
- Workpiece boiling
- Filing
- Hardware fittings
- Casket decarning
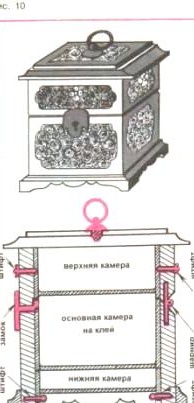
Having familiarized yourself with the general methods of working on papier-mâché material, we propose to execute one of the products. The most characteristic product of the Russian form is the casket (see Fig. 1, f, g). To make a casket, you need to wind several blanks that are one in one, since the wall of the casket consists of two layers.
The body - the main body has secret cameras - "hiding places". First we perform a "blockhead" for the innermost part - the liner. The wall thickness of the liner is 2-3 mm. Then we make the main body of the doodle with a winding of 4-5 mm. And the last winding - to lining the bottom of the decorative "heel". It corresponds in thickness to the main body. The plates of the bottoms and covers gain in accordance with the thickness of the walls (Fig. 10).
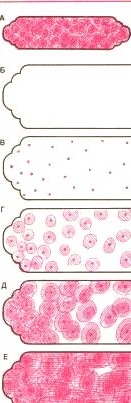
To decorate the casket, we use one of the traditional painting options - the “turtle” (imitation of the tortoise shell pattern with paints). Consider the process of execution of the pattern shown in full size (Fig. 11). Figure 11a shows the finished pattern, but first we translate the mark on the wall of the casket with the help of tracing paper rubbed with chalk from the inside (Fig. 11.6). The stigma plane is painted over with ivory oil paint. The casket is decorated on all open planes. The paint must be allowed to dry well. Take dark brown Mars (translucent paint), with a small brush we freely scatter dotted strokes of the darkest tone (Fig. 11, c). Dry and apply a thin layer of varnish on the surface. We apply varnish only according to the silhouette of this brand (after each subsequent operation, layers of varnish are thus applied, forming the texture of a turtle shell). On dot strokes with the same paint, but thinner, in a lighter tone, paint over all the points of the first pass (Fig. 11, d). Dots turn into blurry spots.Repeating the pattern, in the same tone we expand the spots, which, merging, form a "turtle" pattern (Fig. 11, e, f). Layer-by-layer varnish gives the effect of depth and volume of the picture. All painted finishes are finally varnished and polished.
The inner surface of the product is usually coated with red paint. In special cases, trimmed with velvet.
The fittings are made of brass and polished. It is mounted on the finally lacquered and polished surface of the body in the prepared sockets.
As studs use brass pins of the desired length. They are also used as constipation, pins.
In addition to the “turtle” technique, which does not require special artistic abilities, there are other simple graphic decorating techniques.
“Plaid” (Fig. 12) is a geometric mesh pattern resembling a checkered fabric.

You can perform the pattern with the help of a feeder or with a thin brush. Beauty and workmanship depend on the grace and purity of the line.
A “tsirovka” (Fig. 13) is a radiant, wavy pattern created by engraving on a varnish film to the underlying layer of a metal lining of tin or silver.
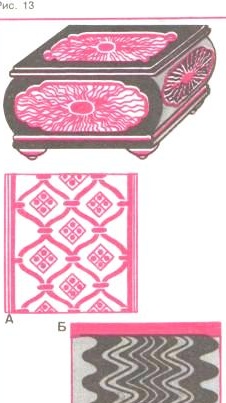
The lining is glued to the aligned primer in the plane of the picture. Then the entire surface is densely covered with black varnish and dried to a semi-dry state. The pattern is fixed in the center of the figure, and then the master’s hand moves radially according to the marking (Fig. 14). Engraving (scratching) is carried out by uniformly pressing the coding with a blunt needle.
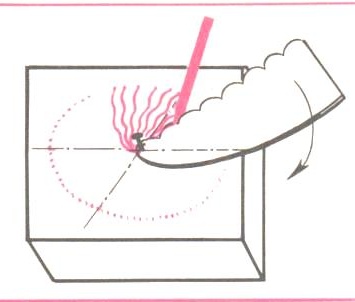
To avoid dustiness, the finished drawing should be dried out, and then continue to work on other planes. The finished product is varnished with light and oil varnish to create an absolutely smooth surface.
“Scan” (Fig. 15) is a pattern drawn on raw varnish from individual metal elements. The pattern of these elements (die cutting) is determined by the shape of the punch tip. It can be squares, rhombuses, circles or sickles with a size of 0.5-2 mm. Their thickness depends on the thickness of the foil from which they are knocked out. Beat them on a lead matrix with a hammer.
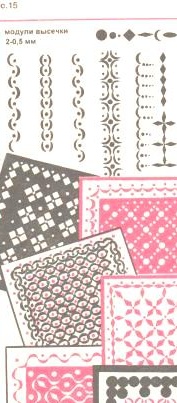
Before work, the product, as usual, is rubbed with a pumice stone and marking is done, that is, the main axial lines and nodes are applied. Then we cover the product with a layer of oil varnish and with a pin or a finely sharpened stick soaked in water, take the desired part, put it in its intended place.
First, the main blocks are laid out, and then filling is done with small details. The layout of the picture should be clear along the horizontal and vertical axes. “Scan”, as an additional element, looks original in products painted with “plaid” (see Fig. 12).