Stages of making a casket:
- The main types of products
- Necessary equipment
- Materials for making papier-mâché
- Winding and gluing blanks of the body
- Pressure testing and drying
- Workpiece boiling
- Filing
- Hardware fittings
- Casket decarning
For the manufacture of fittings, a brass sheet with a cross section of 0.5-0.7 mm is used. Before work, it must be annealed. Then cut the tape width of 20-30 mm, taking into account the length and height of the back wall. Mark and cut into an odd number of links of the future hinge. The tape is cut into squares or rectangles.
We take a steel bar or a needle with a cross section of 1.5-2 mm (you can use a wire, but it should be absolutely straight). The length of the rod is longer than the length of the hinge by 20-30 mm in order to be able to insert and remove it when fitting.
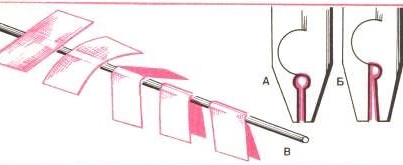
To form the links of the hinge, you need to clamp a piece of a twig of the same section in a vice. We put squares or rectangles cut out of brass on a twig and, squeezing with pliers, form loop links (Fig. 7). The loop can be symmetrical - it needs pliers (Fig. 7, a), or offset - it needs pliers (Fig. 7, b). From the prepared links we assemble a “set” on a twig of the desired length (Fig. 7, c).

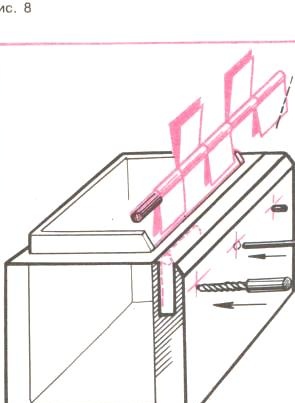
On the back wall of the product we cut a socket for laying the hinge (Fig. 8). The depth of the nest is slightly larger than the size of the link. It is better to make a nest with a mill of small diameter with a cross section of 1.5 mm, but this depends on the thickness of the links. When laying, the center of the link loop should extend along the gap line between the body and the cover.

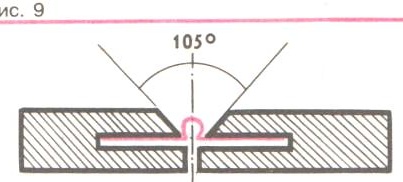
A 105 ° truncation is made on the back of the case, allowing the lid to flip over at a small angle. The truncation corresponds to the loop (Fig. 9).

At the casket or casket (under the open hinge, i.e.visible from the outside) truncation is made to the edge of the slot so that the hinge loop after landing in the socket protrudes prominently.
At the box, the loop is more hidden, the truncation is less deep, but on the top of the hinge socket - both in the body and in the lid - undercut is made under the loop.
The dialed bar is lowered into the body socket. The second part is tucked into the lid. If the nest is too loose, then its voids are half filled with a putty consisting of sawdust and PVA glue.
Before securing the hinge, cardboard strips must be placed in the casement and lid to provide clearance for painting during decoration. The hinge axis must extend along the clearance line between the cover and the body. In a small product, you can attach the hinge simply to the adhesive seal. But a large product requires a strong seal hinges.
After the hinge is tightly fitted, fixed, with a thin drill, the hinge plates are pierced through the wall and directly fixed with metal pins, which are then deepened and cover their trace. If the cover is flat, then the pin is fixed from the inside.
Prefabricated ready. Then we put putty layers on the product, drying it, level it with a fine sandpaper. We apply a layer of black varnish, and on it a layer of oil. We clean the soiled metal fittings. Finishing technology is akin to brooch decoration technology. About this in more detail in the journal "Do it yourself", Nos. 2 and 4, 1996
Getting to the painting, the semi-finished product is “matted” on the surface with fine wet pumice. Oil paints are better placed on the matte surface.
